


NENO LEADX Ultra Manual
© NENO-CNC Schweiz 2023
Seite | 104
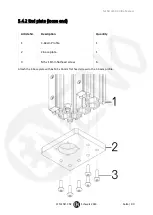
6.2.2 - Back
Make sure that all parts connected to the base brackets can move on the loose side. The loose side
must be able to align itself when we take the next steps.
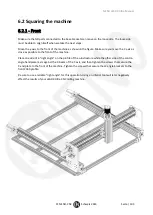
Move the y-axis to the back of the machine as shown in the figure. Make sure you move the Y-axis as
close as possible to the rear of the machine.
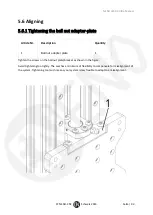
Place one side of a "right angle" on the profile of the substructure while the other side of the contra-
angle handpiece rests against the C-beam of the Y-axis, and then tighten the screws that secure the
Y-end plate to the back of the machine. Tighten the screws that secure the L2 angle brackets to the
rear 2040 profile.
Содержание LEADX Ultra
Страница 34: ...NENO LEADX Ultra Manual NENO CNC Schweiz 2023 Seite 34 2 7 2 Completed Y1 and Y2 axes Y axis Y1 Y axis Y2...
Страница 80: ...NENO LEADX Ultra Manual NENO CNC Schweiz 2023 Seite 80 4 6 X axis complete...
Страница 96: ...NENO LEADX Ultra Manual NENO CNC Schweiz 2023 Seite 96...
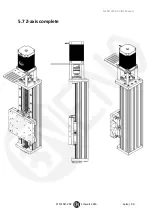
Страница 99: ...NENO LEADX Ultra Manual NENO CNC Schweiz 2023 Seite 99 5 7 Z axis complete...


