Nektar Aura Скачать руководство пользователя страница 20

20    Nektar Aura Owner‘s Manual                                                                               www.nektartech.com

Activating Parts for Playback

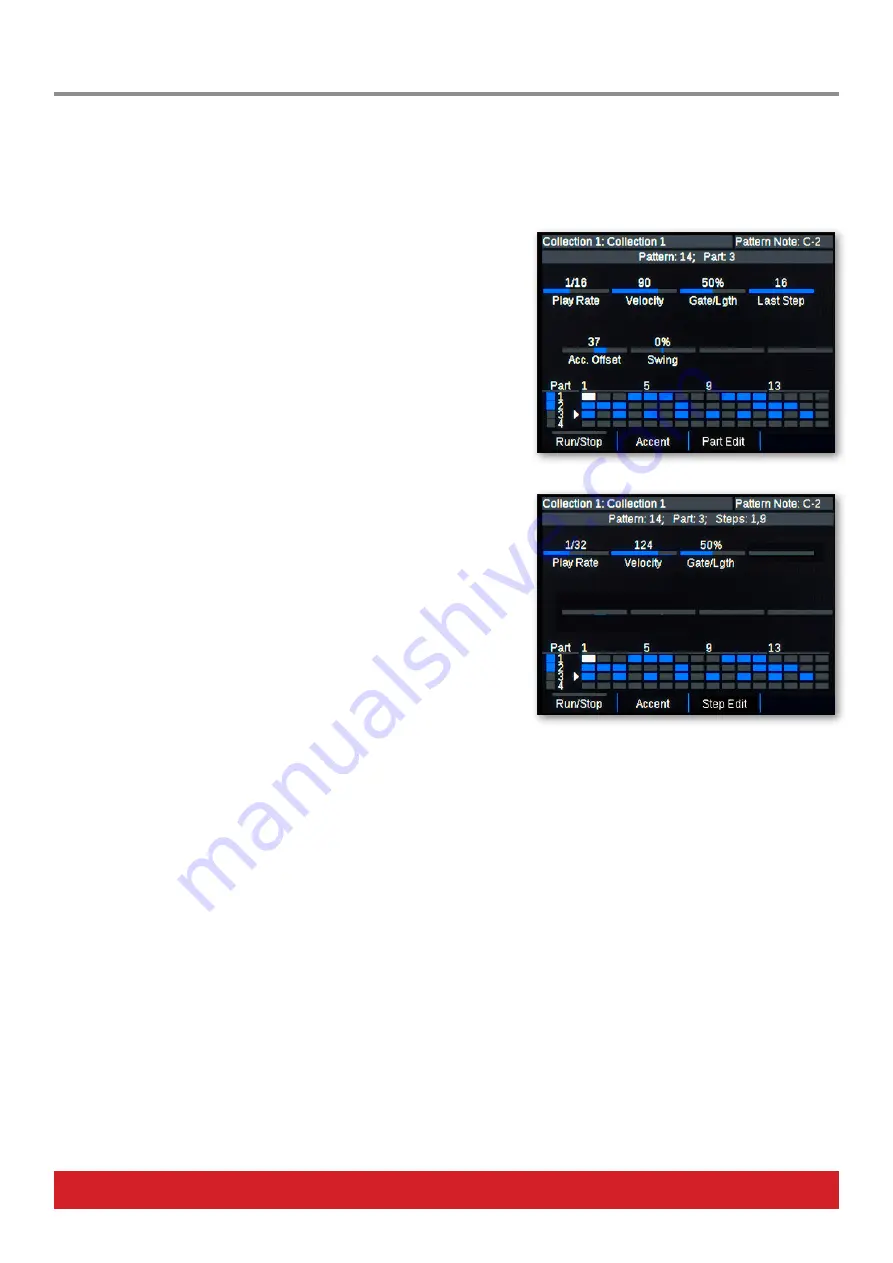
Any of the 4 Parts can be activated/deactivated to play in realtime by pressing  [Shift]+[Part 1-4]. 
The [Part 1-4] button of the Part currently playing is illuminated in full and Parts activated for playback but not yet playing are dim. 
Any Part that’s deactivated for playback is off. 

The display also shows this information. The colored squares to the left of the Step 
grid indicate when a Part is on and the arrow shows which Part is the currently 
selected.

Note that Parts are selected as a Pattern cycles through its active Parts, unless a Part 
is specifically selected, as explained on the previous page.

Programming Step Parameters

As with Patterns and Parts, Steps have to be selected to program Step parameters. 
• 

First make sure the correct Pattern and Part is selected.

• 

Press and hold [Shift] while pressing [S1-16] to select one or more Steps.   
You can glide over buttons to select multiple Steps faster.

• 

The display header updates to show which Steps are selected in the current  
Part as illustrated in the right image.

• 

Changing the parameters listed in Aura’s display now only affects the selected                                                                                                 
Steps.

To deselect the Steps, select another Step, Part or Pattern.

Programming Steps

[S1-16] update as the currently selected Part changes. If a Pattern is selected with multiple Parts active for playback, the Step buttons     
simply update as Parts are playing. To program Steps in a specific Part, select it by pressing the Part buttons. 
Steps can be programmed regardless of whether their parent Part is actively playing or not.

Tying Steps Together

Multiple Steps can be tied together to extend the length of a note. Press and hold the [S1-16] button you want extended and then press 
another [S1-16] button. The tied note will span the distance between the two pressed [S1-16] buttons.

Programming Accents

If an accent is programmed on a Step, its velocity will play at its velocity setting plus the Accent Offset value. In the top right display image, 
the velocity is set to 90 and the Accent Offset is set to 37 so the velocity value triggered by an accent will therefore be 127. 

• 

To program an accent, press and hold the display button labeled [Accent]. 

• 

While holding [Accent], press [S1-16] buttons to program an accent on the Steps pressed. 

Accents are an easy and flexible way to program simple dynamics. The Accent Offset value can be changed in realtime, making it easy to 
increase the velocity accentuation gradually, change to negative values or neutralize Accents again by setting the value to 0.

Step Sequencer: Parts, Steps and Accents

Содержание Aura

Страница 1: ...www nektartech com www nektartech com Owner s Manual...

Страница 2: ...peat Settings 16 Trigger Sync Beat sync vs Key Sync 17 Step Sequencer 18 Programming Patterns The Quick Start Guide 18 Diving Deeper Collection Settings 18 Collection Patterns Parts and Steps Explaine...

Страница 3: ...ent generates uses and can radiate radio fre quency energy and if not installed and used in accordance with the instructions may cause harmful interference to radio communications However there is no...

Страница 4: ...A standard USB cable Note Aura is fully powered via USB so any additional power supply is optional and not included If any of the items above are missing please let us know via email stuffmissing nek...

Страница 5: ...eled FOOT SWITCH on the back of Aura Aura will automatically detect the polarity of the footswitch Using a Y splitter not included or insert cables you can connect 2 foot switches to the same socket S...

Страница 6: ...operate as Part 1 4 buttons and at other times they are used as Arrow buttons 4 Pad 1 16 Sixteen velocity and pressure sensitive pads All pads are illuminated by an RGB LED with 16 color choices 5 Re...

Страница 7: ...buttons Four contextural buttons operate as indicated by the display labels above 11 TFT Color Display 12 Power On Off 13 Power Supply Socket 9V 600mA center positive 2 1mm barrel connector PSU option...

Страница 8: ...s in your DAW that do not host Nektarine The pads will reconfigure to the current Preset settings when you press the display button MIDI Assign When Nektarine is used with Aura the sections of this ma...

Страница 9: ...he Preset number you want to load Save a Preset Once modifications have been made to a Preset covered on page 11 it can be saved to any of the 16 Preset locations Press and hold the display button Sav...

Страница 10: ...Hard Kick Amber Snare Roll Ghost Orange Snare Light Green Hi Hat Green HiHat Open Purple Toms Teal Crash 5 I map Ext KD SD This Preset is for I map layouts with extended Kick and Snare drum options B...

Страница 11: ...nu then shows the following parameters Range C 2 G8 Global 1 16 None Trigger Toggle Decimal Hex Note Channel Note Message Data Entry See table1 See table1 See table1 See table1 Pressure Data 1 Data 2...

Страница 12: ...n 0 127 Channel AT AfterTouch n a Max 0 127 Min 0 127 NRPNc Coarse Value 0 127 MSB 0 127 LSB 0 127 NRPNf Fine Value 0 127 MSB 0 127 LSB 0 127 ToggleC NRPN Coarse Toggle Value 0 127 MSB 0 127 LSB 0 127...

Страница 13: ...Select while moving any of R 1 8 This will select the pot for editing The display updates with parameters as illustrated below When R1 is moved the message type changes which in turn also updates the...

Страница 14: ...to the MIDI out jack on the rear Merge Both internal and USB MIDI messages are sent to the MIDI out jack on the rear By default the MIDI Out jack is set to Internal To change the setting do the follo...

Страница 15: ...int Curve Bias Max Pressure Bias sets the slant of the curve At 100 the curve is linear Values above 100 create an exponential curve and values below result in a logarithmic curve See graph below Step...

Страница 16: ...for the duration of 1 8 Set to 99 if you want the length to match the Repeat Rate Accent Offset 50 to 50 Offsets the velocity of accent notes by the value selected To hear an accent when notes are re...

Страница 17: ...thing but now Repeat notes are synchronized to every 1 16 note value which gives more options for offsetting the triggering of the second pad or more pads for that matter in relation to the first pad...

Страница 18: ...playing The LED of a non playing Pattern is off 6 Press Run Stop to stop playback at any time If the Sequencer is running but no sound is heard press Internal and play the pads to check that they are...

Страница 19: ...tep and will therefore override any higher level settings The below chart shows which parameters can be programmed at every level Parameter Range Collection Pattern Part Step Play Rate 1 4 1 6 1 8 1 1...

Страница 20: ...Steps select another Step Part or Pattern Programming Steps S1 16 update as the currently selected Part changes If a Pattern is selected with multiple Parts active for playback the Step buttons simply...

Страница 21: ...teps in One Move The relative relationship between Parts or Steps can be maintained when editing any of their settings Here is a simple example using velocity but it applies to any of the settings Fir...

Страница 22: ...y Release Shift when the option Use Collection is selected Part 1 s velocity setting is now set at the Collection level and the Pattern s velocity value does not affect it To revert Part 1 s velocity...

Страница 23: ...always match the first Step of every Pattern If the time signature is changed to 3 4 start in the above scenario will match the first beat and following every 4th bar s 1st Step down beat Setting the...

Страница 24: ...Then press the display button Back to return to the Save menu Complete the last Step as described in the Save a Collection section to preserve the Collection name change Load a Collection Once stored...

Страница 25: ...t 5 UNDO Undo last action 6 REDO Redo last undone action 7 GOTO START Collection level all Patterns go to start of first active Part at point of press regardless of their current trigger mode setting...

Страница 26: ...o for the Sequencer and vice versa There are 3 Clock Source options Internal Aura runs from it s internal clock Tempo can be adjusted and will affect both Repeat and Sequencer MIDI Clock Aura is sync...

Страница 27: ...show the About page which lists the current firmware version If the firmware version doesn t match the version on our website go ahead and download the new package Make sure to follow the PDF instruc...

Страница 28: ...www nektartech com Designed by Nektar Technology Inc Made in China...

Отзывы: