Nektar Aura Скачать руководство пользователя страница 16

16    Nektar Aura Owner‘s Manual                                                                               www.nektartech.com

Aura’s Repeat feature can be used to add a steady beat, rolls/flams to your own pad performance or allow you to create note arrays that 
otherwise can be difficult to play.  Repeated notes are sent via MIDI. This means you can use Repeat with external MIDI equipment  or 
record repeated notes in your DAW. 

[Repeat On] Button

To activate/deactivate Repeat, press the dedicated [Repeat On] button when striking and holding a pad.  
By default the button is set to momentary which means Repeat is only on while the button is held but it can also be set to latching as      
described in the section about Repeat Settings.  Press and hold [Repeat On] and notice how the notes are repeated. 

Repeat Settings 

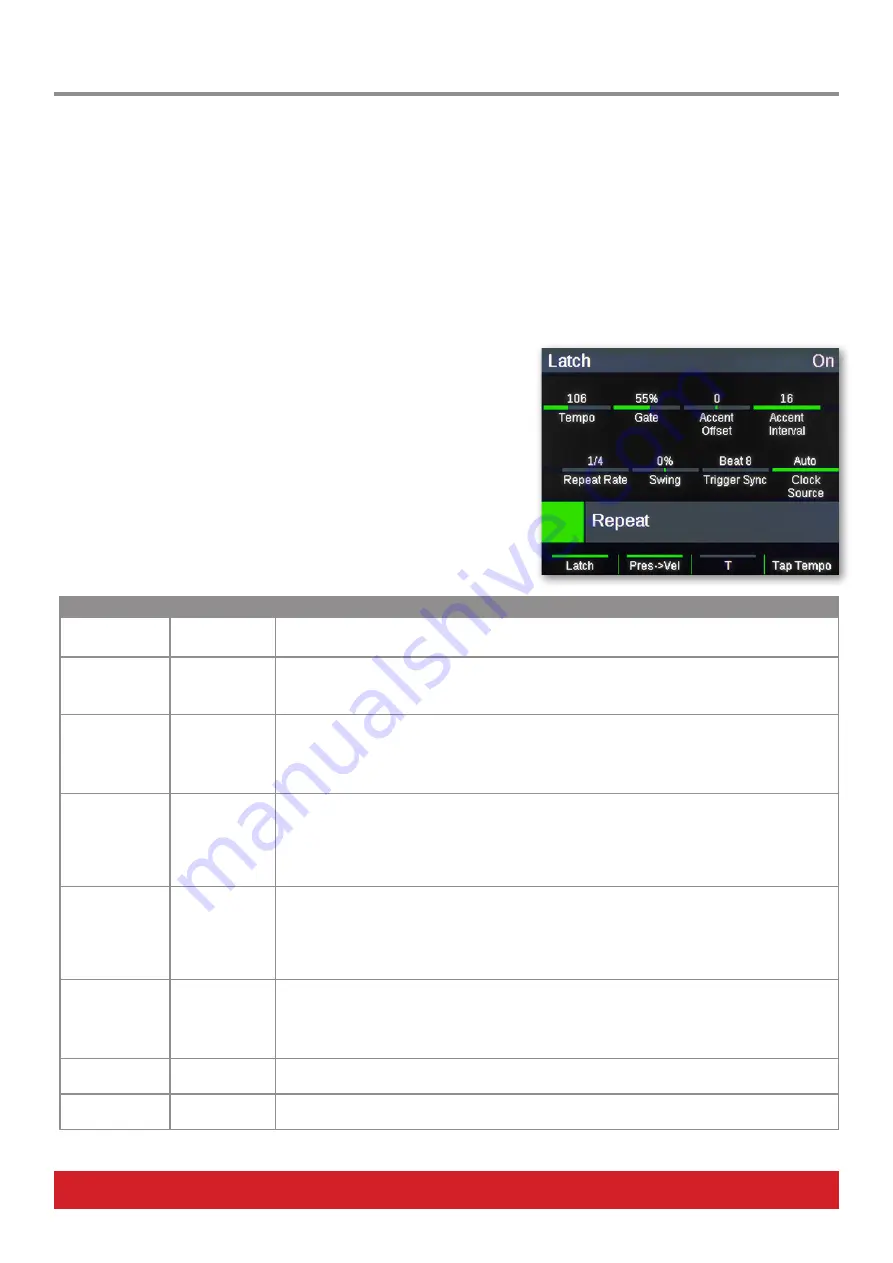
Press the [Repeat] mode button to select the Repeat menu. The display now shows
the Repeat parameter assigned to [R1-8].

Repeat parameters are adjustable in realtime so in many cases  they can also be  
used as performance parameters.

The display updates to show the parameters as listed in the table below.

R1-8 Function

Range

Description

Tempo

30-240 BPM

Sets the tempo when Clock Source is set to ‘Internal’. If Clock Source is set to ‘MIDI Clock’, the    

tempo value reads ‘External’ and can only be changed when Clock Source is set to ‘Internal’ again

Gate

1%-99%

The Gate value determines how long a note is playing as a percentage of the Repeat rate. The     

default  value is 50% which means that if Repeat Rate is set to 1/4, the note will play for the         

duration of 1/8. Set to 99% if you want the length to match the Repeat Rate.

Accent Offset

-50 to +50

Offsets the velocity of accent notes by the value selected. To hear an accent when notes are         

repeated, the Accent Offset parameter needs to be set to a value other than 0. 

An accent will play up to 50 velocity values higher than the originally played velocity value, if      

positive and up to 50 values below, when negative.

Accent Interval

2-16

With a minimum setting of 2, every other note repeated will play at the velocity originally played 

+/- the Accent Offset value. For example, a setting of 9 means every 9th note will be played with 

the accent offset value, etc.

Adjusting the interval in realtime can be a very effective performance tool so don’t hesitate to    ex

-

periment with settings. To repeat notes without an accent playing, set the Accent Offset value to 0.

Repeat Rate

1/4, 1/8, 

1/16,1/32, 1/64, 

1/96

Choose the rate notes are repeated at. Options are 1/4, 1/8, 1/16, 1/32, 1/64,1/96. 

[S1-6] RGB buttons can also be used to select the Repeat Rate and offer a more direct option, ideal 

for realtime performance changes. 

The [T] button changes the Repeat Rate value to triplets.

Swing

-49% to + 49%

By default the swing value is 0% which means that swing is off. 

Changing to values < 0% will move every second note closer to the preceding note and setting the 

value > 0% will move it further away from the preceding note. 

Set the value to 0% when you want it off.

Trigger Sync

Beat 8, Beat 16, 

Key 1, Key 2

See further details in the Trigger Sync section on the following page

Clock Source

Internal, MIDI 

Clock, Auto

See further details in the Clock Source section on page 26.

Repeat

Содержание Aura

Страница 1: ...www nektartech com www nektartech com Owner s Manual...

Страница 2: ...peat Settings 16 Trigger Sync Beat sync vs Key Sync 17 Step Sequencer 18 Programming Patterns The Quick Start Guide 18 Diving Deeper Collection Settings 18 Collection Patterns Parts and Steps Explaine...

Страница 3: ...ent generates uses and can radiate radio fre quency energy and if not installed and used in accordance with the instructions may cause harmful interference to radio communications However there is no...

Страница 4: ...A standard USB cable Note Aura is fully powered via USB so any additional power supply is optional and not included If any of the items above are missing please let us know via email stuffmissing nek...

Страница 5: ...eled FOOT SWITCH on the back of Aura Aura will automatically detect the polarity of the footswitch Using a Y splitter not included or insert cables you can connect 2 foot switches to the same socket S...

Страница 6: ...operate as Part 1 4 buttons and at other times they are used as Arrow buttons 4 Pad 1 16 Sixteen velocity and pressure sensitive pads All pads are illuminated by an RGB LED with 16 color choices 5 Re...

Страница 7: ...buttons Four contextural buttons operate as indicated by the display labels above 11 TFT Color Display 12 Power On Off 13 Power Supply Socket 9V 600mA center positive 2 1mm barrel connector PSU option...

Страница 8: ...s in your DAW that do not host Nektarine The pads will reconfigure to the current Preset settings when you press the display button MIDI Assign When Nektarine is used with Aura the sections of this ma...

Страница 9: ...he Preset number you want to load Save a Preset Once modifications have been made to a Preset covered on page 11 it can be saved to any of the 16 Preset locations Press and hold the display button Sav...

Страница 10: ...Hard Kick Amber Snare Roll Ghost Orange Snare Light Green Hi Hat Green HiHat Open Purple Toms Teal Crash 5 I map Ext KD SD This Preset is for I map layouts with extended Kick and Snare drum options B...

Страница 11: ...nu then shows the following parameters Range C 2 G8 Global 1 16 None Trigger Toggle Decimal Hex Note Channel Note Message Data Entry See table1 See table1 See table1 See table1 Pressure Data 1 Data 2...

Страница 12: ...n 0 127 Channel AT AfterTouch n a Max 0 127 Min 0 127 NRPNc Coarse Value 0 127 MSB 0 127 LSB 0 127 NRPNf Fine Value 0 127 MSB 0 127 LSB 0 127 ToggleC NRPN Coarse Toggle Value 0 127 MSB 0 127 LSB 0 127...

Страница 13: ...Select while moving any of R 1 8 This will select the pot for editing The display updates with parameters as illustrated below When R1 is moved the message type changes which in turn also updates the...

Страница 14: ...to the MIDI out jack on the rear Merge Both internal and USB MIDI messages are sent to the MIDI out jack on the rear By default the MIDI Out jack is set to Internal To change the setting do the follo...

Страница 15: ...int Curve Bias Max Pressure Bias sets the slant of the curve At 100 the curve is linear Values above 100 create an exponential curve and values below result in a logarithmic curve See graph below Step...

Страница 16: ...for the duration of 1 8 Set to 99 if you want the length to match the Repeat Rate Accent Offset 50 to 50 Offsets the velocity of accent notes by the value selected To hear an accent when notes are re...

Страница 17: ...thing but now Repeat notes are synchronized to every 1 16 note value which gives more options for offsetting the triggering of the second pad or more pads for that matter in relation to the first pad...

Страница 18: ...playing The LED of a non playing Pattern is off 6 Press Run Stop to stop playback at any time If the Sequencer is running but no sound is heard press Internal and play the pads to check that they are...

Страница 19: ...tep and will therefore override any higher level settings The below chart shows which parameters can be programmed at every level Parameter Range Collection Pattern Part Step Play Rate 1 4 1 6 1 8 1 1...

Страница 20: ...Steps select another Step Part or Pattern Programming Steps S1 16 update as the currently selected Part changes If a Pattern is selected with multiple Parts active for playback the Step buttons simply...

Страница 21: ...teps in One Move The relative relationship between Parts or Steps can be maintained when editing any of their settings Here is a simple example using velocity but it applies to any of the settings Fir...

Страница 22: ...y Release Shift when the option Use Collection is selected Part 1 s velocity setting is now set at the Collection level and the Pattern s velocity value does not affect it To revert Part 1 s velocity...

Страница 23: ...always match the first Step of every Pattern If the time signature is changed to 3 4 start in the above scenario will match the first beat and following every 4th bar s 1st Step down beat Setting the...

Страница 24: ...Then press the display button Back to return to the Save menu Complete the last Step as described in the Save a Collection section to preserve the Collection name change Load a Collection Once stored...

Страница 25: ...t 5 UNDO Undo last action 6 REDO Redo last undone action 7 GOTO START Collection level all Patterns go to start of first active Part at point of press regardless of their current trigger mode setting...

Страница 26: ...o for the Sequencer and vice versa There are 3 Clock Source options Internal Aura runs from it s internal clock Tempo can be adjusted and will affect both Repeat and Sequencer MIDI Clock Aura is sync...

Страница 27: ...show the About page which lists the current firmware version If the firmware version doesn t match the version on our website go ahead and download the new package Make sure to follow the PDF instruc...

Страница 28: ...www nektartech com Designed by Nektar Technology Inc Made in China...

Отзывы: