background image

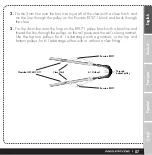
2.

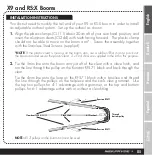
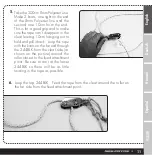
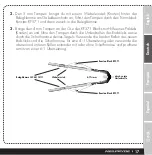
 Tie the 5mm line onto the boom arm just aft of the cleat with a clove hitch, and

run the line through the pulley on the Ronstan RF571 block and back through

the cleat.

3.

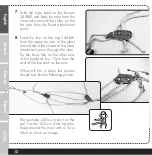
 Tie the 4mm line onto the loop on the RF571 pulley block with a bowline and

thread the line through the pulleys on the tail piece and the sail’s clew grommet.

Use the top two pulleys for 4:1 advantage with a grommet, or the top and

bottom pulleys for 6:1advantage either with or without a clew fitting.

07

Français

Español

Deutsch

English

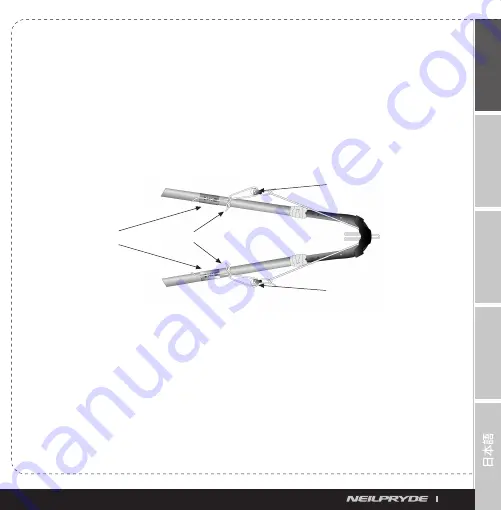
Through

bottom pulley

Ronstan RF571

6:1 Outhaul

Clamcleat CL244/CL111

Clove Hitch

Ronstan RF571

Содержание X1

Страница 1: ......

Страница 2: ...WWW NEILPRYDE COM...

Страница 3: ...immsystem X9 und RS X Gabelb ume Alle X1 X3 und RS One Gabelb ume RS X verstellbares Vorliek Trimmsystem 14 15 16 18 Kit de Palan d coute Wishbones X9 et RS X Tous les Wishbones X1 X3 RS One RS X Kit...

Страница 4: ...h stainless steel screws 2 x Ronstan RF571 pulley block 1 x 3 pulley tail piece with stainless steel rivet for X1 X3 RS One 2 x 2 4m lengths of 5mm line 1 x 2 8m length of 4mm line 2 x EVA Shims HELPF...

Страница 5: ...arm Screw the assembly together with the Stainless Steel Screws supplied NOTE If the plastic cleat is moving on the boom arm use a rubber EVA shim to pack out the boom arm and secure the plastic clea...

Страница 6: ...cing up refer to the writing on the boom to confirm which side is the top snap the 3 pulley tail piece onto the boom tail and center on the existing rivet hole 5 Using the supplied Stainless Steel riv...

Страница 7: ...on the RF571 pulley block with a bowline and thread the line through the pulleys on the tail piece and the sail s clew grommet Use the top two pulleys for 4 1 advantage with a grommet or the top and b...

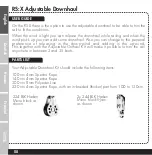
Страница 8: ...of releasing in the down wind and adding in the up wind This together with the Adjustable Outhaul Kit will make it possible to trim the sail anywhere in between 3 and 35 knots RS X Adjustable Downhaul...

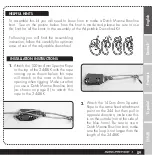
Страница 9: ...to attach this rope to the 244BLK Attach the 140cm 4mm Spectra Rope to the same fixed attachment point on the 244 but then pull in opposite direction make sure this is on the outside not at the side...

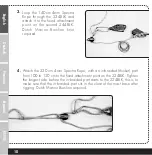
Страница 10: ...ch Marine Bowline knot required Attach the 220 cm 4mm Spectra Rope with an in braided thicker part from 100 to 130 cm to the fixed attachment point on the 224BLK Tighten the longest side before the in...

Страница 11: ...n the cleat leaving 10cm hanging out to hold and pull it back Loop this rope with the knots on the far end through the 244BLK from the cleat side as shown on the picture around the roller closest to t...

Страница 12: ...K from the opposite side of the cleat around the roller closest to the fixed attachment point through the cleat Tie the knots like on the other end of the polyester line 10cm from the end of the line...

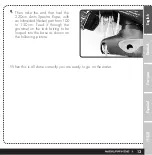
Страница 13: ...at had the 220cm 4mm Spectra Rope with an in braided thicker part from 100 to 130cm Feed it through the grommet on the tack fairing to be looped into the base as shown on the following picture When th...

Страница 14: ...ff Klemmenhalter mit Schrauben 2 x Ronstan RF571 Rollenblock 1 x 3 Rollen Endst ck mit rostfreien Nieten f r X1 X3 RS One 2 x 5 mm Tampen L nge 2 4 m 1 x 4 mm Tampen L nge 2 8 m 2 x EVA Distanzst cke...

Страница 15: ...ng mit Hilfe der mitgelieferten Schrauben zusammen HINWEIS Falls die Kunststoffhalterung auf dem Holm zu locker sitzt benutze die EVA Distanzst cke um einen festen Halt zu erreichen 2 x EVA Distanzst...

Страница 16: ...ere das neue Endst ck exakt ber dem Nietenloch 5 Unter Benutzung der Pop Nietenzange nietest du das neue Endst ck mit der mitgelieferten Niete fest Bringe das Trimmsystem wie hier gezeigt an dem Gabel...

Страница 17: ...d dann zur ck in die Belegklemme 3 Bringe den 4 mm Tampen an der se des RF571 Blocks mit Hilfe eines Palsteks Knoten an und f hre den Tampen durch die Umlenkrollen des Endst cks sowie durch die Schoth...

Страница 18: ...nd erh hter Spannung auf der Kreuz In Kombination mit dem verstellbaren Trimmsystem ist es somit m glich dein Segel auf dem Wasser zwischen 3 und 35 Knoten Wind richtig einzustellen RS X verstellbares...

Страница 19: ...gen Bringe den 140 cm langen 4 mm Spektra Tampen an derselben se des 244 BLK Blocks an aber lege ihn in entgegengesetzte Richtung aus Stelle sicher dass der Tampen an der Au enseite entlangl uft nicht...

Страница 20: ...erwenden Der 220 cm lange 4 mm Spektra Tampen der mit dem dickeren Teil zwischen 100 und 130 cm wird an der se des 224 BLK Blocks angebracht Knote den l ngeren d nnen Teil des Tampens bevor der dicker...

Страница 21: ...emme rutscht und lasse 10 cm Tampen brig um ihn greifen und ziehen zu k nnen F hre den Tampen von der Klemme aus mit dem nicht verknoteten Ende durch den 244 BLK Block wie abgebildet und dann um die R...

Страница 22: ...um die Rolle die neben der se sitzt und durch die Belegklemme hindurch An diesem Ende machst du erneut einen Knoten und einen weiteren im Abstand von 10cm siehe Punkt 5 Wenn du der Anleitung genau ge...

Страница 23: ...schen 100 und 130 cm und f dle es durch die Umlenkrollen der Mastverl ngerung und durch die Rollen des Segels ohne dass sich eine berkreuzung bildet Das Ende des Tampens wird in der Klemme der Verl ng...

Страница 24: ...vis en inox 2 x Poulies Ronstan RF571 1 x Bloc poulies avec rivet inox pour les wishbones X1 X3 RS One 2 x Bouts de 5mm de 2 40m 1 x Bout de 4mm de 2 80m 2 x Adaptateurs EVA pour les joues CONSEILS U...

Страница 25: ...x fournies NOTE Si le taquet en plastic bouge sur le tube du wishbone utilisez les adaptateurs en mousse EVA fournies dans le kit pour bloquer tout mouvement du taquet 2 Fixez le bout de 5mm sur le tu...

Страница 26: ...vet dans le tube et enlever le bloc existant 4 Installez le bloc r as sur l extension arri re et centrez le en utilisant le trou de rivet existant 5 Fixez le bloc avec le rivet fourni en utilisant une...

Страница 27: ...ut de 4mm la poulie Ronstan RF571 en faisant un n ud de chaise passer le dans les r as de la poign e arri re et dans l illet de la voile Utilisez les deux r as ext rieurs pour un montage en 4 brins ou...

Страница 28: ...ez galement modifier la tension en navigation en fonction des diff rentes allures Associ au Kit de point d coute r glable il vous sera possible de r gler votre voile de 3 35 n uds RS X Kit De Palan D...

Страница 29: ...ra fix au m t au niveau de la fen tre de wishbone Avec le bout en Spectra de 1 40 m faites un deuxi me n ud de chaise comme indiqu en v rifiant qu il soit bien sur l ext rieur pas du c t de la mousse...

Страница 30: ...e 224 BLK et refaite un n ud de chaise sur le deuxi me Bloc poulies 244 BLK comme indiqu ci contre Fixez le bout en Spectra 4mm 2 20m la poulie simple 224 BLK avec n ud de chaise Serrer le bien et ass...

Страница 31: ...main et le second pour que le bout ne puisse pas dispara tre dans le taquet Passez le dans le bloc poulie 244 BLK du c t taquet comme indiqu sur la photo autour du r a inf rieur le plus proche du poi...

Страница 32: ...bout dans le bloc poulie 244 BLK sup rieur dans le r a le plus proche du point d attache fixe et travers le taquet Faite 2 noeuds l un l extr mit et le second 10cm du bout Lorsque tout cela est fait l...

Страница 33: ...ch English 33 Passez ensuite le bout en Spectra 4mm 2 20m avec partie tress e plus paisse dans les r as de pied de m t comme indiqu sur la photo ci contre Lorsque tout cela est fait correctement vous...

Страница 34: ...F571 1 x Pieza de cola de 3 poleas con remache de acero inoxidable para botavaras X1 X3 y RS One 2 x Cabos de 5mm de di metro por 2 4m de largo 1 x Cabo de 4mm de di metro por 2 8m de largo 2 x Suplem...

Страница 35: ...ara y asegurar la agarradera pl stica 2 Ate el cabo de 5mm sobre el ca o de la botavara justo a popa de la mordaza con un nudo ballestrinque y pase la l nea a trav s de la polea ubicada en el mot n Ro...

Страница 36: ...dos poleas mirando hacia arriba f jese en la escritura de la botavara para confirmar que lado es el de arriba coloque la pieza de la cola con las tres poleas sobre la cola de la botavara y c ntrelo en...

Страница 37: ...a y pase la l nea a trav s de las poleas de la cola de la botavara y el ollado del pu o de la vela Utilice las dos poleas de arriba para una reducci n de 4 a 1 o las dos poleas de arriba mas la de aba...

Страница 38: ...sted puede agregar mas escota Tambi n esto puede variar de acuerdo a la preferencia personal aflojar a favor del viento y ajustar cuando lo hace en contra del viento Esto junto al kit de escota regula...

Страница 39: ...mo se muestra en la pag 8 para enganchar esta soga al BLK 244 Enganche el cabo Spectra de 140cm x 4 mm a la punta del BLK 244 al mismo punto de enganche fijo en la 244 pero luego tire en direcci n opu...

Страница 40: ...gu a Holand s Enganche el cabo Spectra de 220 x 4 mm con una parte trenzada mas gruesa de 100 a 130 cm al punto de enganche fijo en el BLK 244 Ajuste la parte mas larga antes de que comience la parte...

Страница 41: ...a en el list n dejando 10 cm colgando hacia fuera para agarrar y tirar nuevamente Enlace esta soga con los nudos en la punta a trav s del BLK 244 del lado del list n como se muestra en la foto alreded...

Страница 42: ...o al list n alrededor de la roldana mas cercana al punto de enganche fijo a trav s del list n Ate los nudos como en la otra punta de la l nea de poli ster a 10 cm de la terminaci n de la l nea y en la...

Страница 43: ...rte trenzada mas gruesa de 100 a 10 cm P sela a trav s del ollado de la base del pie de mastil para ser enlazado dentro de la base como se muestra en la siguiente foto Fran ais Espa ol Deutsch English...

Страница 44: ...English Deutsch Fran ais Espa ol 44 RS One RS One RS One...

Страница 45: ...Fran ais Espa ol Deutsch English 45...

Страница 46: ...English Deutsch Fran ais Espa ol 46 RS One...

Страница 47: ...47 Fran ais Espa ol Deutsch English...

Страница 48: ...English Deutsch Fran ais Espa ol 48...

Страница 49: ...Fran ais Espa ol Deutsch English 49...

Страница 50: ...3 4 English Deutsch Fran ais Espa ol 50...

Страница 51: ...5 6 51 Fran ais Espa ol Deutsch English...

Страница 52: ...7 8 English Deutsch Fran ais Espa ol 52...

Страница 53: ...9 Fran ais Espa ol Deutsch English 53...

Отзывы: