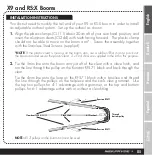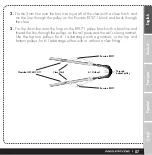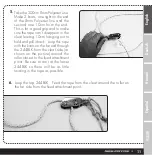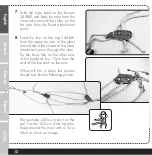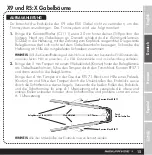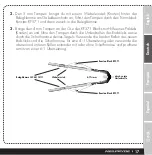
6:1 Outhaul
Clove Hitch
Clamcleat CL244/CL111
Through
bottom pulley
Ronstan RF571
Ronstan RF571
Français
Español
Deutsch
English
NOTE:
All 3 pulleys on the boom tail must be used.
INSTALLATION INSTRUCTIONS
You do not need to modify the tail end of your X9 or RS:X boom in order to install
an adjustable outhaul system. Set up the outhaul as shown:
1.
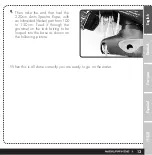
Align the plastic clamps (CL111) about 20cm aft of your rear hand position, and
insert the aluminum cleats (CL244) with teeth facing forward. The plastic clamp
should not be able to move on the boom arm*. Screw the assembly together
with the Stainless Steel Screws (supplied).
*NOTE:
If the plastic cleat is moving on the boom arm, use a rubber/EVA shim to ‘pack out’
the boom arm and secure the plastic cleat. 2 x EVA shims are supplied in the kit for this purpose.
2.
Tie the 5mm line onto the boom arm just aft of the cleat with a clove hitch, and
run the line through the pulley on the Ronstan RF571 block and back through the
cleat.
Tie the 4mm line onto the loop on the RF571 block with a bowline and thread
the line through the pulleys on the tailpiece and the sail’s clew grommet. Use
the top two pulleys for 4:1 advantage with a grommet, or the top and bottom
pulleys for 6:1 advantage either with or without a clew fitting.
05
X9 and RS:X Booms
Содержание X1
Страница 1: ......
Страница 2: ...WWW NEILPRYDE COM...
Страница 44: ...English Deutsch Fran ais Espa ol 44 RS One RS One RS One...
Страница 45: ...Fran ais Espa ol Deutsch English 45...
Страница 46: ...English Deutsch Fran ais Espa ol 46 RS One...
Страница 47: ...47 Fran ais Espa ol Deutsch English...
Страница 48: ...English Deutsch Fran ais Espa ol 48...
Страница 49: ...Fran ais Espa ol Deutsch English 49...
Страница 50: ...3 4 English Deutsch Fran ais Espa ol 50...
Страница 51: ...5 6 51 Fran ais Espa ol Deutsch English...
Страница 52: ...7 8 English Deutsch Fran ais Espa ol 52...
Страница 53: ...9 Fran ais Espa ol Deutsch English 53...


