background image

en 

Cleaning and servicing

26

Using oven cleaner in a hot cooking compartment

damages the enamel.

Never use oven cleaner in the cooking compartment

when it is still warm.

Remove all food remnants from the cooking com-

partment and the appliance door before you next

heat up the appliance.

If different cleaning agents are mixed together, there

may be a chemical reaction between these.

Do not mix cleaning agents.

Completely remove any cleaning agent residue.

Salt contained in new sponge cloths may damage sur-

faces.

Wash new sponge cloths thoroughly before use.

Suitable cleaning agents

Only use cleaning agents that are suitable for the differ-

ent surfaces on your appliance.

Follow the instructions on cleaning the appliance. 

→ 

"Cleaning the appliance", Page 27

Appliance front

Surface

Suitable cleaning agents Information

Stainless steel

¡

Hot soapy water

¡

Special stainless steel

cleaning products

suitable for hot sur-

faces

To prevent corrosion, remove any patches of limescale, grease,

starch or albumin (e.g. egg white) from stainless steel surfaces im-

mediately.

Apply a thin layer of the stainless steel cleaning product.

Plastic or painted

surfaces

E.g. control panel

¡

Hot soapy water

Do not use glass cleaner or a glass scraper.

To avoid permanent stains, immediately remove any descaling agent

that gets onto the surface.

Appliance door

Area

Suitable cleaning agents Information

Door panels

¡

Hot soapy water

¡

Oven cleaners

Do not use a glass scraper or stainless steel wool.

Tip: 

Remove the door panels in order to clean them thoroughly. 

→ 

"Appliance door", Page 32

Door cover

¡

Made of stainless

steel:

Stainless steel cleaner

¡

Made from plastic:

Hot soapy water

Do not use glass cleaner or a glass scraper.

Do not use stainless steel care products.

Tip: 

Remove the door cover for thorough cleaning. 

→ 

"Appliance door", Page 32

Stainless steel in-

terior door frame

¡

Stainless steel cleaner Discolouration can be removed using stainless steel cleaner.

Do not use stainless steel care products.

Door handle

¡

Hot soapy water

To avoid permanent stains, immediately remove any descaling agent

that gets onto the surface.

Door seal

¡

Hot soapy water

Do not remove or scrub.

Cooking compartment

Area

Suitable cleaning agents Information

Enamel surfaces

¡

Hot soapy water

¡

Vinegar water

¡

Oven cleaners

Soak any heavily soiled areas and use a brush or steel wool.

Leave the appliance door open to dry the cooking compartment

after cleaning it.

Notes

¡

Enamel burns at very high temperatures, causing minor discol-

ouration. The functionality of your appliance is not affected by

this.

¡

The edges of thin trays cannot be completely enamelled and may

be rough. This does not impair the corrosion protection.

¡

Food residues leave a white coating on the enamel surfaces. The

coating does not pose a health risk. The functionality of your ap-

pliance is not affected by this. You can remove residues with

lemon juice.

Self-cleaning sur-

faces

-

Follow the instructions for self-cleaning surfaces. 

→ 

"Regenerating self-cleaning surfaces in the cooking compart-

ment", Page 27

Содержание B59FS3A 0 Series

Страница 1: ...Combi steam oven User manual and installation instructions B59FS3A 0...

Страница 2: ...this instruction manual carefully Keep the instruction manual and the product information safe for future refer ence or for the next owner Do not connect the appliance if it has been damaged in transi...

Страница 3: ...e small quantities of drinks with a high alcohol content in food Do not heat spirits 15 vol when undi luted e g for marinating or pouring over food Open the appliance door carefully The telescopic she...

Страница 4: ...ent when using steam Hot liquid may spill over the sides of the ac cessory when it is removed from the cooking compartment Remove hot accessories with care and al ways wear oven gloves WARNING Risk of...

Страница 5: ...e steam func tion ATTENTION Silicone bakeware is not suitable for combined opera tion with steam Cookware must be heat and steam resistant Using cookware with rust spots may cause corrosion in the coo...

Страница 6: ...that would otherwise be re quired to defrost it Switch off the display in the basic settings Basic settings Page 22 Energy is saved when the display is switched off Note The appliance requires A maxim...

Страница 7: ...ing surfaces The back panel in the cooking compartment is self cleaning The self cleaning surfaces are coated with a porous matt ceramic layer and have a rough surface When the appliance is in operati...

Страница 8: ...compartment Drying Page 29 Descaling keeps your appliance working properly Descaling Page 28 Basic settings Individually adjust the appliance settings Basic settings Page 22 5 1 Heating functions This...

Страница 9: ...is emitted from below Slow cooking 70 120 C For gentle slow cooking of seared tender pieces of meat in cookware without a lid The heat is emitted evenly from above and below at a low tem perature Plat...

Страница 10: ...ected Home Connect Page 23 Remote diagnostics Remote diagnostics activated Home Connect Page 23 New function A new function is available if a red symbol is displayed in the main menu Home Connect Page...

Страница 11: ...on prevents the accessories from tilt ing when they are pulled out You can pull out the accessories approximately halfway without them tipping The accessories must be inserted into the cooking compart...

Страница 12: ...ppliance and accessories 7 1 Determining the water hardness before switching on the appliance for the first time Before using the appliance for the first time ask your water supplier about the hardnes...

Страница 13: ...o the pressure conditions in the location where it is installed 1 Remove the product information accessories and any leftover packaging e g polystyrene pellets from the cooking compartment 2 Wipe the...

Страница 14: ...firm the setting Also available to select Rapid heating Page 22 Cooking time Page 19 Ready at Page 19 Added steam Page 17 Information Page 14 8 Press to start the operation Note When you are preheatin...

Страница 15: ...rature Open the appliance door carefully Keep children at a safe distance 9 1 Before using the steam function Before using the steam function each time make sure that your appliance is supplied with s...

Страница 16: ...Page 16 a Once the duration has elapsed an audible signal sounds and the appliance stops heating Switching off the appliance Page 14 13 Press any button to end the signal tone 14 Empty the water tank...

Страница 17: ...oor than with other types of heating If the water tank runs dry while sous vide cooking the operation is paused Requirement The cooking compartment has cooled down sufficiently 1 ATTENTION Risk of dam...

Страница 18: ...e steam jet is triggered and the appliance adds clouds of steam to the cooking compartment for ap prox 3 to 5 minutes a When the steam boost has finished the operation continues to run Depending on th...

Страница 19: ...ime has elapsed a signal sounds 7 Press any button to end the audible signal Changing the cooking time 1 Press 2 Press Cooking time 3 Use or to change the cooking time 4 Press to confirm the setting C...

Страница 20: ...ation Some notifications are displayed automatically Programmes The optimum type of heating temperature and cooking time are preset for programmes To achieve an optimal cooking result you must also se...

Страница 21: ...e 1 To extend the cooking time press Add extra cook ing time 2 Use the or button to change the settings if re quired 3 Press to confirm the settings 11 6 Keeping a dish warm 1 To keep the dish warm pr...

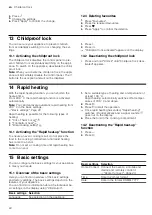
Страница 22: ...e for the following types of heating Circo Therm hot air Top bottom heat Bread baking setting 14 1 Activating the Rapid heat up function To ensure an even cooking result do not place the food in the c...

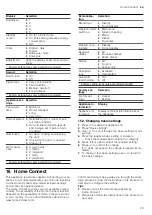
Страница 23: ...ated Automatic rapid heating On1 Off 1 Factory setting may vary according to model Factory set tings Selection Factory set tings Cancel Restore Appliance in formation Display Appliance in formation Di...

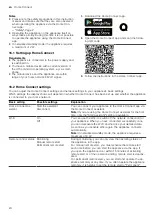
Страница 24: ...ther the appliance is connected to your home network Basic setting Possible settings Explanation Home Connect as sistant Start the assistant Disconnect You can connect your appliance to the Home Conne...

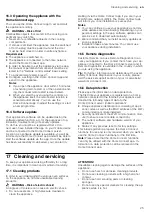
Страница 25: ...tically We recommend that you install security updates as soon as possible Installation takes a few minutes You cannot use your appliance during installation 16 5 Remote diagnostics Customer Service c...

Страница 26: ...en cleaners Do not use a glass scraper or stainless steel wool Tip Remove the door panels in order to clean them thoroughly Appliance door Page 32 Door cover Made of stainless steel Stainless steel cl...

Страница 27: ...th For some surfaces you can use alternative cleaning agents Suitable cleaning agents Page 26 2 Dry with a soft cloth Regenerating self cleaning surfaces in the cooking compartment The back panel in t...

Страница 28: ...clean and allow it to dry fully Requirement The cooking compartment must have cooled down 1 Open the appliance door and remove the remaining water with an absorbent sponge cloth 2 Clean the smooth su...

Страница 29: ...gh to the end an audible signal sounds 4 Empty and dry the water tank Emptying the water tank Page 18 20 Drying To prevent residual moisture dry the cooking compart ment following operation with steam...

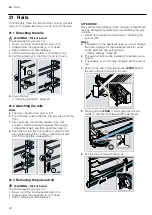
Страница 30: ...rail also rests against the cooking compartment wall and then press this downwards 21 3 Removing the pull out rail WARNING Risk of burns The shelf supports get very hot Never touch the shelf supports...

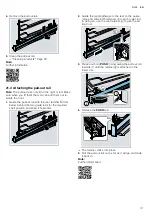
Страница 31: ...ainer from below behind the two guide rods for the required shelf position and keep it horizontal 2 Guide the rail lengthways to the rear to the guide rods and slide both retainers onto each lower rod...

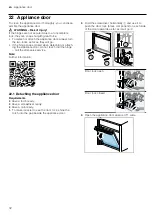
Страница 32: ...when detaching or attach ing the appliance door do not reach into the hinge call the after sales service Note Further information 22 1 Detaching the appliance door Requirements Have a torch ready Have...

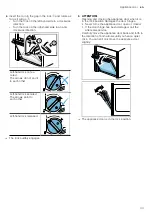
Страница 33: ...ed The arrows point to each other Left hand lock released a The lock audibly engages 5 ATTENTION Opening and closing the appliance door when it is in the lock position damages the door hinges Never fo...

Страница 34: ...ngle and that it is properly fitted in place Attach the appliance door via the left and right hand guide rollers simultaneously 2 Rotate the door handle upwards slightly a The appliance door will slid...

Страница 35: ...n the direction of the arrow 6 WARNING Risk of injury Scratched glass in the appliance door may develop into a crack Do not use any harsh or abrasive cleaners or sharp metal scrapers to clean the glas...

Страница 36: ...ppliance is defective call Customer Service Customer Service Page 39 WARNING Risk of electric shock Improper repairs are dangerous Repairs to the appliance should only be carried out by trained specia...

Страница 37: ...ustomer Service Page 39 2 If there is water in the water tank empty the water tank Open the appliance door Grip on the right and left below the control panel Slowly pull out the control panel and push...

Страница 38: ...you still need the appliance Set a cooking time so that the operation does not stop Time setting options Page 19 The operation stops The maximum operating time has been reached The appliance stops he...

Страница 39: ...nce door On some appliances with steam assisted cooking you will find the rating plate behind the control panel Make a note of your appliance s details and the Cus tomer Service telephone number to fi...

Страница 40: ...emperature and cooking time depend on the amount of food and the recipe Settings ranges are specified for this reason Try using the lower values to start with The setting values apply to food placed i...

Страница 41: ...meat may ex pand WARNING Risk of scalding Very hot steam may escape when the lid is opened after cooking Steam may not be visible depending on the temperature Lift the lid in such a way that the hot...

Страница 42: ...ufacturer s instructions on the pack aging 28 6 List of foods Recommended settings for a variety of foods sorted into food categories Recommended settings for various types of food Food Accessory cook...

Страница 43: ...erforated steam ing tray 3 100 15 25 Small chicken portions 250 g each Wire rack 3 200 220 Medium 30 45 Goose unstuffed 3 kg Wire rack 2 160 180 120 150 Goose unstuffed 3 kg Wire rack 2 1 2 3 1 130 14...

Страница 44: ...ly cook in a bain marie with film e g cling film 5 Use the recommended settings when configuring the appliance settings 6 If the moulds are made from very thick material ex tend the cooking time Makin...

Страница 45: ...100 1 30 2 20 3 10 28 7 Special cooking methods and other applications Information and recommended settings for special cooking methods and other applications e g slow cooking Slow cooking Cook prime...

Страница 46: ...ne that can create a 99 vacuum when vacuum sealing food Tip To prevent gases escaping from the food e g from vegetables vacuum seal the food no more than one day before you cook it The gases inhibit t...

Страница 47: ...aling bag dur ing cooking Use an oven cloth to carefully lift the vacuum sealing bag so that the hot water runs off into the universal pan or the cooking container Use the oven cloth to carefully remo...

Страница 48: ...Recipe tip Vacuum seal along with some caramel sauce Firm apple varieties are the most suitable e g Jonagold or Boskop Vanilla sauce 0 5 l Wire rack Universal pan 82 15 25 Recipe tip Mix 0 5 l milk 1...

Страница 49: ...vered heat resistant cookware that is suit able for cooking with steam Use wide shallow cookware Cold cookware ex tends the reheating time Place the cookware on the wire rack Place food that you are n...

Страница 50: ...mended settings for baking Food Accessory cook ware Height Heating function Temperature in C Steam in tensity Cooking time in mins Shortbread Baking tray 3 140 150 1 25 40 Shortbread Baking tray 3 140...

Страница 51: ...ooking time in mins Toasting bread Wire rack 4 275 1 4 6 1 Do not preheat the appliance 29 Installation instructions 29 1 Scope of delivery After unpacking all parts check for any damage in transit an...

Страница 52: ...G Risk of fire It is dangerous to use an extended power cord and non approved adapters Do not use multiple socket strips Only use extension cables that are certified have a minimum cross section of 1...

Страница 53: ...ing in a tall unit To ventilate the appliance the intermediate floors must have a ventilation cut out If the tall unit has another back panel in addition to the element back panels this must be remove...

Страница 54: ...ct the appli ance from the mains and check the connection Electrically connect the appliance with the protective contact plug Note The appliance must only be connected to a pro tective contact socket...

Страница 55: ...ir gap of at least 4 mm between the appliance and adjacent unit fronts 7 Attach the four fastening elements Page 56 Attach the red fastening elements at the top Attach the green fastening elements at...

Страница 56: ...s with vertical bar handle strips 1 Attach a suitable filling piece in order to cover any sharp edges and to guarantee a safe installation 2 Pre drill aluminium profiles to establish a screw con necti...

Страница 57: ...ignment of the panels and intermediate strips 29 14 Removing the door handle and side panels ATTENTION Unsuitable tools may damage the surface of the appli ance Only use plastic tools Do not use point...

Страница 58: ......

Страница 59: ......

Страница 60: ...er te GmbH Carl Wery Stra e 34 81739 M nchen GERMANY 9001696357 9001696357 030413 en Valid within Great Britain Imported to Great Britain by BSH Home Appliances Ltd Grand Union House Old Wolverton Roa...

Отзывы: