


5-4 Adding Expansion Devices
2.
Turn on notebook power, if it is not already on. If this is the first time the USB
diskette drive is connected, a New Hardware Found message displays on your
screen and a hardware driver automatically installs for your drive.
3.
Insert a diskette in the drive, until it locks in place.
To eject the diskette, press the eject button. Before ejecting the diskette, be sure
that the status LED is not lit.
USB CD-ROM Drive
A USB CD-ROM drive comes with your NEC Versa notebook. Use the USB CD-ROM
drive to load and start programs from a compact disc (CD) or to play your audio CDs.
The USB CD-ROM drive is fully compatible with Kodak™ multisession Photo CD™
discs and standard audio CDs.
The USB CD-ROM drive is automatically assigned an available drive letter.
CD-ROM drive features are shown in the following figure (see the descriptions
following the figure).
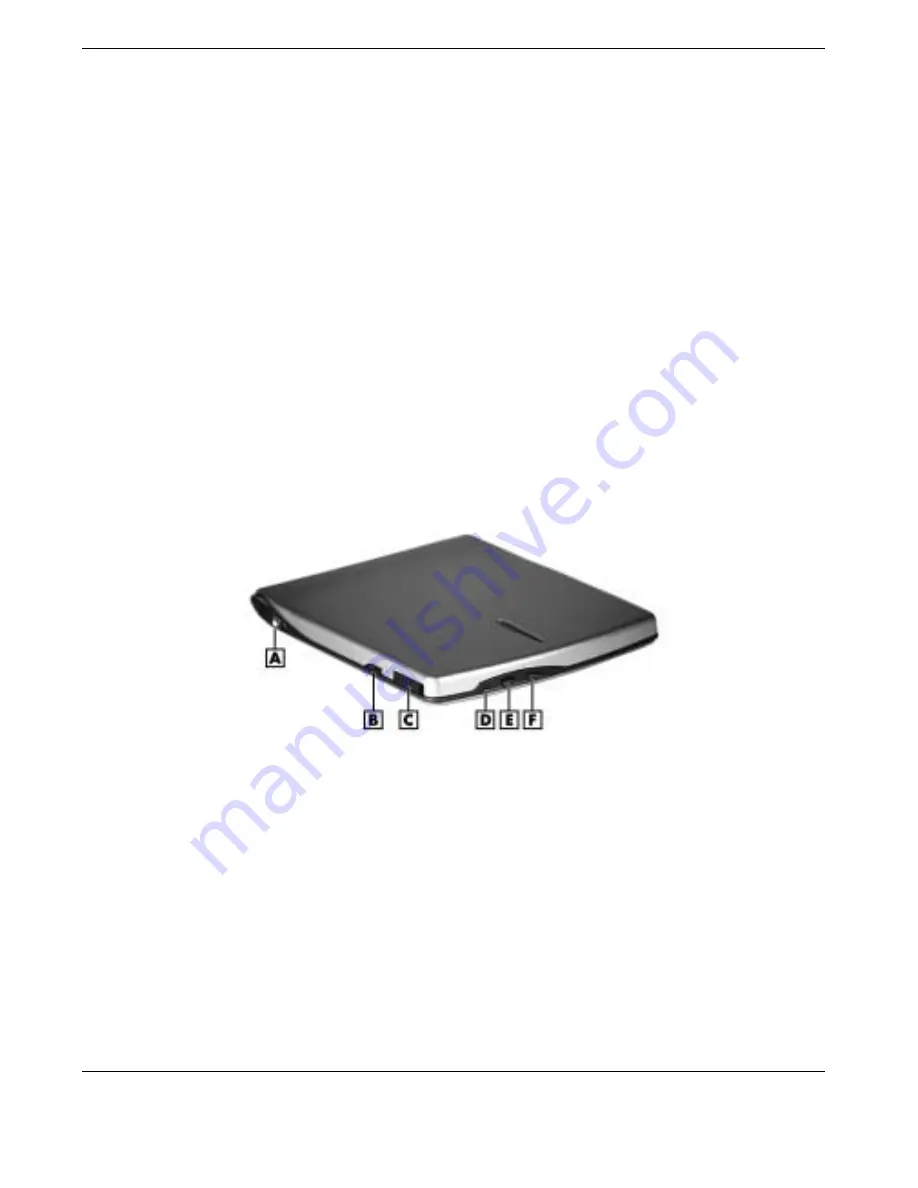
USB CD-ROM drive side and front features
A – Phones (headset) Jack
D – Status LED
B – Volume Control
E – Play/Stop Button
C – Release Latch
F – Forward Button
Phones Jack — Provides a jack for an optional head set. Use this to listen to your
audio CDs.
Volume Control — Adjusts the volume of your audio CDs.
Release Latch — Opens the CD-ROM drive cover. Slide this latch to open the
cover and load or remove a CD from the drive. The latch opens the cover with or
without power.
Play/Stop Button — Use this button to start or stop your audio CD.
Содержание VERSA DAYLITE E120
Страница 1: ...otebook Computer ersa E120 DayLite User s Guide ...
Страница 94: ...6 Communicating with Your NEC Versa MDC Modem LAN Connection Internet Connections ...
Страница 103: ...8 Solving System Problems Problem Checklist Startup Problems If You Need Assistance ...
Страница 118: ...B Specifications Base System Expansion Power Security Dimensions and Weight Recommended Environment ...


