background image

4-28   Installing Options

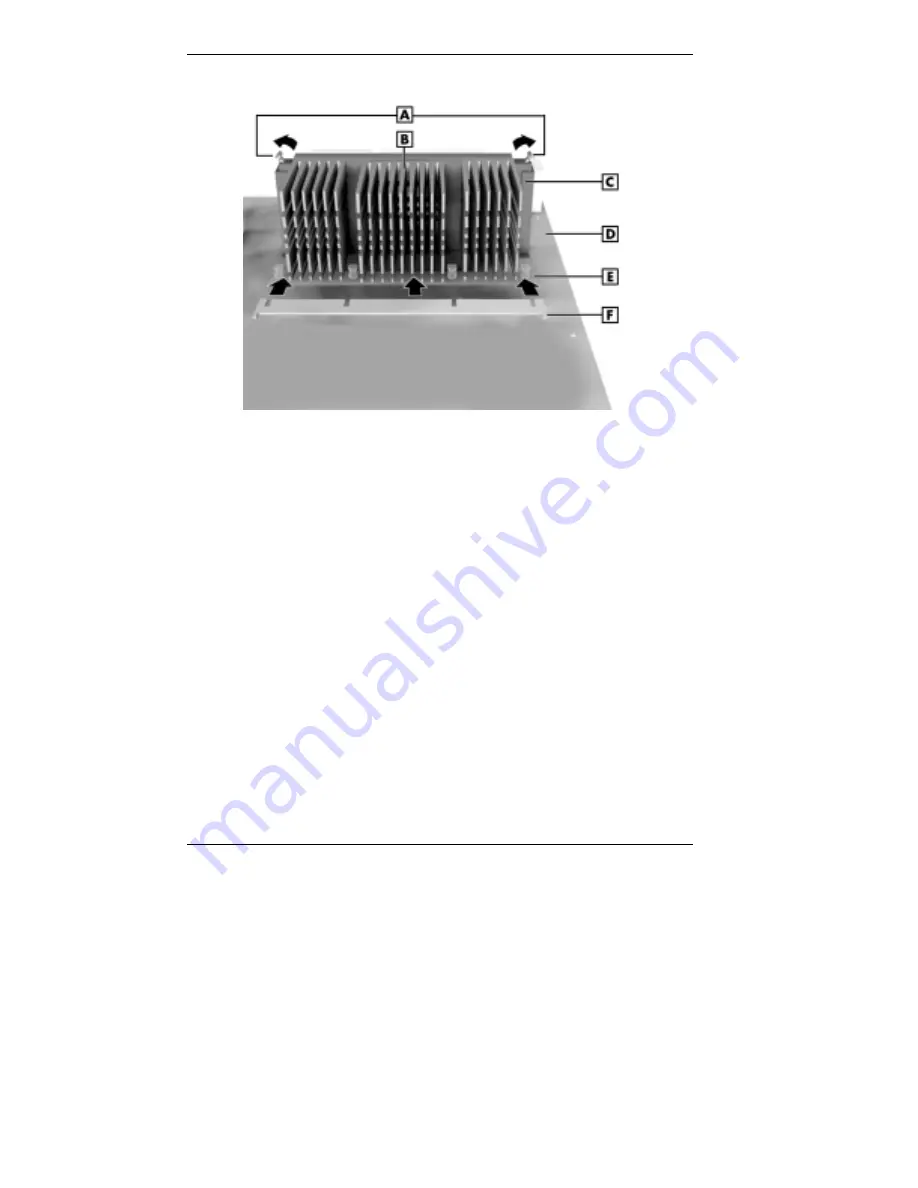
Installing the Pentium II processor

A – Locking Tabs

D – System Board

– Processor Cartridge

– Bottom Bar

C – Retention Mechanism

F – Top Bar

6. 

Set the processor jumpers on the system board for the
processor type that you installed (see “Processor Jumper
Settings” in Chapter 3).

7. 

Replace the AGP graphics board and any expansion
boards that you might have removed (see “Installing an
Expansion Board” and “Installing the AGP Board” later
in this chapter).

8. 

Install the left side cover (see “Replacing the Left Side
Cover” earlier in this chapter).

Содержание POWERMATE VT 300 RELEASE NOTES

Страница 1: ......

Страница 2: ...cument are warranted in accordance with the terms of the Warranty Statement accompanying each product However actual performance of each such product is dependent upon factors such as system configuration customer data and operator control Since implementation by customers of each product may vary the suitability of specific product configurations and applications must be determined by the custome...

Страница 3: ...e 1 5 Tape Backup Unit 1 5 Zip Drive 1 6 PC Card Adapter 1 6 LS 120 SuperDisk Drive 1 6 Rear Features 1 7 External Connectors 1 8 Power Supply Features 1 10 Inside Features 1 10 System Board 1 11 Network Board 1 12 Modem Board 1 12 Storage Device Support 1 12 Chassis 1 12 Speakers 1 13 System Features 1 13 Hardware 1 13 Software 1 14 Preloaded Operating System 1 14 NEC OS Restore CD 1 15 NEC Appli...

Страница 4: ...ow to Use BIOS Setup 3 7 Main Menu 3 7 Advanced Menu 3 11 Security Menu 3 18 Exit Menu 3 19 FLASH Utility 3 20 NEC OS Restore CD 3 21 Introducing OS Restore Options 3 21 Choosing a Restore Program 3 21 Launching the NEC OS Restore CD 3 22 Auto Rebuild and Restore 3 24 Custom Rebuild and Restore 3 26 Fixing the Operating System 3 29 NEC Application and Driver CD 3 31 Launching the Application and D...

Страница 5: ...g a DIMM 4 17 Processor Upgrade 4 19 Removing a Celeron or Pentium III Processor 4 20 Installing a Celeron or Pentium III Upgrade Processor 4 22 Removing the Pentium II Processor 4 24 Installing the Pentium II Upgrade Processor 4 26 Expansion Boards 4 29 Locating Expansion Slots and Connectors 4 30 Installing an Expansion Board 4 31 Removing an Expansion Board 4 33 AGP Board 4 33 Removing the AGP ...

Страница 6: ... Problems 5 2 System Problems 5 2 Diskette Drive Problems 5 4 Monitor Problems 5 5 Keyboard Mouse Problems 5 6 CD ROM Drive Problems 5 7 Speaker Problems 5 8 How to Clean the Mouse 5 9 Battery Replacement 5 11 How to Get Help 5 14 Help From Your Company 5 14 Help From Your NEC CSD Dealer 5 14 Help From NEC CSD Technical Support Center 5 15 NEC CSD Warranty Non Warranty Repair Service 5 16 6 Gettin...

Страница 7: ...sure Up A 13 Checking Your Chair A 13 Checking Your Keyboard A 13 Checking Your Mouse A 13 Checking Your Monitor A 13 Checking You A 14 B System Specifications System Processor B 2 Processor Support B 2 Secondary Cache B 3 Processor Socket B 3 Random Access Memory RAM B 3 Cache Memory B 3 Read Only Memory ROM B 3 Calendar Clock B 4 Input Output I O Features B 4 Video Memory B 5 Sound System B 6 Fa...

Страница 8: ...ts CD ROM Drive B 8 DVD ROM Drive B 8 PC Card Adapter B 9 Zip Drive B 9 Tape Backup Unit B 9 Speakers B 10 Dimensions B 10 System Unit B 10 Keyboard B 10 Power B 10 Operating Environment B 10 Compliance B 11 Index ...

Страница 9: ... Chapter 2 Setting Up the System explains how to set up start up and shut down the system It also provides information on installing applications and tips on caring for the system Chapter 3 Configuring the System describes how to use the software utilities shipped with your system including the BIOS Setup Utility the NEC OS Restore CD and the NEC Application and Driver CD It also provides informat...

Страница 10: ...nd safely This appendix also instructs you on how to set up and use your computer to reduce your risk of developing nerve muscle or tendon disorders WARNING Prolonged or improper use of a computer workstation may pose a risk of serious injury To reduce your risk of injury set up and use your computer in the manner described in Appendix A Setting Up a Healthy Work Environment Appendix B System Spec...

Страница 11: ...r loss of life CAUTION Cautions indicate situations that can damage the hardware or software Note Notes give important information about the material being described Names of keyboard keys are printed as they appear on the keyboard for example Ctrl Alt or Enter Text or keystrokes that you enter appear in boldface type For example type abc123 and press Enter File names are printed in uppercase lett...

Страница 12: ...n NEC CSD tools and utilities software applications and services available with the NEC PowerMate VT 300 Series computer How Does Your Workplace Measure Up This brochure provides information for setting up and using the computer productively and safely Information includes guidelines to reduce the risk of injury associated with using a computer NEC PowerMate VT 300 Series Release Notes Release Not...

Страница 13: ...ormation about your system under the following topics System Tour System Information System Upgrades Service and Support and Reference Healthy Environment This is an online help file that complements the How Does Your Workplace Measure Up brochure In addition service and reference manuals are available on the Internet at the Service and Support area of the NEC CSD website see Chapter 6 for access ...

Страница 14: ...1 Reviewing System Features Front Features Rear Features Inside Features Speakers System Features ...

Страница 15: ...scribed in Appendix A Setting Up a Healthy Work Environment This chapter highlights system hardware and software and describes the security features of the system Front Features The following figure shows the features on the front of the system A brief description follows the figure Front features A CD ROM Drive D Power Sleep Lamp B Diskette Drive E Hard Drive Lamp C Power Sleep Button F USB Port ...

Страница 16: ...tton to suspend system operation when you plan to be away from your computer for a short time This places the system in a power saving mode If you have a VESA compliant monitor your monitor also goes into a power saving mode Press any key or move your mouse to resume system operation at the point where you stopped it An amber system unit power lamp indicates that the system is in a power saving mo...

Страница 17: ...use it as a bootable drive for loading and starting programs from a diskette CAUTION To prevent damage to your diskette drive and data do not turn off the system or remove a diskette while the diskette drive busy lamp is lit Universal Serial Bus Port The universal serial bus USB port on the front of the system allows you to easily and conveniently add plug and play USB devices without opening up t...

Страница 18: ...ideo disc DVD ROM drive Windows 98 systems only The drive offers many improvements over the standard CD ROM technology including superior video and audio playback faster data access and greater storage capacities The DVD ROM drive uses DVD technology to read DVD discs as well as standard audio and video CDs Tape Backup Unit Some models come with a tape backup unit If your system has a tape backup ...

Страница 19: ...milar to inserting a diskette in a diskette drive Each type of PC card has a different function With your PC card adapter you can add a number of functions to your system with a variety of PC cards LS 120 SuperDisk Drive Some models come with an LS 120 MB SuperDisk drive in place of the 3 1 2 inch diskette drive The drive offers high capacity removable data storage through use of SuperDisk diskett...

Страница 20: ...tage select switch and expansion board slots The following figure shows the features Rear features A Power Socket I Line In Jack B Voltage Selector Switch J Microphone In Jack C Mouse Port K Fan D Keyboard Port L Printer Port E USB Port M MIDI Port F Serial Port 1 N VGA Monitor Connector G Serial Port 2 O Expansion Slots H Line Out Jack ...

Страница 21: ...gdom and Germany with a 6 pin mini DIN connector VGA monitor connector The system comes with an accelerated graphics port AGP graphics board The external video graphics array VGA connector on the AGP board supports an NEC MultiSync monitor NEC VistaScan monitor or other VGA compatible monitor with a 15 pin connector Attach the signal cable from your monitor to the VGA connector Printer port Use th...

Страница 22: ...amplified output device such as powered speakers or headset a stereo tape recorder or an external amplifier for audio output MIDI Joystick connector The MIDI Joystick connector lets you attach a joystick to your system for use with games Fax modem ports Some models come with a V 90 rated 56 kilobytes per second Kbps fax modem board The fax modem board allows the connection of a phone line to the c...

Страница 23: ...or the voltage in your area Most wall outlets in the United States and Canada are 115 volts Outlets in Europe Australia and Asia except Taiwan are 230 volts Taiwan uses 115 volt outlets Power supply fan The power supply fan cools the power supply and other system components to keep them from overheating Keep the area near the fan clear for proper ventilation Inside Features See the following figur...

Страница 24: ...nnectors and external connectors are on the system board For information on the external connectors see External Connectors earlier in this chapter The system board supports a diskette drive and up to four IDE devices such as IDE hard drives IDE CD ROM drive IDE DVD ROM drive and IDE Zip drive Internal connectors on the system board include primary and secondary IDE connectors diskette drive conne...

Страница 25: ...ork board installed in a PCI slot Modem Board Some models come with a Robotics 56K Python V 90 ISA modem board or a Lucent V 90 Winmodem PCI board Connect your telephone line to this board Storage Device Support Five storage device bays accommodate up to three accessible devices and two internal hard drives Chassis The NEC micro tower chassis conforms to the Intel ATX form factor specification The...

Страница 26: ...he taskbar next to the system clock Use the software to balance the sound between the left and right speakers System Features Your computer hardware and software deliver the performance and technologies you need for all your challenging tasks today and into the future Hardware The PowerMate VT 300 Series includes the following hardware features PC98 Compliance All the hardware in the system has be...

Страница 27: ...d flash support for easy and economical BIOS upgrades System Memory Your computer comes with at least 32 MB of non ECC synchronous dynamic random access memory SDRAM and supports up to 512 MB AGP Graphics Board All models ship with an AGP graphics board AGP enhances graphics performance particularly for 3 D applications Power Management Options Power management options conserve energy and reduce p...

Страница 28: ...In addition the program automatically determines which drivers are needed for your original hardware configuration and installs them during the restore NEC Application and Driver CD Your system comes with an NEC Application and Driver CD Use this CD to install any or all of the software that comes with your system including Microsoft Internet Explorer Internet Explorer provides a top notch browser...

Страница 29: ...with information about the PowerMate system Healthy Environment This is an online version of the printed brochure Setting up a Healthy Environment The NEC Application and Driver CD also contains a wide selection of drivers for hardware that is compatible with PowerMate series computers These drivers are provided with the original manufacturer s installation wizards to ensure correct installation S...

Страница 30: ...ws full access to the system and the BIOS Windows network security features To learn more about the network security features available through the Windows operating system refer to your Windows documentation or consult your system administrator Locking tab The system also has a locking tab on the rear of the chassis The tab fits through a slot on the rear edge of the chassis cover when the cover ...

Страница 31: ...2 Setting Up the System Cable Connections Startup Shutdown Power Saving Operation System Care More Information ...

Страница 32: ...Setup poster and the following tips Use the icons on the rear of the system unit to identify the keyboard mouse printer USB and monitor connectors If the system comes with a fax modem board connect it to the telephone line as follows Unplug the telephone from the telephone jack on the wall Plug the telephone cable that comes with the system into the line jack on the rear of the system and into the...

Страница 33: ... button to start up your system The power lamp lights green to indicate that the system is on The system performs its Power On Self Test POST and several messages appear indicating that your system is checking its subsystems To see the messages press Tab during POST At the bottom of the NEC startup screen the following message appears Press F2 to enter BIOS Setup If you want to enter the BIOS Setu...

Страница 34: ...stem press Ctrl Alt Del when prompted on screen to do so The log on box appears for entering a password Shutdown Follow these steps to power off your computer 1 Save your work and exit all open application programs 2 Make sure that the hard drive diskette drive and any other drives are not in use A lit device lamp indicates that the device is in use CAUTION Wait until a program is finished running...

Страница 35: ...ows 95 or Windows NT shut down the system by pressing and holding in the power button for several seconds before releasing 6 Turn off power to your monitor Power Saving Operation If the system is running Windows 95 or Windows 98 you can put it in Sleep mode a power saving state by lightly pressing and immediately releasing the power button on the front of your unit The Sleep mode is a convenient w...

Страница 36: ...p mode Press a key or move the mouse to resume system operation where you left off System Care Your system is a durable dependable computer built for heavy use With protective measures and proper care you can prevent problems and promote the successful operation and long life span of your computer Protecting Your System From Damage There are several ways that you can protect your system from possi...

Страница 37: ... sure that system power is off before you connect or disconnect a cable Never make cable changes when the system power is on Doing so can damage the system and its peripherals Use BIOS Setup utility options to protect against viruses see Security Menu in Chapter 3 Use appropriate virus detection software regularly to protect your system from computer viruses If you plan to use software programs ot...

Страница 38: ...es before cleaning them Clean the outside of the computer with a soft clean cloth You can remove stubborn stains with a cloth slightly dampened with a mild detergent Never use a strong cleaner or solvent on any part of the system Keep food and liquids away from your computer Periodically clean the keyboard with a vacuum cleaner brush attachment Do not use any liquid cleaners on the keyboard as the...

Страница 39: ...f you have a CD in the CD ROM drive remove the CD 3 Turn off the system unit and any external options connected to it 4 Unplug the system unit power cable from the wall outlet or surge suppressor then from the unit itself 5 Unplug any external options from the wall outlets or surge suppressor then disconnect them from the system unit 6 Pack the system components in the original shipping materials ...

Страница 40: ...t using the computer Quick Reference to Information About the Computer Information Where to Find It Installing the applications provided by NEC CSD Installing Applications in Chapter 3 Installing the NEC Help Center online documentation Installing the NEC Help Center in Chapter 3 Uninstalling the NEC Help Center Uninstalling the NEC Help Center in Chapter 3 Setting a password Chapter 3 Adding opti...

Страница 41: ... the System Configuration Tools and Utilities BIOS Setup Utility Flash Utility NEC OS Restore CD NEC Application and Driver CD NEC Help Center Resolutions for NEC VistaScan USB Monitors System Board Jumper Settings ...

Страница 42: ...system NEC Applications and Driver CD for installing the NEC supplied applications and optional drivers jumper settings for physically configuring devices in the system See the following table for a quick guide to the utilities tools or procedures required in configuring the system For detailed information about these and other tools see the sections following the table Configuration Tools and Uti...

Страница 43: ...ing NEC Application and Driver CD Hard drive reformatting NEC OS Restore CD Hard drive repartioning NEC OS Restore CD Hard drive setting a pre delay BIOS Setup Advanced menu Hard drive subjecting to power management BIOS Setup Advanced menu Healthy Environment online document installing NEC Application and Driver CD Inactivity timeout setting BIOS Setup Advanced menu Keyboard options BIOS Setup Ad...

Страница 44: ...up Advanced menu Power management enabling configuring BIOS Setup Advanced menu Processor speed changing Jumpers Serial ports enabling BIOS Setup Advanced menu Software provided through NEC installing NEC Application and Driver CD Sound enabling BIOS Setup Advanced menu Time and date setting BIOS Setup Main menu USB functions BIOS Setup Advanced menu Video device subjecting to power management BIO...

Страница 45: ...iguration information is stored in nonvolatile memory A nonvolatile memory device retains its data when system power is turned off Nonvolatile memory in your system is stored in a complementary metal oxide semiconductor CMOS memory chip backed up by a battery on the system board The battery supplies continuous power to CMOS memory and maintains configuration information when system power is off se...

Страница 46: ... to the following Setup Main Menu Main Menu Main Advanced Security Exit BIOS Version Processor Type Processor Speed Cache RAM Total Memory DRAM Bank 0 DRAM Bank 1 System Date System Time Floppy Drive A Floppy Drive B Primary IDE Master Primary IDE Slave Secondary IDE Master Secondary IDE Slave VI xxxx Pentium 450 MHz 512 KB 32 Mb SDRAM None Wed Aug 11 1999 10 17 59 1 44 MB 3 1 2 Not Installed Auto...

Страница 47: ...n values for this menu F6 Selects the Original Values for the field F10 Saves changes and Exits the BIOS Setup utility Up or down arrow keys Moves cursor up and down in the menu Left or right arrow keys Selects next menu Help Setup information displays on the right side of the Setup screen Main Menu The BIOS Setup utility usually comes up displaying the Main Menu If BIOS is displaying another menu...

Страница 48: ...Type This field is read only and cannot be changed from the BIOS Setup utility Example Celeron Processor Speed This field is read only and cannot be changed from the BIOS Setup utility Example 433 MHz Cache RAM This field is read only and cannot be changed from the BIOS Setup utility Example 128 KB Total Memory This field is read only and cannot be changed from the BIOS Setup utility Example 32 MB...

Страница 49: ...ype Auto Device type Auto Device type Auto Device type Auto Each device menu item displays the Hard drive or CD ROM identifier if a device is installed If you install a hard drive that does not feature auto IDE type detection or your IDE hard drive was formatted on another system with parameters different from those reported by the drive enter a parameter for each of the fields in the device subme...

Страница 50: ...titioned and formatted unpredictable results may occur including data loss Cylinders When Type is Auto value in the Cylinders field is auto detected and field is read only Write Precompensation When Type is Auto value in Write Pre compensation field is auto detected and field is read only Heads When Type is Auto value in Heads field is auto detected and field is read only Sectors When Type is Auto...

Страница 51: ...Bit Transfer Mode ON Off When On allows 32 bit data transfers Advanced Menu The Advanced Menu is a top level menu in the BIOS Setup utility Choose the Advanced Menu by selecting Advanced in the legend bar Advanced Menu options are available by selecting submenus Use the arrow keys to select an Advanced Menu option Press Enter to display the submenu Settings of the Advanced Menu options and subopti...

Страница 52: ...ging Enabled Disabled Selecting Enabled permits ECC event logging Quick Boot Enabled Disabled When Enabled the BIOS does not test system memory above 1 MB or wait for ready signals allowing a quick boot 1 st Boot Device Disabled IDE 0 IDE 1 IDE 2 IDE 3 Floppy LS 120 ATAPI Zip CDROM SCSI Network Sets the hard drive as the first boot device 2 nd Boot Device Disabled IDE 0 IDE 1 IDE 2 IDE 3 Floppy LS...

Страница 53: ...ogy S M A R T for reporting server system information over a network PS 2 Mouse Support Enabled Disabled Select Enabled to allow use of a PS 2 mouse CPU Serial Number Disabled Enabled Advanced Menu Advanced Chipset Setup Menu Item Settings default is bold Graphics Aperture Size 4 MB 8 MB 16 MB 32 MB 64 MB 128 MB 256 MB Determines the effective size of the graphics aperture used in the particular P...

Страница 54: ...er conserving state that the hard disk drive enters after a specified period of inactivity has expired Standby Time Out Minutes Disabled 1 2 4 8 10 20 30 40 50 60 Specifies the length of time of system inactivity while in full power on state before entering Standby state Suspend Time Out Minutes Disabled 1 2 4 8 10 20 30 40 50 60 Specifies the length of time of system inactivity while in Standby s...

Страница 55: ...n Windows 98 systems LAN Resume from Soft Off Disabled Enabled The Disabled setting causes the system to ignore any incoming signal from the LAN network board Enabled allows the system to boot up on an incoming LAN signal from the network board RTC Alarm Resume from Soft Off Disabled Enabled When Enabled you can choose the time the system boots up see the following time settings RTC Alarm Date Set...

Страница 56: ...abled if an ISA adapter board requires VGA palette snooping PCI IDE Bus Master Disabled Enabled Set to Enabled to specify that the IDE controller on the PCI local bus includes a bus mastering device Advanced Menu Peripheral Setup Menu Item Settings default is bold Onboard Sound Chip Disabled Enabled The Enabled setting allows use of onboard sound Onboard FDC Auto Disabled Enabled Select Auto to au...

Страница 57: ...ode of the onboard parallel port EPP Version Use this setting 1 7 or 1 9 to select the EPP version Parallel Port IRQ Parallel port 7 Setting depends on setting of Parallel Port Mode If not set at auto you can select the interrupt line for the onboard parallel port Parallel Port DMA Channel This option allows you to choose DMA channel 1 to 3 for the onboard parallel port in ECP mode Onboard IDE Dis...

Страница 58: ...Security Menu option Press Enter to display the submenu Settings of the Security Menu options and suboptions appear in the following table Security Menu Items Menu Item Settings default is bold Password Check Setup Always Set Supervisor Password Enter Use this field to set or change the supervisor password Press Enter to bring up a dialog box where the password can be entered and confirmed Set Use...

Страница 59: ...e submenu Explanations of the Exit Menu options and suboptions appear in the following table Exit Menu Items Menu Item Settings default is bold Exit Saving Changes Implements the changes just made and exits BIOS Exit Discarding Changes Reverts to the settings from before the BIOS session Load Optimal Settings Reverts to the factory set optimal settings Load Fail Safe Settings Reverts to the factor...

Страница 60: ...n board system information Update the BIOS from the BIOS flash diskette as follows 1 Write down the BIOS Setup parameters currently set on your system 2 Turn off the system 3 Put the flash diskette in drive A and turn on the system 4 When the flash upgrade menu appears choose Update Flash Memory Area from a file 5 When the menu asks you to enter a path filename use the arrow keys to select the bio...

Страница 61: ...ore your system to its working state if a problem occurs that causes data loss or corruption After restoring the operating system use the NEC Application and Driver CD to install your applications optional drivers and online documents Note Use the NEC Application and Driver CD to install or restore applications optional drivers and online documents see NEC Application and Driver CD later in this c...

Страница 62: ... and restore see Fixing the Operating System The operating system and factory shipped drivers are always restored regardless of which program you choose See NEC Application and Driver CD for instructions on installing any of the applications or online documents or to install device drivers that did not come with your system Launching the NEC OS Restore CD Follow these steps to launch the NEC OS Re...

Страница 63: ...appears with three options Back Reject and Accept 3 Read the license agreement and click Accept to continue The Restore Mode screen appears with four options Back Auto Custom and Fix OS See one of the following sections to continue with the restore Auto Rebuild and Restore Custom Rebuild and Restore Fixing the Operating System ...

Страница 64: ... reformat your hard drive If you are running Windows NT 4 0 skip to step 4 If you are running Windows 95 or Windows 98 the Partition Information screen appears 3 The Partition Information screen that appears in Windows 95 or Windows 98 has three options Back FAT 16 and FAT 32 and lets you select the File Allocation Table FAT type you want to use for the operating system restore Click Back to retur...

Страница 65: ...nue 5 Click Continue The following take place system performs FDISK system reboots partitions are formatted OS and drivers load from the CD The Operating System Restore Completed screen appears when all files have been restored 6 Remove the CD from the CD tray 7 Click OK to reboot This completes the Auto Rebuild and Restore procedure See NEC Application and Driver CD for instructions on installing...

Страница 66: ...ioning the Hard Drive screen appears with options allowing you to retain the present partition structure or partition the hard disk using FAT16 or FAT32 If the existing partition table is not functional the system performs an Auto restore as described in Auto Rebuild and Restore 3 If you want to partition and reformat the hard drive go to step 6 Otherwise click Skip to retain the present partition...

Страница 67: ...o step 6 5 To partition the hard drive click Continue on the Partitioning the Hard Drive screen The Partition Information screen appears in Windows 95 and Windows 98 systems In Windows NT 4 0 systems the FAT16 Partition warning appears as described in step 7 6 The Partition Information screen has three options and lets you select the File Allocation Table FAT type you want to use for the operating...

Страница 68: ...tinue The following takes place system performs FDISK using the FAT type selected system reboots partitions are formatted OS and drivers load from the CD The Operating System Restore Completed screen appears when all files have been restored 9 Remove the CD from the CD tray 10 Click OK to reboot This completes the Custom Rebuild and Restore procedure See NEC Application and Driver CD for instructi...

Страница 69: ...with these options 1 Launch the NEC OS Restore CD and follow the prompts to get to the Restore Mode screen see Launching the OS Restore CD 2 Click Fix OS to do a basic operating system restore The Fix OS screen appears and displays two options Back and Continue 3 Click Continue The Installing Applications screen appears showing the status of the restore It also displays the version of Windows OS b...

Страница 70: ...ORG CAUTION Some or all applications might not exhibit full functionality after the Fix OS is performed To restore the system to its factory installed state perform another OS Restore using the Auto or Custom option CAUTION Using the Fix OS option repetitively without using the Auto or Custom option afterward might cause unpredictable results To restore the system to its factory installed state pe...

Страница 71: ...re the operating system the drivers that were factory shipped are automatically installed Should a problem occur that causes data loss or corruption you can restore these files to your computer using one of the programs on the CD Launching the Application and Driver CD Use the Application and Driver CD to install applications drivers utilities Internet browsers and the online NEC Help Center CAUTI...

Страница 72: ...wsers and the online NEC Help Center Description Located in the bottom portion of the dialog box the text describes the selected or highlighted software category or application driver etc Install Clicking the Install button installs the selected software Exit Clicking the Exit button closes the Application and Driver Installation Utility dialog box Once the Application and Driver Installation Util...

Страница 73: ... NEC Help Center see the following section Installing the NEC Help Center To uninstall the NEC Help Center follow the instructions in Uninstalling the NEC Help Center Installing the NEC Help Center The installation of the NEC Help Center requires Microsoft Internet Explorer 4 01 5 0 or higher If Internet Explorer is not already installed on your system install it from the NEC Application and Drive...

Страница 74: ...hese steps 1 Access the C Program Files nechlpct directory 2 Double click the Unwise exe icon to remove all files related to the NEC Help Center and the C Program Files nechlpct directory To reinstall the NEC Help Center use the NEC Application and Driver CD and follow the instructions in Installing the NEC Help Center Resolutions for NEC VistaScan USB Monitors The following table lists the suppor...

Страница 75: ...3 67 85 11 1024 x 768 60 02 75 12 1280 x 1024 63 98 60 13 1024 x 768 68 68 85 System Board Jumper Settings System board jumpers enable you to configure your system for a particular system requirement Conditions that require changing jumper settings include the following You are upgrading your processor You must set jumpers on the system board for the CPU Bus speed You need to configure the system ...

Страница 76: ...D Technical Support for assistance see Section 6 for information on contacting Technical Support You can obtain the BIOS Recovery program by downloading it to a diskette from the NEC CSD Bulletin Board System BBS the NEC CSD File Transfer Protocol FTP site or the NEC CSD website See Chapter 6 for information on downloading The following figure shows system board jumpers Locating system board jumpe...

Страница 77: ...pgrading the processor Otherwise keep the jumpers at their factory settings 1 Power off and unplug the system and any external options 2 Remove the left side cover see Removing the Left Side Cover in Chapter 4 WARNING System power must be off before changing a jumper setting 3 Locate the processor bus speed SW1 jumper block on the system board see the figure Locating system board jumpers earlier i...

Страница 78: ...Hz 400 MHz 66 MHz 600 MHz 100 MHz 433 MHz 66 MHz 5 Replace the left side cover see Replacing the Left Side Cover in Chapter 4 6 Connect system power cables and external options 7 Power on the system and run BIOS Setup utility to check the configuration of your system Clear CMOS Password If you need to clear your password or reset your CMOS settings to their factory state set jumper block JBAT1 as ...

Страница 79: ...not clear CMOS while power is on 2 Remove the left side cover see Removing the Left Side Cover in Chapter 4 3 Locate jumper block JBAT1 on the system board see the figure Locating system board jumpers earlier in this chapter 4 Move the jumper from pins 1 and 2 to pins 2 and 3 to clear your password and reset the CMOS settings 5 Move the jumper back to pins 1 and 2 6 Replace the left side cover plu...

Страница 80: ...erals WARNING The system power must be off before removing the cover and changing a jumper setting 2 Remove the left side cover see Removing the Left Side Cover in Chapter 4 3 Locate JP1 on the system board see the figure Locating system board jumpers earlier in this chapter 4 Set jumper JP1 as follows Set the jumper on pins 1 and 2 to allow system boot up when the power button is pressed Remove t...

Страница 81: ...ing the Left Side Cover in Chapter 4 Connect system power cables and external options 6 Power on the system Press F2 to open the BIOS Setup utility 7 Set the BIOS for the power option you jumpered see Advanced Menu Power Management Setup in this chapter for the settings ...

Страница 82: ...4 Installing Options General Rules Safety Precautions System Unit Covers System Board Options Expansion Boards Data Storage Devices ...

Страница 83: ...e right side cover and the front panel Procedures for removing the covers and front panel are included in this chapter General Rules Follow these general rules when installing system options Turn off system power and unplug the power cable Turn off and disconnect all peripherals from the front or rear of the system When handling boards or chips touch the system metal frame to discharge static Do n...

Страница 84: ...n damage computer components Protect computer components by following these safety instructions CAUTION Electrostatic discharge can damage computer components Discharge static electricity by touching a metal object before removing the system unit cover Avoid carpets in cool dry areas Leave boards and chips in their anti static packaging until ready to be installed Dissipate static electricity befo...

Страница 85: ...u connect the cable Misaligned connector pins can cause damage to system components at power on When disconnecting a cable always pull on the cable connector or strain relief loop not on the cable itself System Unit Covers The following sections describe how to remove and replace the system unit left side cover right side cover and front panel Remove the left side cover to access the interior of t...

Страница 86: ... system power cable Power is removed only when the power cable is unplugged 1 Turn off and unplug the system unit 2 Disconnect any external options such as a keyboard and monitor from the front or rear of the system unit CAUTION Electrostatic discharge can damage computer components Discharge static electricity by touching a metal object before removing the left side cover 3 If you have a padlock ...

Страница 87: ...ssis 5 Grasp the handle on the left side cover and slide the cover towards the rear of the chassis about an inch 6 Pull the top of the side cover away from the chassis about one half inch then lift the cover off the system Removing the left side cover A Left Side Cover C Handle B Thumb Screws D Lock Tab ...

Страница 88: ...beyond the back edge of the chassis see the following figure 2 Fit the flange on the bottom of the cover over the rail along the bottom edge of the chassis 3 Align the lock tab slot at the bottom rear of the cover with the lock tab 4 Align the tabs on the top of the cover with the top slots on the chassis 5 Firmly press the cover against the chassis and slide the cover towards the front of the cha...

Страница 89: ... Tab Slots C Chassis Rail B Left Side Cover D Lock Tab 6 Replace the two previously removed thumb screws 7 If you have a padlock for the locking tab on the rear edge of the chassis install it 8 Reconnect all external peripherals 9 Plug in your power cables ...

Страница 90: ...er and unplug the system power cable Power is removed only when the power cable is unplugged 1 Turn off and unplug the system unit 2 Disconnect any external options such as a keyboard and monitor from the front or rear of the system unit CAUTION Electrostatic discharge can damage computer components Discharge static electricity by touching a metal object before removing the left side cover 3 Remov...

Страница 91: ... side cover A Screws C Right Side Cover B Handle 5 Grasp the handle on the right side cover and slide the cover towards the rear of the chassis about one half inch 6 Pull out the bottom of the cover and tilt the cover towards the left side of the chassis until it releases from the chassis 7 Remove the cover from the chassis ...

Страница 92: ...he chassis about a half inch from the front panel Replacing the right side cover A Right Side Cover D Tabs B Flange E Tab Slots C Rail 2 Align the tabs on the inside of the top of the cover with the tab slots on the left side of the chassis 3 Fit the flange on the bottom of the cover over the rail along the bottom edge of the chassis ...

Страница 93: ...rted into their slots in the chassis 5 Replace the three previously removed screws 6 Replace the left side cover see Replacing the Left Side Cover earlier in this chapter 7 Reconnect all external peripherals 8 Plug in your power cables System Board Options This section describes how to upgrade options on the system board Procedures described in this section include adding memory modules upgrading ...

Страница 94: ...o memory module sockets on the system board The sockets support up to 512 MB of high speed memory The system supports 168 pin 100 MHz SDRAM modules in 32 64 128 and 256 MB unbuffered memory configurations Non ECC dual inline memory modules DIMMs are supported Use the following guidelines in selecting DIMM types memory can be installed in one or two sockets the size of the DIMMs can vary between so...

Страница 95: ... DIMMs For sample memory configurations see the table Sample DIMM Upgrade Paths To locate memory module sockets on the system board see the previous figure System board sockets and connectors To determine the memory you need to purchase for a memory upgrade see Checking System Memory Supported DIMMs DIMM Size Non ECC Configuration 32 MB 4 Mbit x 64 64 MB 8 Mbit x 64 128 MB 16 Mbit x 64 256 MB 32 M...

Страница 96: ...ng System Memory If you do not know how much memory is installed in your system check the amount by using the following procedure 1 On the Windows 95 Windows 98 or Windows NT 4 0 desktop point to My Computer and click the right mouse button 2 With the left mouse button click Properties The General tab shows the random access memory RAM This is the amount of system memory in your computer In Window...

Страница 97: ...dules reduce static discharge by touching the chassis 1 Remove the left side cover see Removing the Left Side Cover earlier in this Chapter 2 Locate the memory upgrade sockets on the system board see the figure System board sockets and connectors earlier in this chapter 3 Eject a DIMM by pressing the plastic clips at the outer edges of the socket away from the memory module Removing a DIMM A Plast...

Страница 98: ...er earlier in this chapter 2 If you need to remove a currently installed DIMM see Removing a DIMM earlier in this chapter CAUTION Before you install a DIMM reduce static discharge by touching the chassis 3 Align the notches on the new DIMM with the keys in an empty memory socket see the following figure If your memory configuration requires only one DIMM install it in DIMM socket 1 next to the pro...

Страница 99: ...he left side cover see Replacing the Left Side Cover earlier in this chapter Note If you find a discrepancy in the amount of memory displayed at the Power On Self Test or in Windows with the amount of memory that you installed check that you installed the memory modules correctly ...

Страница 100: ...sor Cartridge or see Removing the Pentium II Processor Cartridge in the following sections To install the upgrade processor see Installing the Celeron or Pentium III Processor Cartridge or see Installing the Pentium II Processor Cartridge in the following sections CAUTION NEC recommends that you contact your NEC dealer or NEC service center for assistance in upgrading your processor Incorrect inst...

Страница 101: ...ling components reduce static discharge by touching the chassis 1 Power off the system and remove the left side cover see Removing the Left Side Cover earlier in this chapter 2 Position the system on its right side for easier access to the system board and processor cartridge WARNING If the system was just running the processor cartridge and heat sink on the system board are hot To avoid a burn le...

Страница 102: ...ble from its connector on the system board 6 At one end of the processor cartridge see the following figure carefully pull the locking lever away from the cartridge approximately 1 4 inch The lever requires a strong steady pull to release the cartridge 7 While holding the locking lever out carefully pull up on the end of the cartridge to release the end from the retention mechanism Removing the Ce...

Страница 103: ...pgrade Processor Install the Celeron or Pentium III upgrade processor cartridge as follows 1 Remove the processor currently in your system see Removing the Celeron or Pentium III Processor in the previous section CAUTION Before picking up the processor reduce static discharge by touching the metal chassis 2 Align the cartridge with the top of the retention mechanism so that the notch in the cartri...

Страница 104: ...the system board 5 Set the processor jumpers on the system board for the processor type that you installed see Processor Jumper Settings in Chapter 3 6 Replace the AGP graphics board and any expansion boards you might have removed see Installing an Expansion Board and Installing the AGP Board later in this chapter 7 Set the processor jumpers on the system board for the processor type that you inst...

Страница 105: ... handling components reduce static discharge by touching the chassis 1 Remove the left side cover see Removing the Left Side Cover earlier in this chapter 2 Position the system on its right side for easier access to the system board and processor cartridge WARNING If the system was just running the processor cartridge and heat sink on the system board are hot To avoid a burn let the components coo...

Страница 106: ...dule from DIMM socket 1 and place it on an antistatic surface see Removing a DIMM earlier in this chapter Squeeze each end of the top bar and pull it out of the processor heat sink and retention mechanism Continue to step 6 to remove the processor cartridge 6 Press the two locking tabs in as far as they go to release the processor cartridge from the retention mechanism 7 Carefully pull the cartrid...

Страница 107: ...ing Tab F Top Bar Installing the Pentium II Upgrade Processor Install the Pentium II upgrade processor cartridge as follows 1 Remove the Pentium II processor currently in your system see Removing the Pentium II Processor in the previous section CAUTION Before picking up the processor reduce static discharge by touching the metal chassis ...

Страница 108: ...fully seated in the Slot 1 connector 4 Lock the cartridge in place by pressing out on the two locking tabs 5 For systems using the top bar install it as follows CAUTION Use caution when inserting the top bar to prevent damage to the plastic clips on the DIMM socket Insert the bar into its pins on the retention mechanism and the heat sink The flat side of the bar goes against the flat side of the b...

Страница 109: ...sor jumpers on the system board for the processor type that you installed see Processor Jumper Settings in Chapter 3 7 Replace the AGP graphics board and any expansion boards that you might have removed see Installing an Expansion Board and Installing the AGP Board later in this chapter 8 Install the left side cover see Replacing the Left Side Cover earlier in this chapter ...

Страница 110: ...oard without changing the hardware settings There are no system resource conflicts to resolve Plug and Play automatically configures the board for the system The PCI connectors support bus mastering and accept PCI expansion boards that run at half the system board s bus speed The PCI bus handles 32 bits of data at a time boosting system performance The following sections show PCI and ISA slot and ...

Страница 111: ...ure shows the locations of the expansion slots on the chassis and the expansion board connectors on the system board Locating expansion board slots and connectors A AGP Board Slot E AGP Board Connector B PCI Slots F PCI Connectors C PCI ISA Shared Slot G ISA Connector D System Board ...

Страница 112: ...he left side cover see Removing the Left Side Cover earlier in this chapter 2 Follow any preinstallation instructions that come with the expansion board such as setting jumpers on the board 3 Remove and save the screw securing the expansion board slot cover 4 Remove and save the slot cover Removing a slot cover A Slot Cover B Screw ...

Страница 113: ...into the expansion slot connector on the system board 7 Secure the expansion board bracket in place with the previously removed screw Installing an expansion board A Screw C System Board B Expansion Board 8 Attach any signal cables required by the expansion board 9 Replace the left side cover see Replacing the Left Side Cover earlier in this chapter ...

Страница 114: ...oard or install the slot cover if you are not installing a board Secure the board or slot cover with the previously removed screw see Installing an Expansion Board in the previous section 6 Replace the left side cover see Replacing the Left Side Cover earlier in this chapter AGP Board The system board has a dedicated AGP board connector for the AGP graphics board shipped with your system If you ne...

Страница 115: ...e or in an antistatic bag 5 Install an AGP board see Installing the AGP Graphics Board in the next section Installing the AGP Graphics Board Install an AGP graphics board as follows 1 Remove the current AGP graphics board see Removing the AGP Graphics Board earlier in this section 2 Insert the new AGP board in the AGP connector on the system board 3 Secure the board to the chassis with the previou...

Страница 116: ...p drive Other storage devices might require the installation of a compatible controller board See your hardware dealer about the storage devices available for your system Locating Device Bays The system has five bays see the following figure two 5 1 4 inch accessible device bays 1 6 inch high half height one 3 1 2 inch accessible device bay containing the standard 1 44 MB diskette drive two 3 1 2 ...

Страница 117: ...panel B 3 1 2 Inch Accessible Bay Depending on your configuration one accessible device bay might contain a CD ROM drive DVD ROM drive or other storage device The other accessible bay supports devices with 5 1 4 inch form factors frames tape drive CD ROM drive or DVD ROM drive PC card adapter LS 120 drive Zip drive ...

Страница 118: ...or example check the following information Diskette drive remove any termination on an optional diskette drive See the documentation that comes with the drive IDE drive check the jumper settings on the device before installing it See the documentation that comes with the device for jumper setting information CD ROM drive must be set correctly as the first master or second slave device on the secon...

Страница 119: ...or C Primary IDE Connector B Secondary IDE Connector Use the following table when configuring IDE drives on the primary and secondary IDE connectors on the system board If you are installing a DVD ROM drive substitute the DVD ROM drive for the CD ROM drive in the following table ...

Страница 120: ... drive CD ROM tape backup Master hard drive Slave none Master CD ROM Slave tape backup 3 devices hard drive CD ROM LS 120 drive Master hard drive Slave none Master CD ROM Slave LS 120 drive 3 devices hard drive hard drive CD ROM Master hard drive Slave hard drive Master CD ROM Slave none 3 devices hard drive hard drive tape backup Master hard drive Slave hard drive Master tape backup Slave none 3 ...

Страница 121: ...Slave hard drive Master tape backup Slave LS 120 drive 4 devices hard drive LS 120 drive CD ROM Zip drive Master hard drive Slave CD ROM Master Zip drive Slave LS 120 drive 4 devices hard drive LS 120 drive CD ROM tape backup Master hard drive Slave CD ROM Master tape backup Slave LS 120 drive 4 devices hard drive LS 120 drive Zip drive tape backup Master hard drive Slave LS 120 drive Master Zip d...

Страница 122: ...ndard storage devices System power cables vary in length and provide connector sizes to accommodate a variety of supported storage configurations Power cable connectors are keyed to fit only in the correct position Cabling Storage Devices All storage devices require power and signal cable connections Devices shipped with the system are already connected Your computer supports the following types o...

Страница 123: ...nnector to the connector on the IDE drive Use care to prevent bending connector pins Align the cable connector as shown in the following figure 2 Locate an available power connector coming from the power supply 3 Connect the appropriate power cable to the power connector on the IDE drive Connecting the IDE drive cable A Connects to System Board IDE Connector B Connects to IDE Devices ...

Страница 124: ... 3 Connect the power cable to the power connector on the device PC Card Adapter Cabling Cable a PC card adapter as follows 1 Connect the connectors at one end of the card adapter cable set to the PC adapter board The connectors are keyed to fit only one way The PC ISA adapter board installs in the ISA expansion slot See Installing an Expansion Board if the board must be installed first 2 Connect t...

Страница 125: ...e the AGP graphics board and any expansion boards that may be in the way see Removing the AGP Graphics Board and Removing an Expansion Board earlier in this chapter 4 Connect one end of the LAN cable to the JWOL connector on the system board see the figure System board and sockets and connectors earlier in this chapter 5 Connect the other end of the LAN cable to the LAN board see the documentation...

Страница 126: ...he 5 1 4 inch accessible device bays If you are going to install an accessible 5 1 4 inch device you also need to remove the blank panel from the front panel see Removing the Blank Panel later in this chapter The front panel is held in place on the chassis by six plugs three to a side on the front panel To remove the front panel proceed as follows 1 Remove the left side cover see Removing the Left...

Страница 127: ...d C Front Panel B Plugs 3 If you are removing or replacing a hard drive go to Installing a 3 1 2 Inch Hard Drive If you are removing or replacing a 5 1 4 inch device continue with this procedure 4 Identify the bay on the front panel for the device being installed ...

Страница 128: ... the Front Panel for procedures to reinstall the plastic panel Locating the blank panel tabs A Blank Panel Tabs 6 Remove the metal shield from the bay where you are installing the device see the figure Removing the front panel for shield location Insert a screwdriver into one of the holes in the metal shield Twist the shield with the screwdriver until it comes loose 7 Install the device see Instal...

Страница 129: ...place 2 Align the front panel plugs with the mounting holes in the front of the chassis 3 Evenly press the front panel into position until the plugs lock the panel in place 4 Replace the left side cover see Replacing the Left Side Cover earlier in this chapter Installing a 3 1 2 Inch Hard Drive You can upgrade your system by adding a second drive or replacing an existing hard drive Each hard drive...

Страница 130: ...nplug the hard drive power and signal cables remove the four screws holding the old drive to the chassis see the following figure for screw locations remove the old drive from the system install a new drive as follows 5 Connect the IDE drive signal and power cables to the hard drive you are installing in the system 6 Attach the hard drive to the chassis Set the hard drive on the brackets inside th...

Страница 131: ...vice Installing a hard drive A Screws B Top Bracket 7 Replace the front panel see Replacing the Front Panel earlier in this chapter 8 Replace the left side cover see Installing the Left Side Cover earlier in this chapter 9 Run the Setup program to set the new configuration see BIOS Setup Utility in Chapter 3 ...

Страница 132: ...over see Removing the Left Side Cover earlier in this chapter 3 Remove the right side cover see Removing the Right Side Cover earlier in this chapter 4 Remove the front panel see Removing the Front Panel earlier in this chapter 5 From the front of the system slide the device connector end first into the device bay see the following figure Slide it in far enough for access to the connectors at the ...

Страница 133: ...9 Replace the right side cover see Replacing the Right Side Cover earlier in this chapter 10 Replace the left side cover see Replacing the Left Side Cover earlier in this chapter 11 Connect the system and peripheral power cables and power up the system 12 Run the Setup program to set the new configuration see BIOS Setup Utility in Chapter 3 ...

Страница 134: ...5 Solving System Problems Solutions to Common Problems How to Clean the Mouse Battery Replacement How to Get Help ...

Страница 135: ...ns to Common Problems See the following sections to match your problem area and view the possible causes and solutions When trying to solve problems you should note what the system was doing when the problem occurred and what you attempted to do to correct the problem This information is useful if you request assistance System Problems Check the following list to match your problem and see the pos...

Страница 136: ...efore the system boots Change the Hard Disk Pre Delay to a higher setting see BIOS Setup Advanced Menu in Chapter 3 System does not boot and error message displayed on screen Run the Setup Utility see Chapter 3 Check that the parameters are set correctly particularly if you just installed an option System emits continuous beeps Turn the system off wait at least five seconds and turn the system on ...

Страница 137: ...ting If you get a message operating system not found after you change the setting the delay is at too low a setting Set the hard disk pre delay slightly higher System performance appears sluggish Check that your system is set for optimal operation See your operating system documentation Check the memory requirements of your software applications If required install additional DIMM memory see Chapt...

Страница 138: ...sk Error message displayed If you are trying to boot from the diskette drive insert a diskette with system files into drive A If a bootable diskette does not boot use the BIOS Setup Utility to verify that the initial boot parameter is set to diskette drive A and not a hard drive Monitor Problems Check the following problems to see the possible cause and solution Monitor screen is dark or the displ...

Страница 139: ...y and that all connections have been made Check that the video refresh rate and video driver are correct Click the right mouse button anywhere on the Windows desktop and a menu appears Click on Properties and the Display Properties window appears Keyboard Mouse Problems Check the following problem to see the possible cause and solution Mouse or keyboard does not respond You may have connected the ...

Страница 140: ... My Computer on the Windows 95 or Windows 98 or Windows NT 4 0 desktop The drive designation is below the drive icon As an alternative open Windows Explorer and scroll down the list of folders until you locate the drive icon The drive designation is beside the icon The drive is not reading a disc Check that the disc is inserted in the disc tray with the printed label side up Check that the disc is...

Страница 141: ...and solution No sound from the speakers Check that the speaker power is on Verify that all speaker cable connections are correct and secure Check that the speaker s AC adapter is plugged into a properly grounded AC power outlet Speaker volume is too low Adjust the volume control on the speaker If the volume is still too low adjust the volume through the system software See your Windows Multimedia ...

Страница 142: ...int around the mouse ball and tracking mechanism Periodically however you might need to clean the mouse ball Use these steps to clean your mouse 1 Power off your computer and any peripherals attached to it 2 Turn the mouse over Locate the mouse ball cover Mouse ball cover A Mouse Ball Cover 3 Rotate the ball cover counterclockwise and remove the cover ...

Страница 143: ... follows Use tap water or tap water and a mild detergent to clean the mouse ball Use a clean lint free cloth to dry the ball Blow into the mouse socket to remove remaining dust or lint 6 Gently put the ball back into the mouse 7 Fit the ball cover back into the mouse and turn the cover clockwise until it locks in place ...

Страница 144: ...ivalent type recommended by the manufacturer when replacing the battery Lithium acts as a catalyst when exposed to water and causes spontaneous combustion on contact Discard used batteries according to the manufacturer s instructions CAUTION Removing the battery from the system board causes the computer to lose system configuration information Prior to removing the battery run the BIOS Setup utili...

Страница 145: ...pter 4 Observe all safety precautions when removing the cover 3 Locate the battery socket on the system board see the following figure You may have to remove an expansion board to access the battery see Removing Expansion Boards in Chapter 4 Locating the battery socket on the system board A Battery ...

Страница 146: ...ry and discard in accordance with the manufacturer s instructions Removing the battery A Battery B Clip 6 With the positive side of the new battery facing up press the battery into the socket 7 Replace the left side cover see Replacing the Left Side Cover in Chapter 4 8 Connect external peripherals and power cables 9 Run the Setup Utility to reconfigure your system parameters see BIOS Setup Utilit...

Страница 147: ...upport Services NEC CSD Bulletin Board System NEC CSD Technical Support Services See Chapter 6 for more information about the services listed above If you still need help continue with the suggestions that follow Help From Your Company If you are in a company the best source of help may be internal Your company may have designated central support personnel to whom you can go when you have problems...

Страница 148: ...e toll free phone support is limited to the length of the standard warranty For hardware support after the standard warranty get system hardware support for a fee Preinstalled software toll free phone support for 90 days from the time of your first call to the NEC CSD Technical Support Center After the initial 90 days get preinstalled software support for a fee Please have available your system s ...

Страница 149: ...ice see the previous sections in this chapter to determine if you can solve the problem yourself within your company through your dealer or with the help of a technician from the NEC CSD Technical Support Center If your system requires repair service from NEC CSD call 1 800 632 4525 United States and Canada only If you are outside the U S and Canada please contact your local NEC CSD sales provider...

Страница 150: ...6 Getting Services and Support NEC CSD Website NEC CSD FTP Site Email Fax Technical Support Service NEC CSD Bulletin Board System NEC CSD Technical Support Services ...

Страница 151: ... how to access them NEC CSD Website If you have a modem or a network board and Internet access you can access the NEC CSD website You can do this through a commercial online service or through your Internet account The NEC CSD website contains general information about NEC CSD and its products an online store press releases reviews and service and support information Look in the Service and Suppor...

Страница 152: ...us files video drivers printer drivers BIOS updates and Setup Disk files The files are essentially the same files as on the NEC CSD website and the NEC CSD Bulletin Board System To access the NEC CSD FTP site enter the following Internet ftp address through your service ftp neccsdeast com Once in the file menu follow the prompts to choose and download the file s you want Email Fax Technical Suppor...

Страница 153: ...ion about your questions as possible Also if you are sending a fax please include your voice telephone number and your fax number with the question You will receive a response to your questions within one business day NEC CSD Bulletin Board System If you have access to a modem you can use the NEC CSD Bulletin Board System BBS to get the latest information on hardware and software The BBS allows yo...

Страница 154: ...ialing the phone number If you need to check communications settings check that the settings match the following BBS parameters Baud rate select any baud rate that matches your modem Parity none Data bits 8 Stop bits 1 Flow control Xon Xoff select Hardware if using 14 4 Kbps or higher 5 Following the HyperTerminal instructions enter the BBS phone number 916 379 4499 Your business phone system and ...

Страница 155: ... menu 11 At the File menu select F for a list of downloadable files Follow the prompts to select a file for downloading CAUTION Executable files automatically format your diskette when you download files from the BBS Formatting destroys any data on the diskette Before you download files from the BBS check that you do not have information on the diskette that you need After you complete downloading...

Страница 156: ...for the following support System hardware toll free phone support is limited to the length of the standard warranty For hardware support after the standard warranty get system hardware support for a fee Preinstalled software toll free phone support for 90 days from the time of your first call to the NEC CSD Technical Support Center After the initial 90 days get preinstalled software support for a ...

Страница 157: ...ment Making Your Computer Work for You Arrange Your Equipment Adjust Your Chair Adjust Your Input Devices Adjust Your Monitor Vary Your Workday Pre existing Conditions and Psychosocial Factors Checking Your Comfort How Do You Measure Up ...

Страница 158: ...e everywhere More and more people sit at computers for longer periods of time This appendix explains how to set up your computer to fit your physical needs This information is based on ergonomics the science of making the workplace fit the needs of the worker Some nerve tendon and muscle disorders musculoskeletal disorders may be associated with repetitive activities improper work environments and...

Страница 159: ... susceptible to developing these disorders due to preexisting conditions or psychosocial factors see Preexisting Conditions and Psychosocial Factors later in the appendix To reduce your risk of developing these disorders follow the instructions in this appendix If you experience discomfort while working at your computer or afterwards even at night contact a doctor as soon as possible Signs of disc...

Страница 160: ...ou use frequently within easy reach Adjust your workstation setup to the proper height as described in this appendix by lowering the table or stand that holds your computer equipment or raising the seat height of your chair To create more desk space you can put your computer base on the floor Adjust your chair Adjust your keyboard and mouse Adjust your monitor ...

Страница 161: ...ture throughout the day Check the following Keep your body in a relaxed yet upright position The backrest of your chair should support the inward curve of your back Use the entire seat and backrest to support your body Tilt the backrest slightly backwards The angle formed by your thighs and back should be 90 or more ...

Страница 162: ...ootrest when attempts to adjust your chair and workstation fail to keep your feet flat Be sure that you have adequate clearance between the top of your thighs and the underside of your workstation Use armrests or forearm supports to support your forearms If adjustable the armrests or forearm supports should initially be lowered while all the other adjustments discussed in this appendix are made On...

Страница 163: ...ur wrists straight and use your entire arm when moving a mouse Do not grasp the mouse tightly Grasp the mouse lightly and loosely Adjust the keyboard height so that your elbows are near your body and your forearms are parallel to the floor with your forearms resting on either armrests or forearm supports in the manner described previously If you do not have armrests or forearm supports your upper ...

Страница 164: ...your wrists between typing Avoid resting your wrists on sharp edges Type with your wrists straight Instead of twisting your wrists sideways to press hard to reach keys move your whole arm Keep from bending your wrists hands or fingers sideways Press the keys gently do not bang them Keep your shoulders arms hands and fingers relaxed ...

Страница 165: ... Adjust the monitor height so that the top of the screen is at or slightly below eye level Your eyes should look slightly downward when viewing the middle of the screen Position your monitor no closer than 12 inches and no farther away than 28 inches from your eyes The optimal distance is between 14 and 18 inches Rest your eyes periodically by focusing on an object at least 20 feet away Blink ofte...

Страница 166: ...an anti glare filter Clean your monitor regularly Use a lint free non abrasive cloth and a non alcohol neutral non abrasive cleaning solution or glass cleaner to minimize dust Adjust the monitor s brightness and contrast controls to enhance readability Use a document holder placed close to the screen Position whatever you are looking at most of the time the screen or reference material directly in...

Страница 167: ...structions Vary your tasks throughout the day Take frequent short breaks that involve walking standing and stretching During these breaks stretch muscles and joints that were in one position for an extended period of time Relax muscles and joints that were active Use a timer or reminder software to remind you to take breaks ...

Страница 168: ...following hereditary factors vascular disorders obesity nutritional deficiencies e g Vitamin B deficiency endocrine disorders e g diabetes hormonal imbalances connective tissue disorders e g arthritis prior trauma to the hands wrists arms shoulders neck back or legs prior musculoskeletal disorders aging fluid retention due to pregnancy poor physical conditioning and dietary habits and other condit...

Страница 169: ...ally adjust your chair and your posture Checking Your Keyboard Is your keyboard angled so your wrists are straight when you type Is your keyboard directly in front of you Do you avoid resting your wrists on sharp edges Do you press the keys gently and not bang on them Checking Your Mouse Is your mouse at the same height as the keyboard and next to the keyboard Are your wrists straight and your tou...

Страница 170: ...quent short breaks Do you stretch and walk during your breaks Do you vary your tasks during the day Do you have regular eye checkups Do you contact your doctor if you feel any sustained discomfort For more information on workstation setup see the American National Standard for Human Factors Engineering of Visual Display Terminal Workstations ANSI HFS Standard No 100 1988 The Human Factors Society ...

Страница 171: ...ystem Specifications System Processor Memory RAM Cache ROM Calendar Clock Input Output I O Facilities Video Memory Sound System Fax Modem Board Peripherals Dimensions Power Operating Environment Compliance ...

Страница 172: ... MHz 66 MHz FSB 333 MHz 66 MHz FSB 366 MHz 66 MHz FSB 400 MHz 66 MHz FSB 433 MHz 66 MHz FSB Intel Pentium II Processors 350 MHz 100 MHz FSB 400 MHz 100 MHz FSB 450 MHz 100 MHz FSB Intel Pentium III Processors 450 MHz 100 MHz FSB 500 MHz 100 MHz FSB 550 MHz 100 MHz FSB 600 MHz 100 MHz FSB Processor Support 32 bit addressing 64 bit data ...

Страница 173: ...or two industry standard DIMM sockets on system board Total memory support for up to 512 MB of high speed SDRAM in two memory module sockets on system board DIMM speed must match or exceed processor bus speed Memory module type gold plated non parity SDRAM modules Expansion supports 32 MB 64 MB 128 MB and 256 MB 100 MHz non ECC DIMMs Cache Memory pipelined 32 bit addressing 64 bit data Read Only M...

Страница 174: ...nectors Universal Serial Bus USB two USB ports support two USB peripherals directly to the system with appropriate connector each port supports up to 127 daisy chained devices supports 12 megabits Mbs per second Keyboard PS 2 compatible 6 pin connector mini DIN Mouse PS 2 compatible 6 pin connector mini DIN MIDI Joystick supports MIDI and joystick interfaces 15 pin connector Microphone In supports...

Страница 175: ...ort for a total of four IDE devices 40 pin connectors support for PIO mode 3 and mode 4 Diskette drive supports 1 44 MB diskette drive 34 pin connector CD Audio In connector Modem In connector Wake On LAN Four I O bus expansion slots Two dedicated 32 bit PCI slots One shared PCI ISA slot One AGP dedicated slot Video Memory Standard video memory 4 MB Some models may come with up to 16 MB of video m...

Страница 176: ...able Music Synthesizer Plug and Play PCI compatibility Stereo jacks microphone in and line out ACPI compliant Fax Modem Board Systems might come with one of the following fax modems 3Com USR Python V 90 56 Kbps ISA Modem Winmodem V 90 56 Kbps PCI Modem MDM100 Peripherals Systems might come with one or more of the following peripherals Network Board Some models may come with one of the following PC...

Страница 177: ...AGP board Diskette Drive All systems come with a Samsung Diskette Drive SFD 321B 3 1 2 inch 1 44 MB Recording capacity High density mode Unformatted 2 00 1 00 MB Formatted 1440 KB 512B 18 Sec 720 KB 256B 18 Sec Normal density mode Unformatted 1 00 0 50 MB Formatted 640 KB 256B 16 Sec 20 KB 128B 16 Sec Data transfer rate High density mode 500 250 Kbit sec Normal density mode 250 125 Kbit sec Disk s...

Страница 178: ...DMA 20 GB Ultra DMA CD ROM Drive CD ROM drive types are subject to change One of the following CD ROM drives comes with the system Lite On LTN 301 32X CD ROM drive NEC CDR 3000A 32X CD ROM drive Lite On LTN 382 40X CD ROM drive when available DVD ROM Drive Some systems may come with one of the following DVD ROM drives Hitachi GD 2500 4X DVD ROM drive Hitachi 6X DVD ROM drive when available ...

Страница 179: ... models may come with an Iomega Zip 100 ATA Drive Removable Zip disk capacity 100 MB formatted Sustained data transfer rate up to 11 2 Mbits sec Burst transfer rate up to 26 7 Mbits sec Spindle speed 2941 rpm Tape Backup Unit Some models may come with a Seagate CTT8000 ATAPI 8 GB mini cartridge drive 900 Oe 740 Travan cartridge capacity 4 0 GB uncompressed 8 0 GB compressed Effective backup rate 3...

Страница 180: ... Width 7 02 in 180 mm Depth 15 17 in 389 mm Weight starting at 28 lb Keyboard Height 1 6 in 40 6 mm Width 19 0 in 482 6 mm Depth 8 4 in 213 3 mm Weight 3 5 to 4 lb Power Power supply 145 Watt 110 220 Volt switch selectable Power management full power reduction Operating Environment Temperature 50 F to 95 F 10 C to 35 C Relative humidity 20 to 80 ...

Страница 181: ... B UL 1950 3rd edition Canadian C UL C22 2 No 950 95 ICES 003 Issue 2 Revision 1 European CE EMC Directive 89 336 EEC EN55022 1993 Class B EN50082 1 1997 CE LVD Directive 73 23 EEC EN60950 Meets all requirements in European Waste Regulation Ordinance for packaging and scrap ...

Страница 182: ...placing 5 11 socket 5 12 BIOS flash ROM 1 14 BIOS Setup utility Advanced menu 3 11 Exit menu 3 19 Main menu 3 6 3 7 navigation keys 3 7 Security menu 3 18 starting 3 6 uses 3 2 3 7 BIOS updates 3 20 Boards expansion 4 29 fax modem B 6 modem 1 12 network 1 12 4 44 Booting problems 5 3 5 4 5 5 Buttons power 1 3 sleep 1 3 C Cables CD ROM drive 4 37 diskette drive 4 37 4 40 IDE drive 4 37 4 41 PC card...

Страница 183: ... Setup utility 3 5 FLASH utility 3 20 Connectors audio 1 9 external 1 8 fax modem 1 9 keyboard port 1 8 LAN 1 9 line in 1 9 line out 1 9 microphone in 1 9 MIDI joystick 1 9 mouse port 1 8 network 2 2 printer port 1 8 RJ 45 2 2 serial ports 1 8 USB port 1 8 Controls system unit 1 3 Cover removal left side cover 4 5 right side cover 4 9 system unit 4 4 Cover replacement left side cover 4 7 right sid...

Страница 184: ...29 4 31 removing 4 33 Exterior cleaning 2 8 External connectors 1 8 F Fan 1 10 Fax modem board specifications B 6 port 1 9 setup 2 2 Features front 1 2 hardware 1 13 internal 1 10 rear 1 7 security 1 16 software 1 14 FLASH diskette 3 20 Front cover removing 4 45 replacing 4 48 replacing blank plastic panel 4 48 H Hard drive backing up 2 9 specifications B 8 upgrading 4 48 Hardware features 1 13 He...

Страница 185: ... path 4 14 upgrading 4 12 4 13 Microphone in 1 9 Microsoft Internet Explorer browser 1 15 MIDI joystick connector 1 9 Modem board 1 12 Monitor adjusting A 9 A 13 cleaning 2 8 problems 5 5 VGA connector 1 8 Mouse adjusting A 7 A 13 cleaning 5 9 port 1 8 problems 5 6 setup 2 2 Moving preparations 2 9 N NEC Application and Driver CD 1 15 1 16 NEC CSD bulletin board system 6 4 email fax service 6 3 FT...

Страница 186: ... compliance 1 13 Performance problems 5 4 Ports USB 1 4 Power button 1 3 cables 4 37 4 41 cabling 4 41 lamp 1 3 management 1 14 problems 5 2 saving mode 2 5 setup 2 3 Sleep mode 2 6 socket 1 10 specifications B 10 Power mode setting 3 40 Power supply fan 1 10 voltage selector switch 1 10 Preparing the system for shipment 2 9 Primary device 4 38 Printer port 1 8 Problems 5 2 booting 5 3 5 4 5 5 CD ...

Страница 187: ...king tab 1 17 4 6 4 8 password 1 16 Windows 1 17 Security menu BIOS 3 18 Serial ports 1 8 Setup fax modem 2 2 keyboard 2 2 mouse 2 2 network 2 2 power 2 3 shutdown 2 4 voltage selector switch 2 3 Setup utility See BIOS Setup utility Shipping 2 9 preparations 2 9 Slave device 4 38 Sleep button 1 3 Software features 1 14 Sound system specifications B 6 Speakers 1 13 AC adapter 1 13 problems 5 8 spec...

Страница 188: ...8 protecting from damage 2 6 System fan 1 10 System memory 1 14 checking 4 15 System unit cleaning 2 8 T Tape backup unit 1 5 cables 4 37 cabling 4 41 installing 4 51 specifications B 9 Time incorrect 5 3 Troubleshooting 5 2 battery 5 3 booting 5 3 5 4 5 5 CD ROM drive 5 7 common problems 5 2 date incorrect 5 3 disk error 5 3 5 5 diskette drive 5 4 keyboard mouse 5 6 monitor 5 5 password 5 4 perfo...

Страница 189: ...Index 8 W Wake On LAN cabling 4 44 Windows 95 or Windows 98 1 14 Windows NT 1 14 Z Zip drive 1 6 cables 4 37 cabling 4 41 installing 4 51 specifications B 9 ...

Страница 190: ...r there is no guarantee that interference will not occur in a particular installation If this equipment does cause harmful interference to radio or television reception which can be determined by turning the equipment off and on the user is encouraged to try to correct the interference by one or more of the following measures Reorient or relocate the receiving antenna Increase the separation betwe...

Страница 191: ... y a replacement incorrect de la batterie Remplacer uniquement avec une batterie du même type ou d un type recommandé par le constructeur Mettre au rébut les batteries usagées conformément aux instructions du fabricant Battery Disposal Do not place used batteries in your regular trash The nickel cadmium or nickel metal hydride batteries must be collected recycled or disposed of in an environmental...

Страница 192: ...Road Sacramento CA 95828 1037 916 388 0101 declare that the product NEC POWERMATE VT 300 is in conformity with part 15 of the FCC Rules Operation of this product is subject to the following two conditions 1 this device may not cause harmful interference and 2 this device must accept any interference received including interference that may cause undesired operation ...

Отзывы: