background image

English−16

Setup

For box contents, please refer to the printed sheet provided in the box.

The accessories included depends on the location where the monitor was shipped.

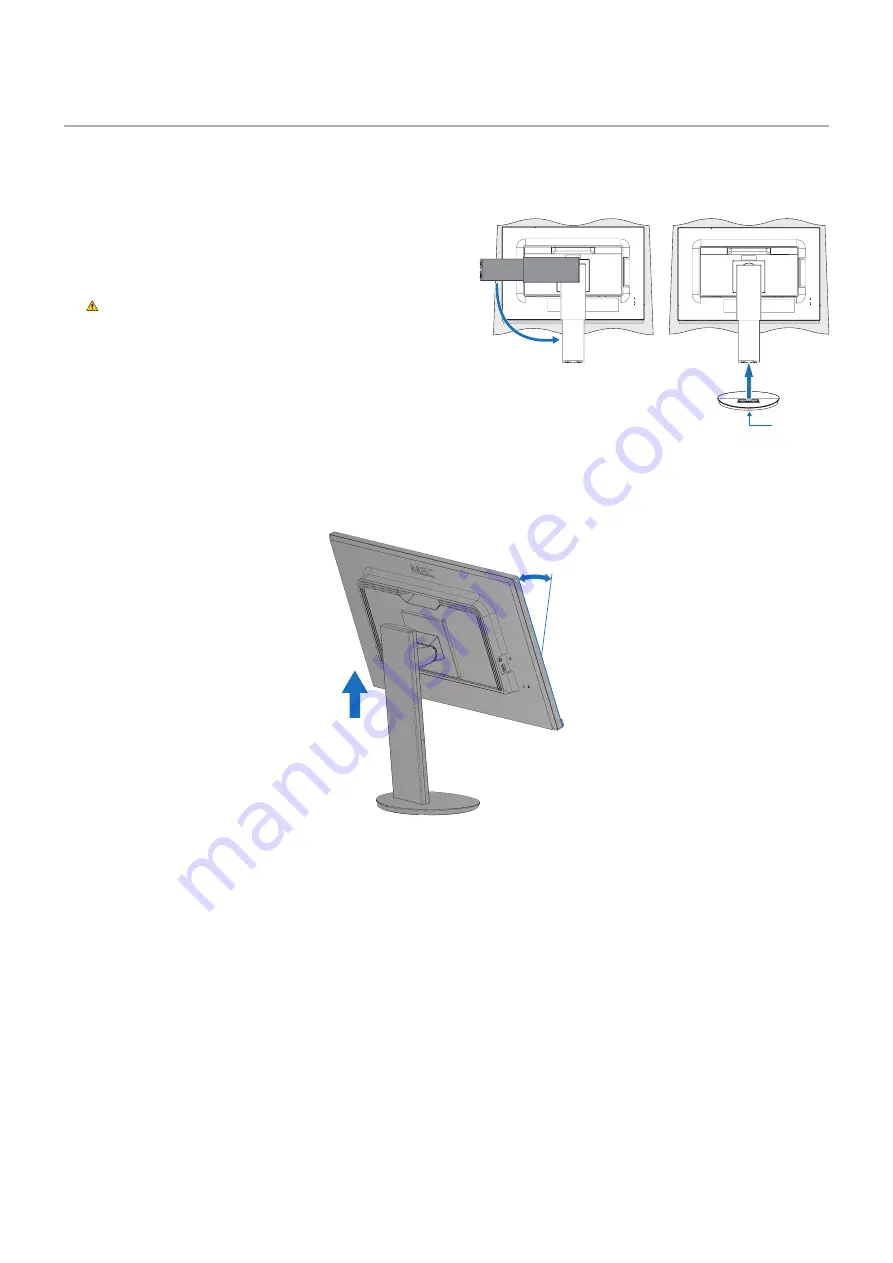
To attach the base to the LCD monitor stand:
1.  Place the monitor face down on a non-abrasive surface 

(

Figure 1).

2.  Please rotate the stand 90 degrees as shown in 

Figure 1.

CAUTION:

Please refer to 

“CAUTION 5”

.

3.  Attach the base to the stand, then tighten the screw at the base’s 

bottom (

Figure 2).

NOTE:

Reverse this procedure if you need to re-pack the 

monitor.

To connect the LCD monitor to your system, follow these instructions:

NOTE:

Make sure to read 

“Important Information” on page 3

 before installation.

1.  Turn off the power to your computer.

2.  Place your hands on each side of the monitor to tilt the panel to a maximum tilt angle and lift up to the highest position 

(

Figure 3).

Maximum Tilt

Figure 3

Figure 2

Screw

Figure 1

90°

Содержание MultiSync EA242F

Страница 1: ...itor MultiSync EA242F MultiSync EA272F MODEL EA242F EA242F BK EA272F EA272F BK The regulations for this monitor applied to one of model names listed above Please find your model name in the label on the rear side of the monitor ...

Страница 2: ...tion Using the OSD On Screen Display Controls 26 Changing the Input 27 Power management function LED indicator patterns 27 Chapter 3 Troubleshooting Screen Image and Video Signal Issues 29 Hardware Issues 30 Image Persistence 32 Human Sensing function 33 Using the Auto Brightness function 34 Chapter 4 Specifications EA242F 36 EA272F 37 Appendix A OSD Controls List ECO TOOLS 39 SCREEN 40 COLOR 42 T...

Страница 3: ...utlet on a circuit different from that to which the receiver is connected Consult the dealer or an experienced radio TV technician for help If necessary the user should contact the dealer or an experienced radio television technician for additional suggestions The user may find the following booklet prepared by the Federal Communications Commission helpful How to Identify and Resolve Radio TV Inte...

Страница 4: ...ted in the United States and or other countries USB Type C and USB C are registered trademarks of USB Implementers Forum NaViSet is a trademark or registered trademark of NEC Display Solutions Ltd in Japan in the United States and other countries All other brands and product names are trademarks or registered trademarks of their respective owners NOTE 1 The contents of this user s manual may not b...

Страница 5: ...on This symbol indicates that the power cord should be unplugged from the power outlet WARNING 1 UNPLUG THE POWER CORD Unplug the power cord if the product malfunctions Should the product emit smoke or strange odors or sounds or if the product has been dropped or the cabinet broken turn off the product s power then unplug the power cord from the power outlet Failure to do so could not only lead to...

Страница 6: ...responds to the AC voltage of the power outlet and has been approved by and complies with the safety standards in the country of purchase 7 Please install the product in accordance with the following information When transporting moving or installing the product please use as many people as necessary to be able to lift the product without causing personal injury or damage to the product Please ref...

Страница 7: ...ALWAYS use furniture that can safely support the product ALWAYS ensure the product is not overhanging the edge of the supporting furniture ALWAYS educate children about the dangers of climbing on furniture to reach the product or its controls ALWAYS route cords and cables connected to your product so they cannot be tripped over pulled or grabbed NEVER place a product in an unstable location NEVER ...

Страница 8: ...rm the distribution system in building installation shall provide the circuit breaker rated 120 240 V 20 A maximum 3 Do not bind the power cord and the USB cable It may trap heat and cause a fire 4 Do not climb on the table where the product is installed Do not install the product on a wheeled table if the wheels on the table have not been properly locked The product may fall causing damage to the...

Страница 9: ...na Japan Voltage 120 230 230 220 100 Please use this power cord under 125 V power supply NOTE This product can only be serviced in the country where it was purchased Image Persistence Image persistence occurs when a residual or ghost image of a previous image remains visible on the screen Unlike CRT monitors LCD monitors image persistence is not permanent but a still image being displayed for a lo...

Страница 10: ...lmologist Get regular eye checkups To avoid eye fatigue adjust the brightness to a moderate setting Place a sheet of white paper next to the LCD screen for luminance reference Do not position the Contrast control to its maximum setting Use the preset Size and Position controls with standard signals Use the preset Color Setting Use non interlaced signals Do not use primary color blue on a dark back...

Страница 11: ...interfaces See page 13 Plug and Play The Microsoft solution with the Windows operating system facilitates setup and installation by allowing the monitor to send its capabilities such as screen size and resolutions supported directly to the computer automatically optimizing display performance USB Hub 3 1 Gen 1 The USB hub adds flexibility to your computing by providing easy access to USB SuperSpee...

Страница 12: ... Stores the current settings and recovers stored settings see page 45 Low Blue Light Low Blue Light function substantially reduces blue light and helps to alleviate eye strain see page 42 Flicker Free Special backlight system reduces flicker for less eyestrain NaViSet Administrator 2 Software Offers an expanded and intuitive graphical interface allowing adjustments of the OSD display settings from...

Страница 13: ... Installation This Chapter Includes Parts Name and Functions on page 12 Connections on page 14 Setup on page 16 Flexible Arm Installation on page 20 ControlSync on page 21 Multiple monitors connection using DisplayPort on page 23 ...

Страница 14: ...USTOMIZE SETTING by touching this key for 3 seconds or more when the OSD menu is closed 4 LEFT RIGHT UP DOWN 2 When the OSD menu is open navigates through the OSD menu When the OSD menu is closed touch one of the following keys to open the menu for the function indicated 1 key BRIGHTNESS key VOLUME 5 ECO RESET When the OSD menu is open this key sends a reset command for the OSD settings When the O...

Страница 15: ...cifications page NOTE Supports DisplayPort signals input when a connected USB C device complies with USB Power Delivery Functions as a USB hub Provides power delivery to a connected device when the function is enabled in the OSD USB FUNCTIONALITY must be set to AUTO or ON 7 USB Upstream Port Type B Connects with external equipment such as a computer Please use this port to control the monitor from...

Страница 16: ...ally adjusting the factory preset timing signal Major supported timings Resolution Vertical Frequency Scan Type Notes H V 640 x 480 60 72 75 Hz p 720 x 400 70 Hz p 720 x 480 60 Hz p 720 x 576 50 Hz p 800 x 600 56 60 72 75 Hz p SVGA 1024 x 768 60 70 75 Hz p XGA 1280 x 720 50 60 Hz p 720p 1280 x 960 60 75 Hz p 1280 x 1024 60 75 Hz p SXGA 1440 x 900 60 Hz p 1680 x 1050 60 Hz p 1920 x 1080 50 60 Hz p ...

Страница 17: ...USB compliance logo Hi Speed USB USB 2 0 cable or charging cable doesn t support video audio transmission When using USB C port for video audio please use computer port with DP Alt Mode compliance logo HDMI Alt Mode or MHL is not supported When using computer battery charging Power delivery please use computer and cable with USB Power Delivery compliance logo It may take a few seconds for the moni...

Страница 18: ...ION Please refer to CAUTION 5 3 Attach the base to the stand then tighten the screw at the base s bottom Figure 2 NOTE Reverse this procedure if you need to re pack the monitor To connect the LCD monitor to your system follow these instructions NOTE Make sure to read Important Information on page 3 before installation 1 Turn off the power to your computer 2 Place your hands on each side of the mon...

Страница 19: ...ified cables with this product so as not to interfere with radio and television reception For DisplayPort HDMI USB and USB C please use a shielded signal cable For mini D Sub 15 pin please use a shielded signal cable with ferrite core Use of other cables and adapters may cause interference with radio and television reception Please refer to CAUTION 3 and CAUTION 9 NOTE Adjustment of the volume con...

Страница 20: ...nstalled the cables Figure 5 and Figure 6 Figure 5 Figure 6 Power Cord DisplayPort Cable Power Cord DisplayPort Cable Security Slot 6 Connect the power cord to a power outlet NOTE Please refer to the Caution section of this manual for proper selection of the AC power cord see page 7 Please make sure that enough power is supplied to the monitor Please refer to Power Supply in the Chapter 4 Specific...

Страница 21: ...rols List section of this User s Manual for a full description of these OSD controls NOTE If you have any problems please refer to the Troubleshooting section of this User s Manual see page 28 Figure 7 Power key Adjustable Stand with Pivot Capability Hold the monitor on each side and adjust the screen position as desired For screen rotation pivot hold the monitor on each side lift to its maximum h...

Страница 22: ...ns on page 35 for details Remove the Monitor Stand for Mounting NOTE Handle with care when removing the monitor stand 1 2 3 Non abrasive surface Mount the Flexible Arm Using four screws that meet the specifications listed below attach the arm to the monitor 100 mm 100 mm Mounting Bracket 2 0 3 2 mm Screw M4 Lock washer and flat washer Unit 6 10 mm Thickness of bracket and washer M4 4 x 12 mm with ...

Страница 23: ...r Controlling all connected sub monitors Synchronized control 1 Connect a ControlSync cable ø 2 5 to the master monitor s ControlSync OUT port and into a sub monitor s ControlSync IN port Up to five monitors can be daisy chained together by connecting the monitors to each other via the ControlSync OUT to IN ports on the monitors 2 Follow the steps for DATA COPY see page 45 When a setting for the m...

Страница 24: ... Yes Yes USB FUNCTIONALITY No Yes USB SELECTION No Yes FACTORY PRESET No Yes MENU TOOLS LANGUAGE Yes Yes OSD TURN OFF Yes Yes OSD LOCK OUT Yes Yes OSD ROTATION No Yes HOT KEY Yes Yes SIGNAL INFORMATION Yes Yes SENSOR INFORMATION Yes Yes KEY GUIDE Yes Yes DATA COPY No No CUSTOMIZE SETTING No Yes MULTI DISPLAY MONITOR NO No No TARGET MONITOR NO No No INDIVIDUAL ADJUST No No ECO INFORMATION CARBON SA...

Страница 25: ... cap from the DisplayPort OUT connector on the monitor Please contact your display adapter supplier for detailed information BIT RATE Maximum number of connectable monitors MST multi stream transport HBR2 Default setting 4 units HDCP contents 4 units HBR 2 units HDCP contents 2 units NOTE The number of monitors that can daisy chain from a single connection to the computer depends on the display ad...

Страница 26: ...splayPort switch menu 5 Select DP VER 1 1 to switch the DisplayPort setting 6 Touch the MENU key to close the OSD menu 7 Turn on the computer NOTE MST multi stream transport and SST single stream transport requires a corresponding display adapter Check to make sure that the display adapter supports MST multi stream transport Please refer to the user instructions for the computer to change the sett...

Страница 27: ...lish 25 English Chapter 2 Basic Operation This Chapter Includes Using the OSD On Screen Display Controls on page 26 Changing the Input on page 27 Power management function LED indicator patterns on page 27 ...

Страница 28: ...rols are under each menu item Tables listing all options available in the OSD menu are located in Appendix A OSD Controls List on page 38 ECO TOOLS Set environment friendly ECO settings SCREEN Set screen settings COLOR Set color settings TOOLS Set volume sound input etc MENU Tools Set language signal information etc MULTI DISPLAY Set monitor no target monitor no and individual adjust ECO INFORMATI...

Страница 29: ...u rays and DVDs television broadcast and streaming media services Power management function LED indicator patterns The power management function is an energy saving feature that automatically reduces the power consumption of the monitor when the keyboard or the mouse has not been used for a fixed period Mode LED indicator Power consumption Condition Maximum operation Blue Approx 118 0 W All functi...

Страница 30: ... Troubleshooting This Chapter Includes Screen Image and Video Signal Issues on page 29 Hardware Issues on page 30 Image Persistence on page 32 Human Sensing function on page 33 Using the Auto Brightness function on page 34 ...

Страница 31: ...rSpeed USB 10Gbps USB 3 1 Gen 2 Selected resolution is not displayed properly If the resolution you set is over or under a range OUT OF RANGE window will appear then warn you Please set supported resolution at the connected computer The image is unstable unfocused or swimming is apparent Make sure the signal cable is fully connected to the monitor and the computer Use the OSD Image Adjust controls...

Страница 32: ...oes not respond Unplug the power cord of the monitor from the AC outlet to turn off and reset the monitor LED on monitor is not lit no blue or amber color can be seen Make sure the power cord is properly connected to the monitor and the wall and make sure the monitor s power switch is on Increase the LED BRIGHTNESS adjustment No Video If no video is present on the screen turn the key off and on ag...

Страница 33: ...connector only Please use the provided ControlSync cables You can use up to five sub monitors via ControlSync USB Type C device does not work Warning Remove USB C cable OSD was shown The monitor detected abnormal voltage or current on USB C port Please remove USB C cable immediately No picture Make sure USB FUNCTIONALITY is set to ON or AUTO Check if the connected USB C device complies with Displa...

Страница 34: ...till image being displayed for a long period of time should be avoided To alleviate image persistence turn off the monitor for as long as the previous image was displayed For example if an image was on the monitor for one hour and a residual image remains the monitor should be turned off for one hour to erase the image NOTE As with all personal display devices NEC DISPLAY SOLUTIONS recommends usin...

Страница 35: ...of time with no human detected has passed You can set the notification screen at SENSOR INFORMATION see page 45 C After displaying the notification if LIGHT is set at HUMAN SENSING the monitor screen gets gradually darker until it gets to 0 brightness If DEEP is set at HUMAN SENSING the monitor enters into power saving mode D When the sensor detects a person coming back the monitor is automaticall...

Страница 36: ...Set a level for the dark room condition This is the minimum brightness level the monitor will lower to when the ambient lighting level is low Make sure the room is at its darkest when setting this level Then use the front Keys to move the cursor up to the BRIGHTNESS setting Choose the desired brightness level Figure 3 Figure 3 When the AUTO BRIGHTNESS function is enabled the Brightness level of th...

Страница 37: ...English 35 English Chapter 4 Specifications This Chapter Includes EA242F on page 36 EA272F on page 37 ...

Страница 38: ...s 296 5 mm 11 7 inches 527 0 mm 20 7 inches USB Hub I F Port Load Current SuperSpeed USB USB 3 1 Gen 1 Upstream 2 USB C Port Downstream 3 Downstream Port 5V 0 9A Max USB C Port 65 W Max AUDIO AUDIO Input STEREO Mini Jack DisplayPort Connector USB C Port DisplayPort Alt Mode HDMI Connector Analog Audio Digital Audio Digital Audio Digital Audio Stereo L R 500mV rms 20 Kohm PCM 2ch 32 44 1 48 kHz 16 ...

Страница 39: ... 336 3 mm 13 2 inches 597 9 mm 23 5 inches USB Hub I F Port Load Current SuperSpeed USB USB 3 1 Gen 1 Upstream 2 USB C Port Downstream 3 Downstream Port 5V 0 9A Max USB C Port 65 W Max AUDIO AUDIO Input STEREO Mini Jack DisplayPort Connector USB C Port DisplayPort Alt Mode HDMI Connector Analog Audio Digital Audio Digital Audio Digital Audio Stereo L R 500mV rms 20 Kohm PCM 2ch 32 44 1 48 kHz 16 2...

Страница 40: ...apter Includes ECO TOOLS on page 39 SCREEN on page 40 COLOR on page 42 TOOLS on page 42 MENU TOOLS on page 43 MULTI DISPLAY on page 45 ECO INFORMATION on page 46 INFORMATION on page 46 OSD Warning on page 46 Default values can be provided on request ...

Страница 41: ... function is disabled when DV MODE is set to DYNAMIC This function is disabled when Color Control System is set to DICOM SIM OFF Does not function ON AMBIENT LIGHT Adjusts the brightness to the optimal setting by detecting the brightness level of the environment 1 BLACK LEVEL Adjusts the brightness level of black when displayed on screen OFF MODE SETTING The Intelligent Power Manager allows the mo...

Страница 42: ... the OSD menu is closed START TIME HUMAN SENSING Adjusts the wait time before entering to low brightness mode or power saving mode when the Human Sensor detects no person DV MODE Dynamic Visual Mode allows you to select from the following settings NOTE This function is disabled when Color Control System is set to L B PROGRAMMABLE or DICOM SIM STANDARD is used for TCO Certificate compliance STANDAR...

Страница 43: ...en FINE value is wrong When FINE value is correct INPUT RESOLUTION Analog input only Selects one of the following pair of resolutions as the input signal priority 1360 x 768 or 1280 x 768 or 1024 x 768 vertical resolution 768 1600 x 900 or 1280 x 960 horizontal frequency 60kHz 1680 x 1050 or 1400 x 1050 vertical resolution 1050 VIDEO LEVEL HDMI input only NORMAL Setting for use with a computer Dis...

Страница 44: ...re NOTE When MOVIE GAMING or PHOTO is selected as the DV MODE NATIVE is selected automatically and cannot be changed TOOLS TOOLS Menu VOLUME Controls the volume of the speakers or headphones To mute the speaker output touch the ECO RESET key SOUND INPUT HDMI DisplayPort USB C inputs only Selects the sound input source VIDEO DETECT Selects the method of video detection when more than one video inpu...

Страница 45: ...ciated with the current display input When connecting a computer to each of the upstream ports the monitor s USB downstream ports can be used by selecting this setting for the current input signal You can change the active display and upstream USB port combination by using the INPUT key see page 12 When using only one upstream port the connected upstream port is used by default NOTE To avoid data ...

Страница 46: ... level in the sub menu that opens ECO MODE Touch the ECO key the ECO MODE sub menu opens You can toggle among 3 selections OFF 1 and 2 OFF The HOT KEY function for the ECO key key and key are disabled SIGNAL INFORMATION If you select ON the monitor displays VIDEO INPUT after changing the input NOTE The compliance marks that are shown when powering on the monitor the first time are not shown when s...

Страница 47: ...VIDUAL ADJUST Sets the monitor number for each monitor Control a sub monitor from the master monitor by INDIVIDUAL ADJUST This function is for controlling a sub monitor from the master monitor It is useful if the sub monitor is located at an unreachable spot Please set the monitor number for each monitor If you set a unique number to each of the monitors you can control a specific monitor If you s...

Страница 48: ... Euro You can adjust currency setting to Euro icon from US Dollar by touching the or key in CURRENCY SETTING item 4 Select CURRENCY CONVERT SETTING by touching the or key 5 Adjust CURRENCY CONVERT SETTING by touching the or key This initial Euro setting is based on the OECD data for Germany 2007 Edition Please check the receipt of electricity prices for France or OECD data for France The French va...

Страница 49: ... NEC DISPLAY SOLUTIONS is strongly committed to environmental protection and sees recycling as one of the company s top priorities in trying to minimize the burden placed on the environment We are engaged in developing environmentally friendly products and always strive to help define and comply with the latest independent standards from agencies such as ISO International Organisation for Standard...

Страница 50: ...m global index html Global For Energy Saving information Default setting USB FUNCTIONALITY Off For ErP requirement Setting Default setting USB FUNCTIONALITY Off Power consumption 0 5 W or less Time for power management function Approx 1 min For ErP Network standby requirement Setting Default setting USB FUNCTIONALITY Off Power consumption 0 5 W or less with 1 port activating 3 0 W or less with all...

Отзывы: