NEC Express5800/AT101a Скачать руководство пользователя страница 46

3-6  

Setting Up Your Tape Blade


4. 

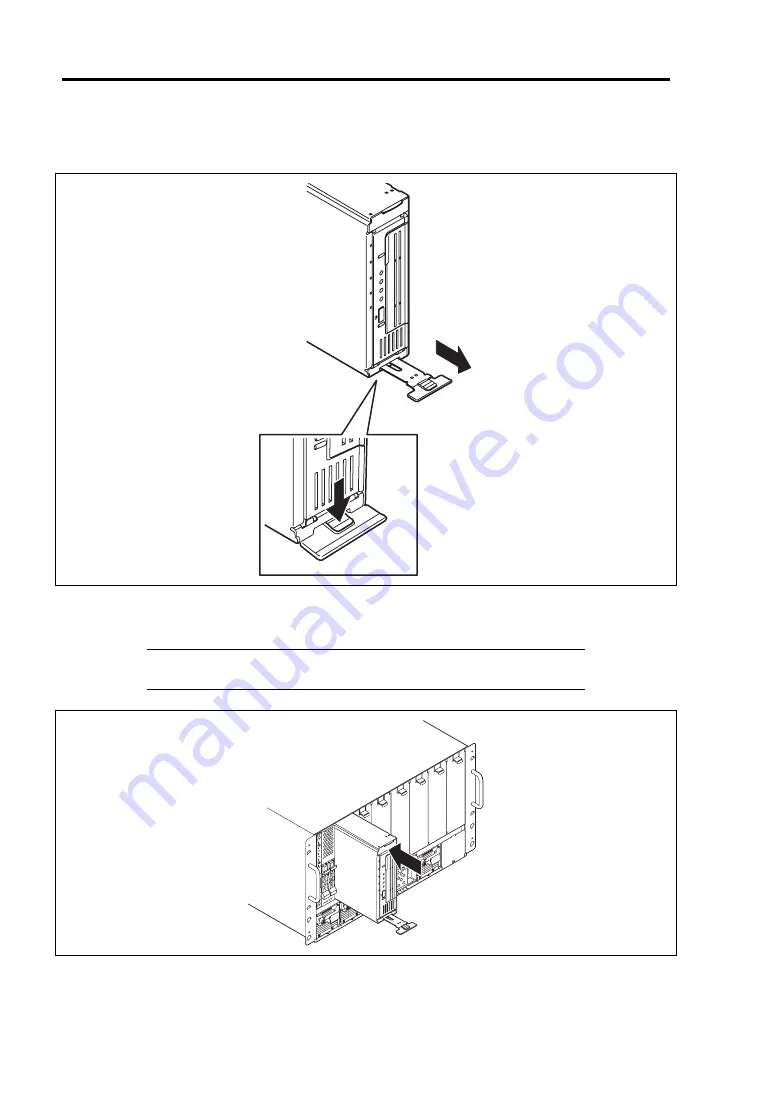
While pushing the eject button on the lower part of Tape Blade, pull the eject lever toward 
you. 


5. 

Insert the end of Tape Blade into the guide rails at top and bottom of the Blade Enclosure, 
then push the Tape Blade slowly and carefully into the Blade Enclosure. 

IMPORTANT:

 Do not press the cartridge door. Otherwise, the 

cartridge door might be broken. 


6. 

Push the eject lever in the Tape Blade firmly. 

Содержание Express5800/AT101a

Страница 1: ...NEC Express5800 Series N8404 002 Tape Blade AT101a User s Guide 1st Edition 11 2010 856 128149 111 A ...

Страница 2: ... Warranty Statement accompanying each product However actual performance of each such product is dependent upon factors such as system configuration customer data and operator control Since implementation by customers of each product may vary the suitability of specific product configurations and applications must be determined by the customer and is not warranted by NEC To allow for design and sp...

Страница 3: ...ates the presence of a hazard that may cause minor personal injury including burns or property damage if the instruction is ignored Precautions and notices against hazards are presented with one of the following three symbols The individual symbols are defined as follows This symbol indicates the presence of a hazard if the instruction is ignored An image in the symbol illustrates the hazard type ...

Страница 4: ...herwise an electric shock or fire may be caused Keep away from water or liquid Otherwise an electric shock or fire may be caused Keep away from fire Otherwise an ignition may be caused Do not touch the Tape Blade with wet hand Otherwise an electric shock may be caused Do not touch any component other than specified Otherwise an electric shock or personal injury such as burns may be caused Indicate...

Страница 5: ...en the equipment is operated in a commercial environment This equipment generates uses and can radiate radio frequency energy and if not installed and used in accordance with the instruction manual may cause harmful interference to radio communications Operation of this equipment in a residential area is likely to cause harmful interference in which case the user will be required to correct the in...

Страница 6: ...ndows Server 2003 Enterprise x64 Edition operating system Windows Server 2003 stands for Microsoft Windows Server 2003 R2 Standard Edition operating system and Microsoft Windows Server 2003 R2 Enterprise Edition operating system or Microsoft Windows Server 2003 Standard Edition operating system and Microsoft Windows Server 2003 Enterprise Edition operating system Windows XP x64 Edition stands for ...

Страница 7: ...00 SIGMABLADE Connecting the Tape Blade with the CPU blade can expand I O capabilities with the LTO and two mezzanine cards Read this User s Guide thoroughly to fully understand handling of the Tape Blade and appreciate its functions to the maximum extent ...

Страница 8: ...scription includes information necessary to use the Tape Blade such as names and functions of its components Chapter 3 Setting Up Your Tape Blade tells you how to check MAC address and procedure to install the Tape Blade in Blade Enclosure Chapter 4 Configuring Your Tape Blade tells you how to configure the SAS controller installed in the Tape Blade Chapter 5 Installing the Operating System descri...

Страница 9: ...ything and that individual components are not damaged If you find any component missing or damaged contact your service representative Store the provided accessories in a designated place for your convenience You will need them to install an optional device or troubleshoot the Tape Blade as well as to set it up Make a backup copy of each provided floppy disk if any Store the original disk as the m...

Страница 10: ... 1 10 Data Cartridge Storage 1 10 Defining Backup and Recovery from Accident Sequences 1 10 Transfer to Third Party 1 11 Disposal and Consumables 1 12 Product Life 1 13 User Support 1 13 Chapter 2 General Description 2 1 Overview 2 2 Standard Features 2 3 Names and Functions of Components 2 4 Front View 2 4 Internal View 2 5 External View 2 6 Data Cartridge 2 7 Lamp Indications 2 9 Using Your Tape...

Страница 11: ...Setting for Solving Problems 5 7 Network Monitor 5 7 Updating the System 5 10 Making Backup Copies of System Information 5 10 Chapter 6 Installing and Using Utilities 6 1 Installing the Tape Device Driver 6 2 For Windows Server 2003 6 2 Chapter 7 Maintenance 7 1 Cleaning 7 2 Cleaning the Read Write Head 7 2 Cleaning the Tape Blade 7 2 Making Backup Copies 7 3 System Diagnostics 7 4 Test Items 7 4 ...

Страница 12: ... 9 1 Safety Notes 9 2 Anti static Measures 9 3 Confirmation after Installation Removal 9 4 Preparation for Installation 9 5 Installation Removal Procedure 9 6 Mezzanine Card 9 6 Setting the Data Cartridge 9 11 Ejecting the Data Cartridge 9 13 Reading Writing Data 9 14 Appendix A Specifications A 1 ...

Страница 13: ...Chapter 1 Notes on Using Your Tape Blade This chapter includes information necessary for proper and safe operation of the Tape Blade ...

Страница 14: ...this instruction may cause an electric shock or fire as well as malfunctions of the Tape Blade Do not remove the battery Your Tape Blade contains the lithium battery Do not remove the battery Danger of explosion if the battery is incorrectly replaced Placing the battery close to a fire or in the water may cause an explosion When the Tape Blade does not operate appropriately due to the dead batteri...

Страница 15: ...t removed you may be electrically shocked CAUTION Keep water or foreign matter away from the CPU blade and Tape Blade Do not let any form of liquid water etc or foreign matter e g pins or paper clips enter the CPU blade and Tape Blade Failure to follow this warning may cause an electric shock a fire or a failure of the CPU blade and Tape Blade When such things accidentally enter the CPU blade and ...

Страница 16: ... the cartridge load compartment Otherwise the fingers will be caught pinched by the LTO to cause an injury Avoid contact with the CPU blade and Tape Blade during thunderstorms Disconnect the power plug from the outlet when a thunderstorm is approaching If it starts thundering before you disconnect the power plug do not touch any part of the CPU blade and Tape Blade including the cables Failure to ...

Страница 17: ... easily affected by drastic temperature change If the Tape Blade is used after storage or relocation make sure that the Tape Blade is fully adapted to the operating environment Turn on the power of each CPU blade by the use of the POWER switch or the remote power on after the period of 30 seconds or longer has passed from the supply of AC power the POWER lamp of the Tape Blade goes on amber to eve...

Страница 18: ...Make sure to touch the metal frame of the chassis to discharge static electricity from your body before handling the components Do not touch the terminals or parts on the components by a bare hand and place the components directly on the desk Make sure that the options are optional devices for the purchased Tape Blade If an option can be installed or connected to the Tape Blade the option may not ...

Страница 19: ...RM data cartridge can be appended to maximize full capacity of the tape cartridge but the user will be unable to erase or overwrite data on the cartridge WORM data cartridges are clearly indentified their distinctive two tone cartridge color To check whether your backup or archive software application supports the WORM cartridges refer to the manual supplied with the software application DATA ENCR...

Страница 20: ...the empty protective case firmly and store it in a place free of dust and dirt After Use Be sure to put the data cartridge that you used in the protective case and store it in a place free of dust and dirt You can place it horizontally or vertically General Precautions Data cartridges are consumables Do not continue to use any cartridge in which an error occurs and replace it with a new one Do not...

Страница 21: ...n you should change the date if it is used for a long time Estimated life Frequency 260 times Two years under the typical office environment Usage life Five years under the environmental controlled machine room Storage life Five years Above estimation may be shortened by the operating environment conditions temperature humidity dust etc It is recommended to do the followings to manage the service ...

Страница 22: ...For example if cartridge C generates a read error you can use cartridge B to recover the data If cartridge B generates a read error you can use cartridge A to recover the data DATA CARTRIDGE STORAGE Always store data cartridges in a clean location under the specified storage conditions Enabling the write protect feature is recommended when storing data cartridges When storing data cartridges for a...

Страница 23: ... of all backed up data through your backup software before transferring or selling the unit For details about how to perform this operation refer to your backup software documentation NEC does not accept responsibility for information leaks to third parties Provided Software To transfer or sell any software application that comes with the Tape Blade to a third party the following requirements must...

Страница 24: ...mited period of time and require replacement e g lithium or Li Ion battery For stable operation of the Tape Blade NEC recommends you replace these components on a regular basis Consult with your service representative for replacement or the product lives WARNING Do not remove the battery The Tape Blade contains the lithium battery Do not remove the battery Placing the battery close to a fire or in...

Страница 25: ...nd if your problem fits the description If it does take the recommended measure for it 3 Check if the software required for operation of the Tape Blade is properly installed If the Tape Blade still appears to fail after you have taken the above actions consult with your service representative immediately Take notes on lamp indications of the Tape Blade and alarm indications on the display unit bef...

Страница 26: ...s adjustment is important to prevent the screen from reflecting bright lights and to make the display contents easy to see You will not be able to keep good working posture and you will feel more tired than you should if you operate a display unit without adjusting horizontal and vertical angles Adjustment of Screen Brightness and Contrast The display unit has brightness and contrast adjustment fu...

Страница 27: ...apter 2 General Description This chapter provides information that you should be familiar with before using the Tape Blade It includes names and functions of the components and features of the Tape Blade ...

Страница 28: ...hat share common resources such as cabling power supplies and cooling fans This high density technology reduces the installation space lowers a total cost of ownership and offers increased computing density while ensuring both maximum scalability and ease of management The Tape Blade does not require any power cord and cables to connect with the CPU blade In addition the Tape Blade can contain opt...

Страница 29: ... data uncompressed High reliability Temperature detection Error notification Internal voltage monitoring feature Expandability Management Utilities Equipped with option slot that makes up to two additional slot option cards available Two network ports NEC ESMPRO Monitoring of system status through EM card Maintenance Features Off line Maintenance Utility ...

Страница 30: ...later for the indications and meanings of the lamp 4 LAN1 Link Access lamp green The lamp lights when LAN port 1 is connected to the network The lamp flashes when data is being transmitted 5 LAN2 Link Access lamp green The lamp lights when LAN port 2 is connected to the network The lamp flashes when data is being transmitted 6 ID lamp blue The lamp is intended to identify the Tape Blade in the sys...

Страница 31: ...m battery inserted under the SAS controller 4 Type I mezzanine slot Slot to install mezzanine card for blade 5 Type II mezzanine slot Slot to install mezzanine card for blade 6 MP connector Used to connect with the midplane in Blade Enclosure 7 MAC address label 2 1 7 6 5 4 3 ...

Страница 32: ...2 6 General Description External View 1 Top cover 2 Slide tag 3 Eject lever 1 2 3 ...

Страница 33: ...sier identification as shown below Precautions on Entry to Label To represent the data contained in the data cartridge use a label which can be easily replaced and no adhesion is left To change the label indication do not erase it with an eraser but peel the old label and paste a new one The INDEX labels are provided with the data cartridge Pasting the label in the position specified in the previo...

Страница 34: ...by setting the write protect notch To protect the data from being erased set the write protect notch as shown in the figure below Although position of the write protect is all the same for tape cartridges the notch is varied occasionally Refer to a User s Guide of your data cartridge for details ...

Страница 35: ...lade includes five lamps POWER lamp The POWER lamp lights green while the power of the Tape Blade is on The lamp lights amber when the Tape Blade is powered off but the power is supplied from the power supply unit in Blade Enclosure The lamp is off if the power is not supplied to the Tape Blade POWER lamp STATUS lamp ID lamp LAN2 Link Access lamp LAN1 Link Access lamp ...

Страница 36: ...Blade does not support EXPRESSSCOPE Engine BMC You cannot view the error log through NEC ESMPRO Manager STATUS lamp indications STATUS lamp Status Color Description Action On Green The Tape Blade is operating normally Off The power is turned off Turn on the power On Red BMC is being initialized 1 Wait until the lamp goes off 2 If the lamp still goes on check installation of the Tape Blade Flash Re...

Страница 37: ...the switch module installed in the Blade Enclosure SIGMABLADE To check connection status of LAN port refer to the User s Guide of the EM card and the switch module installed in the Blade Enclosure ID lamp The ID lamp is intended to identify a specific Tape Blade in the system in which several blades are installed Making this lamp being lit can help the maintenance work to identify the faulty devic...

Страница 38: ...g is not required Clean Cartridge amber Flashing The drive must be cleaned Refer to the page 7 2 and clean the drive Unlit No error Tape amber Flashing A tape inserted into the drive may have a defect Use another tape Unlit No error Drive amber Flashing Hardware error is detected in the drive Solid The LTO can be used Unlit The LTO is powered off Ready green Flashing The LTO is used ...

Страница 39: ... seconds or longer has passed from the supply of AC power to CPU blade and Tape Blade The POWER lamps on CPU blade and Tape Blade goes on amber if they are powered on The power on operation within the period of 30 seconds from the supply of AC power to them may not turn on the power of the CPU blade If so turn on the power of the CPU blade by using the POWER switch after making sure that the AC po...

Страница 40: ... the blade device installed in the Blade Enclosure The ID lamp allows you to identify the device subject to maintenance among several devices installed in the Blade Enclosure The ID lamp on Tape Blade can also be made lit blue by proper software commands e g NEC ESMPRO Manager or Web console of Blade Enclosure from the management PC on the network ID lamp ...

Страница 41: ...Chapter 3 Setting Up Your Tape Blade This chapter describes how to set up the Tape Blade appropriate for your system on a step by step basis ...

Страница 42: ...dress When the numeral alphabet of the last digit is even number A C or E The MAC address for LAN port 1 is as described on the label The MAC address for LAN port 2 can be obtained by adding 1 to the described MAC address When the numeral alphabet of the last digit is odd number B D or F The MAC address for LAN port 1 can be obtained by adding 1 to the described MAC address The MAC address for LAN...

Страница 43: ... static electricity from your body before handling the Tape Blade Do not touch the pins leads or circuitry and place the Tape Blade directly on the desk For static notes see Anti static Measures in Chapter 9 Installation Order Install the Tape Blade into the slot adjacent to the target CPU blade See the description below for installation order SIGMABLADE H A pair of a CPU blade and a Tape Blade oc...

Страница 44: ...a CPU blade and a Tape Blade occupies two slots as shown below Slots 1 and 2 slots 3 and 4 slots 5 and 6 or slots 7 and 8 Slot 1 Slot 2 Slot 3 Slot 4 Slot 5 Slot 6 Slot 7 Slot 8 NOTE A Tape Blade may be installed in either of the two slots composing a pair ...

Страница 45: ...ation Order described earlier 2 If the CPU blade has already been installed power off the CPU blade IMPORTANT You cannot install remove Tape Blade with the power of CPU blade being on 3 If a blank cover is installed on the slot on which the Tape Blade is to be installed unlock it by holding the lever on the front face and remove the blank cover IMPORTANT Keep the removed blank cover for future use...

Страница 46: ...ever toward you 5 Insert the end of Tape Blade into the guide rails at top and bottom of the Blade Enclosure then push the Tape Blade slowly and carefully into the Blade Enclosure IMPORTANT Do not press the cartridge door Otherwise the cartridge door might be broken 6 Push the eject lever in the Tape Blade firmly ...

Страница 47: ...ted with the Tape Blade you are going to remove You cannot install or remove the Tape Blade while the CPU blade is being powered on NOTE The power of the Tape Blade is automatically turned off linking with the CPU blade 2 While pushing the eject button on the lower part of Tape Blade pull the eject lever toward you IMPORTANT Be sure to push the eject lever in the Tape Blade ...

Страница 48: ...3 8 Setting Up Your Tape Blade This page is intentionally left blank ...

Страница 49: ...Chapter 4 Configuring Your Tape Blade This chapter describes how to configure the SAS controller installed in the Tape Blade ...

Страница 50: ...onfiguration Utility Install the Driver This section explains how to install SAS driver of Windows 1 Boot the system and log in Administrator 2 Insert the CD ROM labeled N8404 002 Tape Blade AT101a Driver CD into the CD ROM drive and use an appropriate tool such as Explorer to double click win hba_drv update vbs 3 The following message appears Select Yes Driver Setup Do you want to setup the SAS C...

Страница 51: ...different from those in this document In such a case contact your sales agent for details About SAS Configuration Utility SAS Configuration Utility is used in the following case After installing this product when the system cannot be booted from USB DVD ROM drive 5 Start SAS Configuration Utility 6 Select Global Properties 7 Change Support Interrupt setting Hook interrupt the Default to Bypass Int...

Страница 52: ... SAS Configuration Utility 1 If you changed any settings you are prompted to save the changes before you exit At the prompt select the item which you want press Enter key xxxxxxxx xxxxxxxx changes have been made Cancel Exit Save changes then exit this menu Discard changes then exit this menu Exit the Configuration Utility and Reboot 2 At Adapter list menu press ESC key until a message prompts you ...

Страница 53: ... return to the previous menu at any time by pressing Esc key About details of an option move the cursor to the option and press F1 Shift 1 key help is displayed Adapter List menu It is a menu displayed first when SAS Configuration Utility starts Global Properties menu It is a menu displayed to push Alt N key at Adapter List menu Adapter Properties menu It is a menu displayed to push Enter key at A...

Страница 54: ...4 6 Configuring Your Tape Blade This page is intentionally left blank ...

Страница 55: ...Chapter 5 Installing the Operating System Refer to the User s Guide of your CPU Blade for how to install the operating system ...

Страница 56: ...utility that confirms the network features contained in network driver Using PROSet enables the following items Confirm detailed information of the adapter Diagnosis including loop back test packet transmission test and so on Setup of teaming NOTE All of the operation that related to device driver and Intel PROSet must be executed with administrator privileges from the console connected to the CPU...

Страница 57: ...rating System 5 3 SETTING TEAM Refer the CPU Blade User s Guide to setup Teaming and removing Team of onboard network adapter or optional network board SETTING WOL The Tape Blade does not support WOL Wake On Lan feature ...

Страница 58: ...g to Disabled 5 Click OK 6 Reboot the system IMPORTANT If Receive Side Scaling is not displayed on Windows Server 2003 64 bit x64 Edition Windows Server 2003 32 bit x86 Edition uninstall Intel PROSet according to Uninstall Intel PROSet Set the Receive Side Scaling in above procedure When re install Intel PROSet refer to PROSet Uninstallation of Intel PROSet 1 On the CPU Blade open the Control Pane...

Страница 59: ...he CPUs NetDMA Normally the memory transfer operation of network data is performed by the CPU Using DMA Direct Memory Access of the network adapter for that process can reduce CPU utilization IMPORTANT The onboard network adapter and optional network board N8403 017 020 021 022 do not support TCP Chimney Offload feature NOTE Download Microsoft Windows Server 2003 Scalable Networking Pack from the ...

Страница 60: ...e list If you want to restore the system to that before installing SNP uninstall SNP in the following procedure IMPORTANT If any other modules e g Update media Service Pack and or security patch is applied after SNP has been installed first uninstall such modules before uninstalling SNP 1 Log in the system in account with the administrator authority 2 Run Add or Remove Programs 3 Select the follow...

Страница 61: ...dows Server 2008 R2 Windows Server 2008 does not provide Network Monitor To use Network Monitor on Windows Server 2008 R2 Windows Server 2008 install Network Monitor according to the steps below 1 Download Microsoft Network Monitor from the following web site http support microsoft com kb 955998 en us 2 Run the downloaded file to start the installer Follow the on screen instructions to install Net...

Страница 62: ...tworks window select a network you want to capture a trace 4 On the Capture menu click Start to start capturing a network trace 5 On the Capture menu click Stop to stop capturing a network trace 6 On the File menu select Save As The Save As window appears Select All captured frames from Frame selection and enter the names of a folder and a file appropriately The following folder is specified by th...

Страница 63: ...ils The Management and Monitoring Tools dialog appears 5 Click to select the Network Monitor Tools check box and then click OK 6 The Windows Components Wizard dialog box appears again so click Next 7 If the setup asks to install the disk insert the OS CD ROM into optical disk drive and click OK NOTE You will be prompted to insert a disk labeled Service Pack 1 CD ROM However if you are using Window...

Страница 64: ...iguration installed removed internal option devices Recovered the system using recovery process Restored the system using the backup tool MAKING BACKUP COPIES OF SYSTEM INFORMATION It is recommended to make a backup copy of the system information using the NEC EXPRESSBUILDER DVD that comes with your CPU Blade after completing the system setup With the backup data you will be able to restore the co...

Страница 65: ...Chapter 6 Installing and Using Utilities Refer to the User s Guide of the CPU Blade contained in the NEC EXPRESSBUILDER DVD for information about utilities provided for the CPU Blade and Tape Blade ...

Страница 66: ... The System Properties dialog box appears 2 Click the Hardware tab and then click Device Manager The Device Manager dialog box appears 3 Confirm that HP Ultrium 4 Sequential Device is displayed in Other devices Double click HP Ultrium 4 Sequential Device The HP Ultrium 4 Sequential Device Properties dialog box appears 4 Click the Driver tab and then click Update Driver The Start Upgrade Device Dri...

Страница 67: ...Chapter 7 Maintenance This chapter describes the daily maintenance of the system and precautions when relocating or storing the Tape Blade ...

Страница 68: ...d After cleaning the cleaning cartridge is automatically ejected IMPORTANT Use our Cleaning cartridge to clean the Tape Blade If you use a cleaner of the other manufacturer a machine failure may be caused LTO Cleaning Cartridge can be used for around 50 times Perform the cleaning operation when the cleaning is required by the display Cleaning the Tape Blade If the Tape Blade looks dirty gently wip...

Страница 69: ...de on a regular basis For backup storage devices suitable for the Tape Blade and backup tools consult with your service representative When you have changed the hardware configuration or BIOS configuration select System Information Management and then Save of the Off line Maintenance Utility to make a backup copy of the system information ...

Страница 70: ...n executing the System Diagnostics make sure to disconnect the target CPU blade from the network Executing the System Diagnostics with the CPU blade being connected to the network the network may be influenced NOTE On checking the hard disk drive no data is written into the disk Startup and Exit of System Diagnostics There are two ways to diagnose the system to use the local console keyboard conne...

Страница 71: ...al injury or property damage See pages 1 2 to 1 4 for details Never attempt to lift the unit with three or less persons Do not install the unit in any place other than specified Do not connect disconnect any interface cable with the power cord of the unit plugged to a power source IMPORTANT If the Tape Blade needs to be relocated stored due to a change in the floor layout to a great extent contact...

Страница 72: ... and carry the Blade Enclosure with four or more persons 7 Protect the Blade Enclosure with the shock absorbing materials and pack it securely Relocating Storing a Device in Blade Enclosure Remove the device from Blade Enclosure according to Chapters 3 and 9 Protect the device with the shock absorbing materials and pack it securely IMPORTANT The Tape Blade or internal option device may be dewed if...

Страница 73: ...Chapter 8 Troubleshooting If your CPU blade and Tape Blade do not operate as expected read this chapter before assuming a failure ...

Страница 74: ... card during the system operation Check whether any alert is reported on NEC ESMPRO Manager and Web console of EM card Example NOTE To monitor the occurrence of fault by NEC ESMPRO the EM card in Blade Enclosure must be associated with NEC ESMPRO For more information refer to the User s Guide of EM card ...

Страница 75: ...e Tape Blade and the Blade Enclosure include lamps to indicate the device status by a variety of colors and display patterns See Chapter 2 for locations of lamps and their indications Error Messages on Virtual LCD The virtual LCD displays the error occurred during operation or DC OFF AC power is being on The following table lists indications on virtual LCD descriptions and actions to take The Web ...

Страница 76: ...ke sure that the sufficient number of fans are installed in correct locations Check if the fans and Tape Blade are installed in correct locations Check if the ambient temperature of installation location satisfies the operation guarantee condition If the same error persists contact your service representative AmbientTempAlm02 A low temperature error was detected in Tape Blade Check if the ambient ...

Страница 77: ...ror persists contact your service representative Cooling Error In the Blade Enclosure the number of fans installed is insufficient or the installed fan is faulty Thus the CPU blade failed to power on due to insufficient cooling power AmbientTempAlm07 A high temperature warning was detected in Tape Blade AmbientTempAlm00 A low temperature warning was detected in Tape Blade Check if fans in Blade En...

Страница 78: ...is correct For example make sure that an LTO1 cartridge is not being used in an LTO4 drive Make sure that a cartridge for which operation is guaranteed such as an N or EF model number cartridge is being used Make sure that the used cartridge s life has not ended Make sure that no error has occurred for the cartridge being used If the drive was brought in from an environment where the temperature a...

Страница 79: ...status but did not reach actual cartridge ejection Execute the software ejection and then press the EJECT button to eject the cartridge The cleaning cartridge cannot be ejected If a cleaning cartridge that has already been used up was inserted or cleaning did not finish normally because the cartridge was used up during cleaning the cleaning cartridge might not be ejected to notify you of this Pres...

Страница 80: ... ON If the power cord is connect to the UPS make sure that the power of the UPS is set to ON and proper power is output from the UPS Refer to the manual shipped with the UPS for details Make sure that the CPU blade connected with Tape Blade is installed correctly The CPU blade BIOS SETUP utility allows you to set the feature for power link with the UPS Menus to check AC LINK in Server menu Does th...

Страница 81: ...casionally takes time from power on operation to CPU blade to turning on the Tape Blade When power on operation for CPU blade is executed the CPU blade notifies the EM card of it and wait for permission Upon getting permission the power on for Tape Blade is executed If the EM card is processing other task and it is busy permission for power on is delayed The remote power on through network does no...

Страница 82: ...ual that comes with the board for details to make correct settings Fail to start OS Is the BIOS configuration of CPU blade correct Run the BIOS SETUP utility of CPU blade to change the boot order Menu to check Boot Is a floppy disk contained in the floppy disk drive Take out the floppy disk and restart the CPU blade Is the OS broken Use recovery process to recover the system Refer to the documenta...

Страница 83: ... blade Make sure that the protocol such as TCP IP and services are properly specified Is the transfer speed correct The internal LAN controller of Tape Blade works on network with transfer rate of 1Gps Open the network property dialog box in control panel to specify the Link Speed value the same as the value specified for HUB ...

Страница 84: ...erver 2008 R2 is installed Event ID 134 Source Microsoft Windows Time Service Level Warning Description NtpClient was unable to set a manual peer to use as a time source because of DNS resolution error on NtpClient will try again in 3473457 minutes and double the reattempt interval thereafter The error was No such host is known 0x80072AF9 This event does not affect system operation Ignore this mes...

Страница 85: ...anager Level Warning Description The service ShellHWDetection may not have unregistered for device event notifications before it was stopped Event ID 7000 Source Service Control Manager Level Error Description The Parallel port driver service failed to start due to the following error The service cannot be started either because it is disabled or because it has no enabled devices associated with i...

Страница 86: ...e LocalSystem account This account is privileged and the provider may cause a security violation if it does not correctly impersonate user requests These events do not affect system operation Ignore these messages There are some cases that an event log is registered as follows at the start of Windows Server 2008 64 bit x64 Edition Windows Server 2008 32 bit x86 Edition Event ID 11 Source iANSMinip...

Страница 87: ...ocedure for license authentication Refer to Windows Server 2008 Installation Supplement Guide for details Event ID 1534 Source Microsoft Windows User Profiles Service Level Warning Description Profile notification of event Create for component 56EA1054 1959 467f BE3B A2A787C4B6EA failed error code is 2147023591 This event does not affect system operation Ignore these messages There are some cases ...

Страница 88: ...ing the LocalSystem account This account is privileged and the provider may cause a security violation if it does not correctly impersonate user requests Ensure that provider has been reviewed for security behavior and update the HostingModel property of the provider registration to an account with the least privileges possible for the required functionality It is not a problem in operating the sy...

Страница 89: ...r link down Intel R PRO 1000 Event ID 13 Source iANSMiniport Level Warning Description Intel R PRO 1000 has been deactivated from the team Event ID 16 Source iANSMiniport Level Warning Description Team Name The last adapter has lost link Team network connection has been lost Event ID 22 Source iANSMiniport Level Warning Description Primary Adapter does not sense any Probes Intel R PRO 1000 Possibl...

Страница 90: ... If a SMBIOS Type 38 record was detected the Dump Data field of the event contains a binary representation of the record If you use Hardware Management which is provided by Windows Server 2003 R2 above shown event log will be registered For more details refer to Enabling Microsoft Windows Server 2003 R2 Hardware Management on the following site NEC Express5800 Web Site http www nec co jp express d...

Страница 91: ...le the optional ROM deployment that will not be used from the system BIOS of the device The following SAS controller message is displayed in POST Adapter configuration may have changed Reconfiguration is suggested When this product is installed to the device on which the SAS controller is mounted or two or more sets of this product are installed on the device the message above may be displayed in ...

Страница 92: ...d proceed Restarting the system may result in collecting improper data MAINTENANCE TOOLS The Maintenance Tools is used for preventive maintenance error analysis of this product Refer to the User s Guide of CPU Blade for how to use Maintenance Tools Function of Maintenance Tools The following functions can be executed for the Tape Blade in the Maintenance Tools Test and diagnostics Execute various ...

Страница 93: ...tional devices or the Tape Blade or malfunctions of the system resulted from installation by the user NEC recommends you ask your service representative for install or removing any optional devices Make sure to use only optional devices and cables authorized by NEC Repair of the system due to malfunctions failures or damage resulted from installing such devices or cables will be charged When you m...

Страница 94: ...epair or alter the Tape Blade Do not remove the lithium or Li Ion battery Do not handle the Tape Blade with the power cord being plugged to a power source CAUTION Observe the following instructions to use the Tape Blade safely Failure to follow these instructions may cause a fire personal injury or property damage See pages 1 2 to 1 4 for details Make sure to complete device installation Do not in...

Страница 95: ...a suitable work space Work with the Tape Blade on the anti static or concrete floor When you work with the Tape Blade on a carpet where static electricity is likely to be generated make sure take anti static measures beforehand Use a work table Place the Tape Blade on an anti static mat to work with it Cloth Do not wear a wool or synthetic cloth to work with the Tape Blade Wear anti static shoes t...

Страница 96: ...n the Tape Blade Confirm that particularly conductive parts such as screws are not left in the Tape Blade Turning on the power with a conductive part on the mother board or cable terminal causes the Tape Blade to malfunction Confirming the cooling effect in the Tape Blade Confirm that the ventilating holes are not covered with an internally connected cable Insufficient cooling effect raises the in...

Страница 97: ...grading Your Tape Blade 9 5 PREPARATION FOR INSTALLATION To install or remove an optional device in the Tape Blade you should first remove the Tape Blade from the Blade Enclosure See Chapter 3 for details ...

Страница 98: ...re handling the mezzanine card Do not touch the terminals and parts on the mezzanine card by a bare hand and place the cards directly on the desk For static notes see the section Anti static Measures described earlier A combination of boards that can be installed in the Blade Enclosure is under certain restrictions Contact your service representative for details NOTE Some optional mezzanine cards ...

Страница 99: ... in either of connectors Type I and Type II The Type II mezzanine card can be installed in Type II connector only To install the Type I mezzanine card start installation from the bottom slot for Type I NOTE Before installing mezzanine card make sure that the shape of mezzanine card slot matches with that of connector of the option card 1 After the shutdown processing for the CPU blade in the slot ...

Страница 100: ...e mezzanine card slot and insert the mezzanine card straight into the slot IMPORTANT Do not make your body contact with the terminals on the board Some malfunction may occur if the board is installed with dirt and or oil adhering to the terminals Insert the mezzanine card straight into the connector The terminal or connector may be damaged if it is inclined If the board cannot be installed securel...

Страница 101: ...messages associated with the board do not appear on the POST screen Refer to the User s Guide of CPU Blade for details of POST error messages 14 Run BIOS SETUP of CPU blade and select Advanced Reset Configuration Data on the Advanced menu and set to Yes This is required to update the hardware update information Refer to the User s Guide of CPU Blade for details 15 Run the BIOS configuration utilit...

Страница 102: ...rews fixing the top cover 5 Firmly hold the cover move it slightly toward the rear of the blade then lift the cover to remove it from the Tape Blade IMPORTANT Handle the cover carefully so as not to make it contact with any electronic components on the Tape Blade 6 Remove the three screws from the mezzanine card 7 Hold both ends of the mezzanine card and pull out the card from the slot Lift the ca...

Страница 103: ...ile setting the data cartridge do not turn off the server This may cause a malfunction or the damage data 1 Ensure that the Tape Blade is powered on Ensure that the write protect switch is properly set 2 Open the cartridge door on the front of the Tape Blade 3 Grasp the cartridge so that the write protect switch faces you ...

Страница 104: ... the cartridge It then glows steadily IMPORTANT Do not change the position for the write protect switch during the drive is installed into the drive It may cause the error if the position is changed with installation NOTE When the data cartridge is need to be re installed at the eject position once the cartridge is removed from the drive then once again re installation will be done ...

Страница 105: ...tape but does not eject a cartridge In this case make sure that the LTO is ready to eject a cartridge the status LED blinks twice and repeats that cycle Then press the Eject button to eject a cartridge 3 After the cartridge partially ejects grasp the cartridge and remove it IMPORTANT When the status LED is blinking do not turn off the server This may cause a malfunction or damage data To avoid a m...

Страница 106: ...9 14 Upgrading Your Tape Blade Reading Writing Data To read write the data from to the data cartridge see the instruction manual provided with the backup application ...

Страница 107: ...ce the actual required backup time depends on the total system environment Interface SAS 3 Gbps Type 1 2 max when Mezzanine Card Type 2 is not used Mezzanine card slot Type 2 1 LAN interface 1000Base T 2 External dimensions mm 181 H 516 D 52 W Weight 5 0 kg Max Power supply 12Vdc supplied from the Blade Enclosure Power consumption 12Vdc 120 W Temperature 10 to 35 C Environmental requirements Humid...

Страница 108: ...A 2 Specifications This page is intentionally left blank ...

Отзывы: