background image

Adjustments

Menu Screen

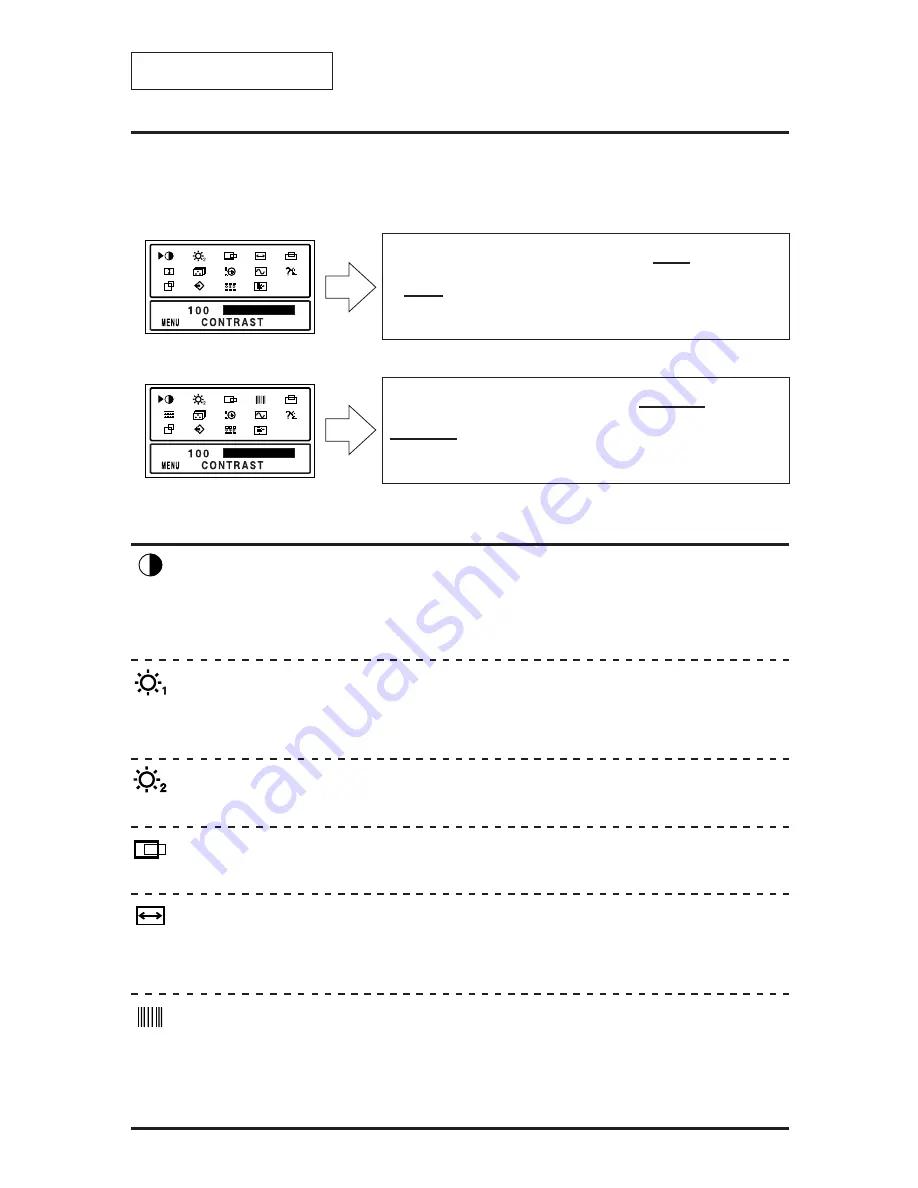
The menu screen is displayed by the MENU key. The adjustment items of this unit are
displayed as icons.
Each icon indicates an adjustment item shown in the figure.

When the resolution is 640 

× 

400 to 832 

× 

624

When the resolution is 1024 

× 

768

The menu screen changes to two different screens according to the screen resolution.

CONTRAST

BACKLIGHT

H. POSITION

V. FINETUNE

V. POSITION

H. FINETUNE

COLOR TEMP VIDEO LEVEL ADJ

DISP. FREQ

LANGUAGE

AUTO SIZE

RECALL

OSD POSITION

PICTURE

CONTRAST

BACKLIGHT

H. POSITION

H. SIZE

V. POSITION

V. SIZE

COLOR TEMP VIDEO LEVEL ADJ

DISP. FREQ

LANGUAGE

AUTO SIZE

RECALL

OSD POSITION

PICTURE

CONTRAST

Adjust the screen contrast. (Standard level = 100)
Press the MENU key to register the setting value.
Direct operation: Even if the menu screen does not appear, the contrast can be adjusted by
pressing the “+” or “

” keys.

V. FINETUNE


*Adjustment items when the resolution is 1024 

× 

768.

When the 1024 

× 

768 screen resolution is used, vertical stripes may be observed depending

on the desktop patterns or applications. If this occurs, perform the following adjustments.
Display a screen which has vertical stripes and align the right side of the screen by the
horizontal position adjustment, then change to the vertical stripe adjustment (V. FINETUNE)
and perform the adjustment using the “+” or “

” key.

BRIGHTNESS (Black level)

Adjust the brightness (low gradation part: black level). (Standard level = 50)
Direct operation: Even if the menu screen does not appear, the brightness can be adjusted
by pressing the “

v

” or “

u

” keys. Press the MENU key to register the setting value.

H. POSITION

The horizontal position of the image can be adjusted.

H. SIZE


*Adjustment items when the resolution is set from 640 

× 

400 to 832 

× 

624.

The horizontal amplitude of the image can be adjusted.
After aligning the left edge of the image by the horizontal position adjustment, change to the
horizontal size adjustment and perform the adjustment by the “+” or “

” key.

BACKLIGHT

Adjust the brightness of the backlight. (Standard level = 100)

Adjustment Item Screen

I - 13

Содержание 1500M LA-1524HMW

Страница 1: ......

Страница 2: ... the floor only SJT type cord sets may be used The cord set must be selected according to the current rating for your unit Please consult Table A for the selection criteria for power cords used in the United States and Canada The cord set is marked with its Cord Type For European Countries In Europe you must use a cord set which is appropriate for the receptacles in your country The cord set is HA...

Страница 3: ...representative CE Conformity This device complies with the requirements of the EEC directive 89 336 EEC as amended by 92 31 EEC and 93 68 EEC Art 5 with regard to Electromagnetic compatibility and 73 23 EEC as amended by 93 68 EEC Art 13 with regard to Safety I 2 E N G L I S H Required item Relative to Standard Value Relative to those Exceeding Standard Value Remarks EM I 1 4 ESD 2 3 RADIATED RF 1...

Страница 4: ...This equipment generates uses and can radiate radio frequency energy and if not installed and used in accordance with the instructions may cause harmful interference to radio communications However there is no guarantee that interference will not occur in a particular installation If this equipment does cause harmful interference to radio or television reception which can be determined by turning ...

Страница 5: ...ily accessible The inside of the fluorescent tube located within the LCD monitor contains mercury Please follow the bylaws or rules of your local municipality to dispose of this tube property Clean the LCD monitor surface with a lint free non abrasive cloth Avoid using any cleaning solution glass cleaner or tissue paper For optimum performance allow 30 minutes for warm up Avoid displaying fixed pa...

Страница 6: ...en the horizontal and vertical synchronization signals are input separately 3 In the modes from 640 400 to 832 624 However the full screen display may not be possible depending on the timing or the type of computer that is used An automatic size adjustment function is provided The input signal is determined automatically and the adjustments for the H POSITION H SIZE 4 V FINETUNE 5 V POSITION V SIZ...

Страница 7: ...C Hold the audio cord to this hook Security Port Used to connect the Kensington security cable Rear view and Side view Speaker Headphone terminal Commercially available audio stereo headphones or speakers can be connected here Mute key Turns the built in speaker and headphone terminal sound ON and OFF Press once to turn the sound OFF and again to turn the sound back ON Volume key Adjusts the sound...

Страница 8: ...rd is used read the operation manual for that card Connect the Macintosh adapter to the computer video output connector Connect the signal connector to the Macintosh adapter Connect the standard connector to the video input connector on the rear side of the monitor Place the signal cable to the hook on the rear side of the monitor Connect the standard connector to the video output connector of the...

Страница 9: ... terminal of the computer Using Headphones Prepare the headphones commercially available and connect as shown in the illustration below Connect the cable from the headphones Using the Multi media Functions Your personal computer must have a voice input output function Always use the accessory cable provided Using the Speakers Prepare the speaker cable accessory and connect as shown in the illustra...

Страница 10: ... USB device being used to the USB Downstream port of the main unit Computer USB Cord Rear panel Right side panel Left side panel Typical Connections Type A Connector Type B Connector Connecting USB Devices Always use the USB cord that is enclosed with the unit Connect the accessory USB cord Connect the cord from the USB peripheral device Printer Keyboard Mouse I 9 Connect the accessory USB cord ...

Страница 11: ...g regional standards U S A UL Switzerland SEV Canada CSA Britain BASEC BS Germany VDE In other regions for safety please use an AC plug cord that complies with each country s safety regulations Always use the accessory power cord and be sure to connect the ground line Place the monitor where it will be used Use a power source that supplies AC 100 V 240 V at 50 Hz 60 Hz Turn on the power switch of ...

Страница 12: ...irect Screen There are three adjustments contrast and brightness and mute and volume on the direct screen Sound OSD Adjustment item icon The adjustment items are displayed by icons Adjustment level display The adjustment level is indicated by both a numeric value and a bar Adjustment item name Menu Screen When the resolution is set 1024 768 The menu screen displays icons for the adjustment items o...

Страница 13: ... menu operation keys v and u to shift the s mark on the menu screen to the auto size adjustment 3 Use the menu operation key key to select ON Auto size adjustment will start operating 4 If the settings on the screen are satisfactory press the MENU key to record the settings and exit 5 If the settings on the screen are not satisfactory manually re adjust where necessary I 12 ...

Страница 14: ...hen the 1024 768 screen resolution is used vertical stripes may be observed depending on the desktop patterns or applications If this occurs perform the following adjustments Display a screen which has vertical stripes and align the right side of the screen by the horizontal position adjustment then change to the vertical stripe adjustment V FINETUNE and perform the adjustment using the or key BRI...

Страница 15: ...form the following adjustments Display a screen which has horizontal stripes and align the bottom of the screen by the vertical position adjustment then change to the horizontal stripe adjustment H FINETUNE and perform the adjustment using the or key V POSITION The vertical position of the image can be adjusted VIDEO LEVEL ADJ The video input signal level of your computer is adjusted automatically...

Страница 16: ...hen fH or fV exceed the specified range 2 Figure B is displayed when the power save mode is set This figure is only displayed in the off state 3 Figure B is displayed when there is no input signal For example this occurs when the computer is not connected or the computer power is off OSD POSITION It is possible to adjust the position that the on screen panel is to be displayed Moves each time the ...

Страница 17: ...r s preset modes If the new adjustment data differ from any of the following 4 they can be registered as new data The data that can be registered are those in the following table It is necessary however that the horizontal frequency be 30 kHz 0 2 kHz to 61 kHz 0 4 kHz and that the difference in the number of vertical lines be 4 lines or more Horizontal frequency Total number of vertical lines Hori...

Страница 18: ...screen Is either one of the numeric values for fH or fV displayed in red The input signal frequency exceeds the range of the security range of this unit Read the operation manual of the computer and change the display mode The pilot LED does not light There is no image The pilot LED does not go off The image is too large or too small It is displaced from the correct position Part of the screen is ...

Страница 19: ...zation signal within the operating range Are two or more keys being operated at the same time Connect the signal cable correctly Check the video output mode from the computer and select a mode within the LCD monitor operating range For details read the operation manual of the hardware you are using Operate only one key at a time The sound is not correct The headphones do not operate The USB device...

Страница 20: ...80 at 60 Hz VGA 400 at 70 Hz 640 480 at 72 Hz 640 480 at 67 Hz 640 480 at 75 Hz 800 600 at 56 Hz 800 600 at 60 Hz 800 600 at 75 Hz 800 600 at 72 Hz 832 624 at 75 Hz 1024 768 at 60 Hz 1024 768 at 70 Hz 1024 768 at 72 Hz 1024 768 at 75 Hz 1024 768 at 75 Hz 640 480 640 400 640 480 640 480 640 480 800 600 800 600 800 600 800 600 832 624 1024 768 1024 768 1024 768 1024 768 1024 768 31 47 31 47 37 86 35...

Страница 21: ...f Professional Employees Naturskyddsforeningen The Swedish Society for Nature Conservation and NUTEK The National Board for Industrial andTechnical Development in Sweden The requirements cover a wide range of issues environment ergonomics usability emission of electrical and magnetic fields energy consumption and electrical and fire safety The environmental demands concern restrictions on the pres...

Страница 22: ...Cadmium damages the nervous system and is toxic in high doses TCO 95 requirement states that batteries may not contain more than 25 ppm parts per million of cadmium The colour generating layers of display screens must not contain any cadmium Mercury Mercury is sometimes found in batteries relays and switches and back light system Mercury damages the nervous system and is toxic in high doses TCO 95...

Страница 23: ......

Отзывы: