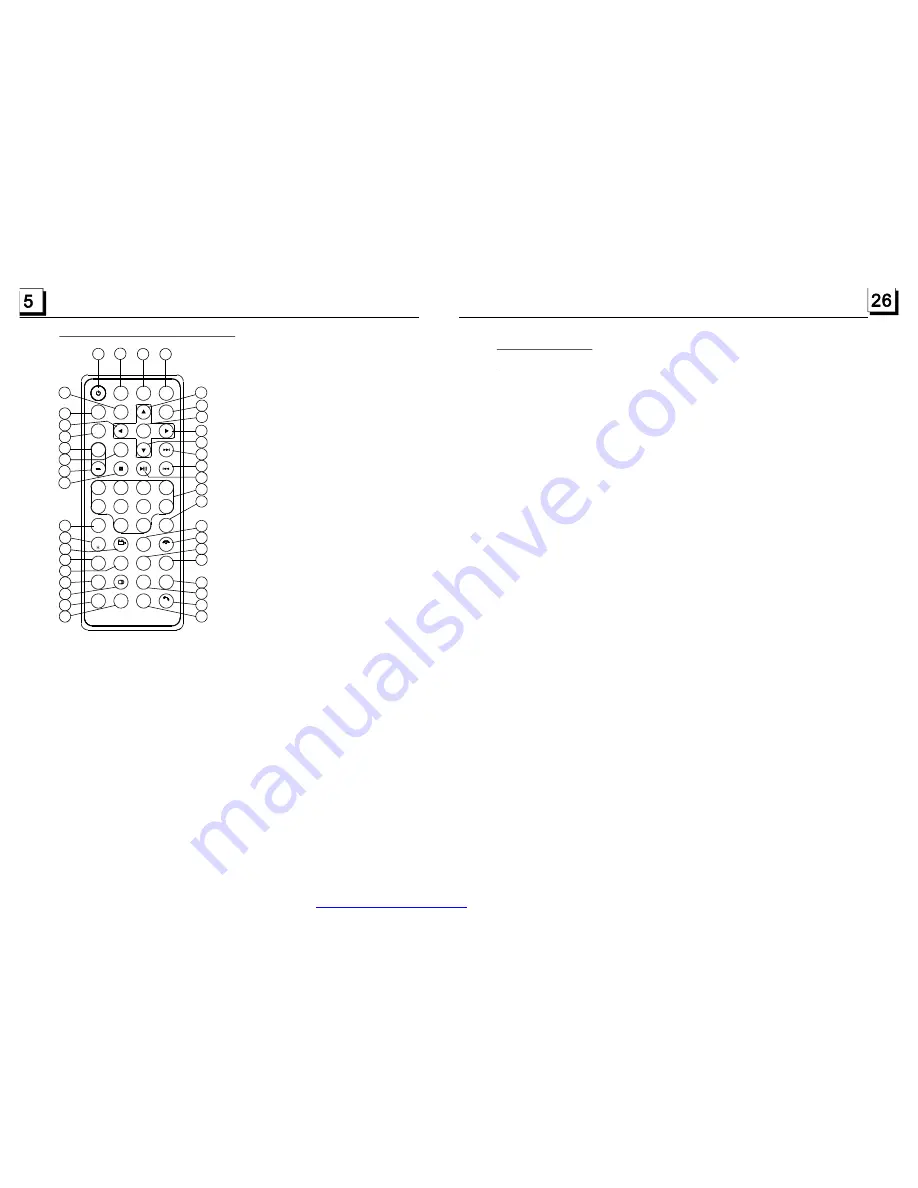
1.5 The Remote Control Description
16. SEARCH BUTTON
17. RDM BUTTON
18. RPT BUTTON
19. SUBTITLE/REDIAL BUTTON
20. TITLE/PBC/PAIR BUTTON
21. ANGLE/ST/# BUTTON
22. ZOOM BUTTON
23. AUDIO BUTTON
24. CLK BUTTON
25. A-B BUTTON
26. INT BUTTON
27. EQ BUTTON
28. LOC/SLOW-FWD/* BUTTON
29. MUTE BUTTON
30. STOP BUTTON
31. VOLUME- BUTTON
32. < BUTTON
33. OK BUTTON
34. BUTTON
35. BAND BUTTON
36. PROG BUTTON
37. OSD BUTTON
38. LOUD BUTTON
39. TEL BUTTON
1. P/N BUTTON
2. MENU BUTTON
3. POWER BUTTON
4. ^ BUTTON
5. >>| BUTTON
6. > BUTTON
7. |<</CLEAR BUTTON
8. v BUTTON
9. SEL BUTTON
12. 10+ BUTTON
13. SETUP BUTTON
14. MODE BUTTON
15. APS/HANG UP BUTTON
10. PLAY/PAUSE BUTTON
11. NUMBER(0~10,+10
-10) BUTTONS
1
2
3
4
5
6
7
9
8
10
11
12
13
14
15
1 6
17
1 8
19
20
21
22
23
24
25
26
27
28
29
30
31
32
3 3
34
35
3 9
36
37
38
PROG
A-B
LOUD
OSD
TEL
PA IR
REDIAL
AP S
S EARCH
#
ZOOM
RPT
TITL E/PBC
AUDIO
I N T
S UBTITLE
RDM
LO C
S LO W_FWD
C LK
ST
0 /1 0
9
10 +
BAND
E Q
4
3
2
1
5
-10
7
6
8
+10
CLEAR
+
SE L
SETUP
0K
MU
MODE
MENU
P WR
P/N
7. Trouble Shooting
Please read the user manual carefully before using the DVD player. If you have any trouble
using this player, try to solve the problems by the suggestions mentioned below. If you can
not remove the trouble after using all the suggestions, please contact the company or the
technical service center authorized by us. For the sake of your safety, please do not open the
cover and repair the player by yourself, if that, it may cause electric shock.
NO PICTURE, SOUND AND INDICATION
* Ensure that the power switch is on.
* Ensure that the power cord is not damaged or the fuse is not blown.
* Ensure that the power plug is connected to the inlet tightly.
NO SOUND BUT HAVE PICTURE
* Ensure that the player s audio output has a good connection with amplifier.
* Check whether the audio connector is damaged.
* Check whether you have turned down the volume.
* Ensure that you have set the right AUDIO setup of the player.
* Ensure that the audio is not muted.
NO PICTURE BUT HAVE SOUND
* Ensure that the player s video output has a good connection with monitor s video input.
* Ensure that you have turned your TV to the AV input channel connecting to your player.
* Check whether the video connector is damaged.
* Ensure that you have set the right VIDEO settings of the player.
BLACK AND WHITE PICTURE OR SCREEN ROLLING
* Ensure that you have set the right TV SYSTEM (e.g. PAL, NTSC) setting.
FLAWS OF PICTURE OR SOUND
* Check whether the setting of AUDIO is right.
* Check whether the disc is scratched or stained.
* Check whether the AV connector and the output terminal is stained.
* Check whether there is condensation inside the Lens. If so, leave the player off for an hour
or so, then try again.
* Check whether the installation angle is less than 30.
DISPLAY NO DISC OR BAD DISC
* Ensure that you have put the disc in the unit.
* Check whether the disc is put in the reverse side.
* Check whether the disc is distorted.
* Check whether the disc is stained or scratched badly.
* Ensure that the disc format is compatible to the player.
* Ensure that the temperature inside the car is not too high. If so, cool off until the ambient
temperature returns to normal.
* Replace another disc to insert it into the disc compartment.
REMOTE CONTROL IS INSENSITIVE OR DOES NOT WORK
* Check the batteries of remote control and make sure that they are powerful and have
good conductivity.
* Direct the remote control to the IR sensor of the player.
* Check whether there are some obstacles between the remote control and IR sensor.
SOME FUNCTION BUTTONS DO NOT WORK
* Turn off the power, then turn on again.
* Reset the unit to zero, then turn on again.
* Remove the front panel from the unit, then install it again and then turn on again.
THE RADIO DOES NOT WORK
* Check whether the antenna cable is connected firmly. Or manually tune for a station.
’
’
PDF created with FinePrint pdfFactory trial version
http://www.pdffactory.com


