21
GRINDING FUNCTION
Mulching (mulching) is a care procedure involving the fragmentation of cut grass. The mulching system allows it to be left
completely or partially on the soil, where it decomposes and provides nutrients.
The lawn meets the mulching conditions when the grass is no more than 4 cm. The lawn on which mulching will be carried
out must be mowed regularly and quite often - even every few days. During mulching, only young and delicate blades can be
left on the surface, without damaging the lawn, as they break down and do not rot.
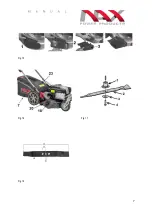
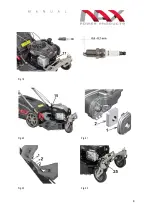
To start the grinding function, remove the grass catcher and remove the side ejection cover (if fitted), mount the grass
grinding attachment /plug
26 (Fig. 14)
to the rear outlet and close the tailflap.
For mulching to be fully effective, you must buy a milling knife.
SIDE EJECTION FUNCTION
To work with the side ejection:
1.
remove the grass basket
7 (Fig. 16)
(if fitted), insert the mulching plug into the rear outlet opening and close the
flap
23 (Fig. 16)
2.
lift the side discharge cover
20 (Fig.16)
and install the side discharge chute with the catches
18 (Fig. 16
).
Note: to
raise the side discharge cover, it may be necessary to use a lot of force or to open a special lock
preventing its automatic opening (if present on your model)
3.
Rest the side discharge cover on the side discharge cover (side discharge duct).
MAINTENANCE
HANDLING THE CUTTING KNIFE
Warning:
Disconnect the spark plug wire before checking the cutting knife or blade attachment shaft. If the knife hits an
object, stop the engine, disconnect the spark plug cable and check the mower for damage. Check whether the crankshaft on
the power take-off side or the adapter to which the knife is attached has not been damaged (bent or cracked).
The knife adapter does not provide protection against engine damage when the knife hits objects other than grass, e.g.
stones, branches, molehills.
Check often that the knives are not bent, that they are not excessively worn, and that there are no other damages such as
cracks or deformations.
Damaged parts must be replaced with new ones, recommended by the manufacturer. For safety, replace the knives every
two years. Knives should be well sharpened (details in chapter "Sharpening a knife"). Blunt knives tug at the grass, causing
the tips to yellow.
Attention! It is imperative to balance the knife after each sharpening. An unbalanced blade can cause
dangerous vibrations that can damage the mower and / or cause an accident. ")
Check the knife clamping screw often. The screw must be firmly tightened to a torque of 45 to 55 Nm.
REMOVING THE KNIFE (FIG. 17)
1
Adapter
2
Knife
3
Saddle half pad
4
Screw
Attention! Cutting knife 2 (Fig. 17) it can be very sharp, use gloves to protect your against injury. Screw
4 (Fig. 17) unscrew to the left (right-hand thread).
1.
Empty the fuel tank.
2.
Use a wooden block to prevent the knife from turning.
3.
Loosen the screw that holds the knife.
Содержание 3000S
Страница 1: ...NAX 3000S ...
Страница 2: ...2 A B C D ...
Страница 3: ...3 PETROL LAWN MOWER WITH A DRIVE Model NAX 3000S ...
Страница 4: ...4 CONSTRUCTION OF MOVER AND ILLUSTRATIVE DRAWINGS Fig 1 Fig 2 ...
Страница 5: ...5 Fig 3 Fig 4 Fig 5 Fig 6 Fig 7 Fig 8 ...
Страница 6: ...6 Fig 9 Fig 10 Fig 11 Fig 12 Fig 13 Fig 14 ...
Страница 7: ...7 Fig 15 Fig 16 Fig 17 Fig 18 ...
Страница 8: ...8 Fig 19 Fig 20 Fig 21 Fig 22 Fig 23 ...
Страница 9: ...9 Fig 24 Fig 25 Fig 26 ...
Страница 26: ...26 DECLARATION OF CONFORMITY ...
Страница 27: ...27 NOTES ...
Страница 28: ...28 ...
Страница 32: ...32 ...

