15
the device is assembled according to the operation manual;
the cutting tool and the whole cutting unit (three-armed knife or head with a cutting line, fastening elements,
construction of the cutting unit) are in good technical condition; regularly check their attachment, damage
and wear (depressions, cracks);
safety devices (e.g. ejector cover, housing, steering handle, engine brake lever) are in good technical condition
and work properly;
the grass catcher is undamaged and correctly mounted, you cannot use a damaged grass basket.
The mower must not be switched on unless the blade is correctly mounted. Danger of dangerous vibrations!
Cutting tools should be sharp and clean. Properly keeping sharp edges of cutting tools reduces the likelihood
of jamming and simplifies handling.
Before adjustment, cleaning, maintenance, switch off the device and remove the high voltage cable from the spark
plug.
Do not mow when other people, especially children or pets, are nearby.
Do not start a damaged mower.
Do not touch the knives until the equipment is turned off and the knives do not stop completely.
Do not lift or carry the device with the engine running.
Turn off the mower and remove the high voltage cable from the spark plug when:
you leave the equipment unattended,
before adjusting the lock,
before checking, cleaning or repairing the device,
after hitting with a foreign object,
before cleaning the outlet,
if excessive vibration occurs.
PREPARATION
When mowing, always wear solid footwear and long pants, do not operate the device without shoes or wearing
sandals.
Check carefully the area where the device will work and remove all stones, branches, wires, bones and other foreign
objects.
In high grass, you may not notice obstacles (e.g. stumps, roots), so before starting work with the device, mark all
obstacles hidden in the grass that cannot be removed.
Always check the blades, bolts and knife assembly for wear and damage before use. Replace worn or damaged
knives and bolts in pairs to maintain balance.
In the case of multi-knife devices, be careful, because the rotation of one knife may cause the rotation of other
knives.
KNIFE SHARPENING
To ensure optimal working conditions for the mower, the machine's knife should be sharpened. This seemingly
simple operation must be carried out with special care. It requires a lot of technical knowledge and necessary
service equipment. The manufacturer is not responsible for any damage to the mower related to improper knife
sharpening. The recommended angle is 30 °.
It is safe to have the knife sharpened by an authorized NAX service center.
Before sharpening, the mower should be turned off, allow the engine to cool down, remove the high voltage cable
from the spark plug, if necessary remove the battery and unscrew the knife.
The knife can be sharpened manually, using a whetstone or a suitable metal file, it is preferable to sharpen
with a professional sharpener, all the time bearing in mind that the blade may overheat, thus it will not be suitable
for work. It is recommended to use liquid coolant for metalworking, it is permissible to use water all the time, bearing
in mind that not all sharpening machines can work in the coolant stream. The blue surface of the blade indicates
damage to the knife, which should no longer be used.
After each sharpening, the knife must be balanced.
If the user does not have a balancing machine
and the appropriate knowledge, it is necessary to return the knife to a specialized service for balancing. Working
with an unbalanced knife causes excessive vibration and, as a consequence, may cause loosening of the screw
connections of the entire device, including the knife attachment screw, which may be dangerous to the health
Содержание 3000S
Страница 1: ...NAX 3000S ...
Страница 2: ...2 A B C D ...
Страница 3: ...3 PETROL LAWN MOWER WITH A DRIVE Model NAX 3000S ...
Страница 4: ...4 CONSTRUCTION OF MOVER AND ILLUSTRATIVE DRAWINGS Fig 1 Fig 2 ...
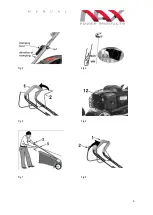
Страница 5: ...5 Fig 3 Fig 4 Fig 5 Fig 6 Fig 7 Fig 8 ...
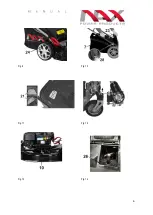
Страница 6: ...6 Fig 9 Fig 10 Fig 11 Fig 12 Fig 13 Fig 14 ...
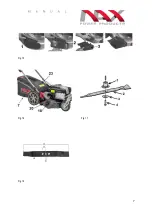
Страница 7: ...7 Fig 15 Fig 16 Fig 17 Fig 18 ...
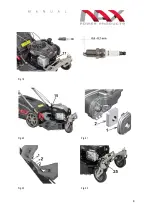
Страница 8: ...8 Fig 19 Fig 20 Fig 21 Fig 22 Fig 23 ...
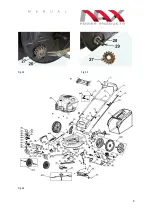
Страница 9: ...9 Fig 24 Fig 25 Fig 26 ...
Страница 26: ...26 DECLARATION OF CONFORMITY ...
Страница 27: ...27 NOTES ...
Страница 28: ...28 ...
Страница 32: ...32 ...


