background image

Table of Contents

. . . . . . . . . . . . . . . . . . . . . . . . . . . .1
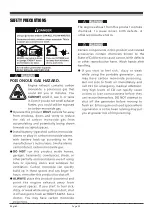
Safety Precautions

 . . . . . . . . . . . . . . . . . .  . . .2

Unpacking the Generator

. . . . . . . . . . . . . . . .6 

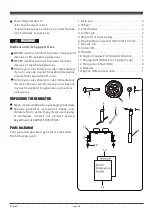
      Parts Included. . . . . . . . . . . . . . . . . . . . . . . .6

 . . . . . . . . . .7

Assembly

 . . . . . . . .  . . . . . .. . . . . . . . . . . . . . . 8

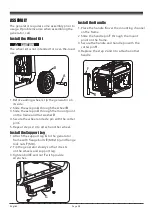
      Install the Wheel Kit . . . . . . . . . . . . . . . . . . 8

      Install the Support Leg. . . . . . . . . . . . . . . . 8

      Install the Handle. . . . . .. . . . . . . . . . . . . . . 8


. . . . . . . . . . . . . .9

Controls and Features

. . . . . . . . . .  . . . . . . . 10

      Generator. . . . . . . . . . . . .. . . . . . . . . . . . . .10

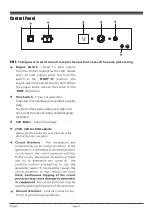
      Control Panel. . . . . . . . . . . . . . . . . . . . . . . 11

Specifications

. . . . . . . . . . . . . . . . . . . . . . . . 12

      Add Engine Oil . . . . . . . . . . . . . . . . . . . . . .13

      Low Oil Shutdown . . . . . . . . . . . . . . . . . . .13

      Add Fuel . . . . . . . . . . . . . . . . . . . . . . . . . . . 14

      Grounding. . . . .. . . . . . . . . . . . . . . .. . . . . .15


      System.. . . . . . . . . . . . . . . . . . . . . . .. . . . . .15

Operation

 . . . . . . . . . . . . . . . . . . . . . . . . .. . . . 16

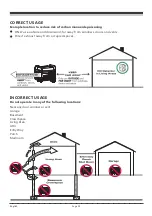
      Generator Location . . . . . . . . . . . . . . . . . . 16

      Surge Protection . . . . . . . . . . . . .. . . . . . . .16

      Starting the Generator (Recoil Start)   . . 17

      Starting the Generator (Electric Start)  .. 18

      Connecting Electrical Loads . . . . . . . .. . . 19

      Stopping the Engine . . . . . . . . . . . . . . . . . 20

      Low Oil Shutdown  . . . . . . . . . . . . . . .  . . . 20

      Do Not Overload Generator . . . . . . . . . . . 20
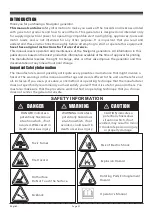
Introduction

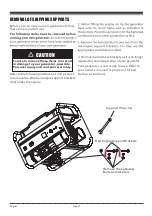
Removal Of Shipping Supports 

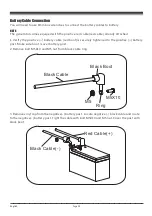
Battery Cable Connection

Connecting to a Building’s Electrical

Maintenance And Storage

. . . . . . . . . . . . . . 21

      Maintenance Schedule  . . . . . . . . . . .  . . 21

      Engine Maintenance .. . . . . . . . . . . .. . . . 22

      Change Engine Oil . . .. . . . . . . . . . . . . . . 22

      Air Filter Maintenance. . . . . . . . . .  . . . . .22

      Spark Plug Maintenance. . . . . . . . . . . . . 23

      Cleaning Fuel Strainer . . . . . . . . .  .  . . . 23


. . . 23

      Generator Maintenance . . . . . . . . . . . . . . 24


. . . . . . . . . . . . . . . . .24

      Service and Storage . . . . . . . . . . . . . . . .. 25

Trouble Shooting 

. . . . . . . . . . . . . . . . . . . . . .27

Inspect


Muffler


 . . . . .  . . . . .  . . . . . 

Battery Replacement

English                                                                                                                                                  

Содержание NG2500

Страница 1: ...rating equipment Ensure engine is stopped and level before performing any maintenance or service IMPORTANT Record product information to reference when ordering parts or obtaining warranty coverage Se...

Страница 2: ......

Страница 3: ...rting the Generator Recoil Start 17 Starting the Generator Electric Start 18 Connecting Electrical Loads 19 Stopping the Engine 20 Low Oil Shutdown 20 Do Not Overload Generator 20 Introduction Removal...

Страница 4: ...rtant Safety Information The manufacturer cannot possibly anticipate every possible circumstance that might involve a hazard The warnings in this manual and the tags and decals affixed to the unit are...

Страница 5: ...SAFETY PRECAUTIONS Page 02 WARNING POISONOUS GAS HAZARD WARNING WARNING English The engine exhaust from this product contains chemicals to cause cancer birth defects or other reproductive harm...

Страница 6: ...ONLY use outside and downwind far away from windows doors and vents Direct exhaust away from occupied spaces INCORRECT USAGE Do not operate in any of the following locations Near any door window or v...

Страница 7: ...ressure in tank Fill or drain fuel tank outdoors DO NOT overfill tank Allow space for fuel expansion If fuel spills wait until it evaporates before starting engine Keep fuel away from sparks open flam...

Страница 8: ...ath or serious injury and or property damage Contact with muffler area could cause burns resulting in serious injury DO NOT touch hot parts and AVOID hot exhaust gases Allow equipment to cool before t...

Страница 9: ...luded Your gasoline powered generator ships with the following parts 1 Axle pin 2 2 Wheel 2 3 Flat Washer 2 4 Cotter pin 2 5 Wrench for Spark plug 1 6 Double Open wrench 10mm 12mm 1 7 Handle Pin 8 Cot...

Страница 10: ...Refer to the following instructions and pictures to remove the attached engine support brackets red under the engine 3 You may discard these brackets as it is no longer required for normal operation o...

Страница 11: ...es some assembly prior to usage If problems arise when assembling the generator call F E G H K 1 Before adding wheels tip the generator on its side 2 Slide the axle pin A through the wheel B 3 Slide t...

Страница 12: ...positive battery cable red boot is securely tightened to the positive battery post Make sure boot is over battery post 2 Remove bolt M5X10 and M5 nut from black cable ring 3 Remove vinyl cap from the...

Страница 13: ...nd air filter box 5 Fuel Valve 6 Air Filter 7 NAVIGATOR OHV Engine 8 Recoil Starter 9 Flat Free Wheel 10 Oil Filler Cap 11 Control Panel 12 13 Battery Handle English We are always working to improve o...

Страница 14: ...ctric start model only To start engine press and hold the switch in the START ll position the engine will crank and attempt to start When the engine starts release the switch to the RUN l position Con...

Страница 15: ...Factor Voltage Regulator Alternator Type Running Watts Starting Watts Engine Engine Type Displacement Low Oil Shutdown Ignition System Starting System Fuel Capacity Fuel Tank Lubricating Oil Capacity...

Страница 16: ...arning device or stop the engine If generator shuts off and the oil level is within specifications check to see if generator is sitting at an angle that forces oil to shift Place on an even surface to...

Страница 17: ...e or explosion Wipe up any spilled fuel immediately If fuel spills wait until it evaporates before starting engine Keep fuel away from sparks open flames pilot lights heat and other ignition sources C...

Страница 18: ...etal decking or steel work DO NOT touch bare wires or receptacles DO NOT use generator with electrical cords which are worn frayed bare or otherwise damaged DO NOT operate generator in the rain or wet...

Страница 19: ...protected from the weather Keep exhaust pipe clear of foreign objects Keep generator away from open flame Keep generator on a stable and level surface WARNING Surge Protection Voltage fluctuation may...

Страница 20: ...When starting engine pull cord slowly until resistance is felt and then pull rapidly to avoid kickback 4 Turn the fuel valve to the ON l position 7 Pull the starter cord slowly until resistance is fe...

Страница 21: ...evices plugged in or turned on 4 Turn the fuel valve to the ON l position 5 Flip the engine switch to the RUN l position 7 Move the choke lever to the START position 8 Press and hold the engine switch...

Страница 22: ...lug in and turn on the desired 230 Volt AC single phase 50Hz electrical loads It is better to attach the item with largest load first This unit has been pretested and adjusted to handle its full capac...

Страница 23: ...2 Contact an Authorized Service Dealer 3 DO NOT operate engine until oil level is corrected If oil level is below LOW mark on dipstick 1 Add oil to bring level to HIGH mark 2 Restart engine and if th...

Страница 24: ...endations Regular maintenance will improve the performance and extend the life of the generator See any authorized dealer for service The generator s warranty does not cover items that have been subje...

Страница 25: ...certain laboratory animals Thoroughly wash exposed areas with soap and water a Drain oil by removing the drain plug and the oil filler cap while the engine is warm Change engine oil every 100 hours fo...

Страница 26: ...n and strainer cup with gasoline c Tightly fasten the cup to main body making sure to avoid fuel leak SCREEN O ring CUP BODY b Remove spark plug using provided wrench Inspect spark plug for damage and...

Страница 27: ...Battery Replacement English 1 Remove the spark plug wire from spark plug 2 Remove the nut and bolt from the negative and positive posts 3 Loosen and remove the screw A and nut B on the battery holding...

Страница 28: ...m lack of gasoline This will dry out all remaining gasoline in tank fuel lines and carburetor 5 Turn fuel selector switch to OFF position Fully close the LPG cylinder knob if it is open and disconnect...

Страница 29: ...ion 2 Move fuel shutoff lever to ON l position 3 Fill crankcase to proper level or place generator on level surface 4 Clean or replace air cleaner 5 Fill fuel tank 6 Drain fuel tank and carburetor fil...

Страница 30: ...P N 323745451 Rev 01...

Отзывы: