background image

NAV-502FHDi


         USER MANUAL


10 


Connecting the NAV-502FHDI in the Car 


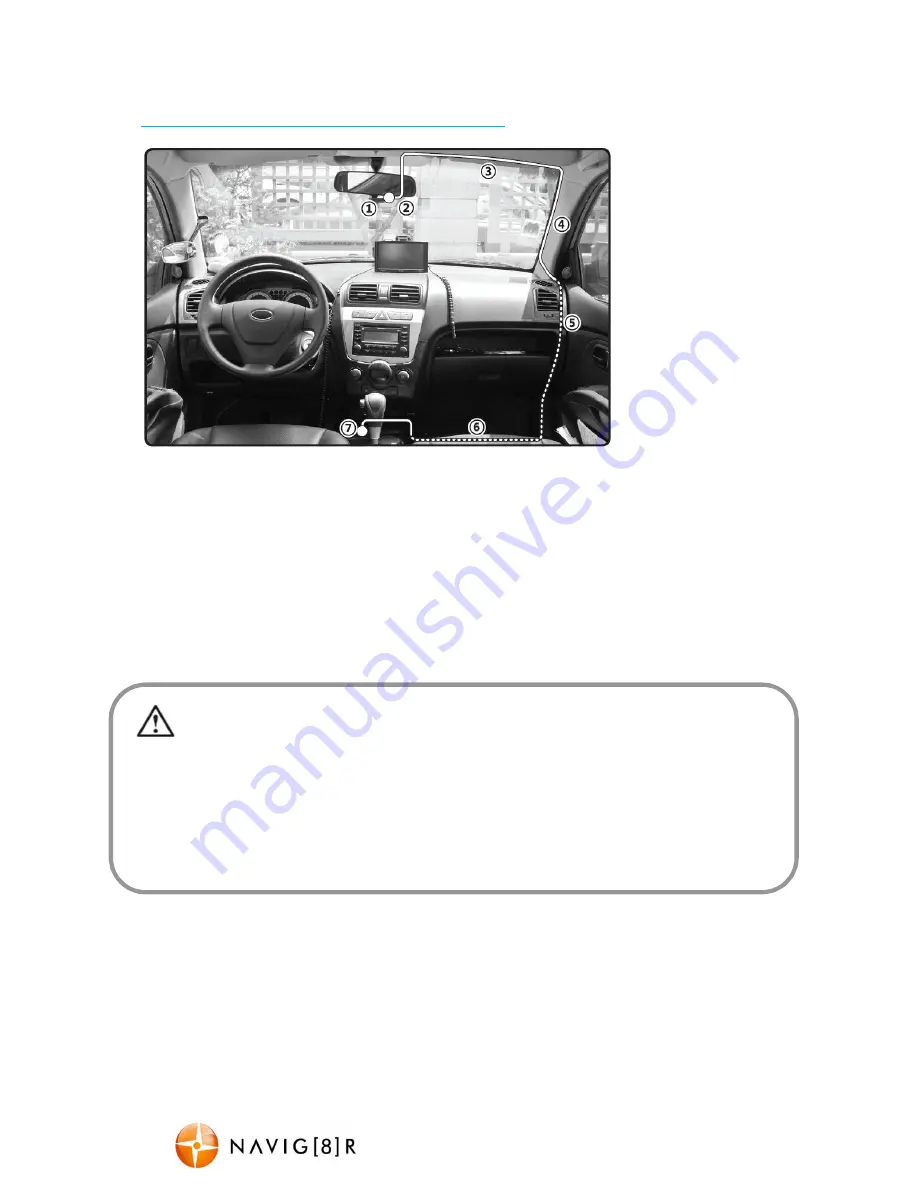
The above wiring diagram shows a left hand drive vehicle. Wiring path is 
only a suggestion. 

1.  NAV-502FHDi device mounted behind the rear vision mirror. 
2.  12v DC cable routed behind rear vision mirror 
3.  Cable hidden behind roof headlining 
4.  Cable hidden behind “A” pillar – beware of airbag equipped cars 
5.  Cable is routed beside the dashboard / near the door hinges 
6.  Cable is passed under the passenger carpet (or under the dashboard) 
7.  12v DC plug is connected to the car’s 12v “cigarette socket”. 


Once the wiring and installation of the NAV-502FHDi have been completed, please check the 

following: 

- With the car’s ignition on (or engine started), the red LED indicator on the NAV-502FHDi will light up and the 
LCD screen should turn on. Recording should start automatically. This will indicate a successful installation –  

- When the car’s ignition is turned off, the device should turn off within 20 seconds. If this doesn’t happen then 
power is still being supplied to the car’s 12v socket and the device will need to be switched off manually. 

Содержание NAV-502FHDi

Страница 1: ...NAV 502FHDi US ERMANUAL 1 Please read carefully before use It isrecommended to use a C lass4 4Mb swrite speed Micro SDHCcard for optimal performance...

Страница 2: ...future reference Use thisproduct only in the manner described Only use awater dampened soft cloth to clean the surface of thisproduct The followingwill damage thisproduct any liquid such aswater or m...

Страница 3: ...rm selection in on screen menu 13 S peaker 7 Reset pin switch WHATSIN THEBOX FEATURESANDOPERATION Memory Card required for operation The NAV 502FHDi requiresaMicro S Dcard not included to record video...

Страница 4: ...behind or close to the rear vision mirror Use the supplied windscreen suction mount to affix theNAV 502FHDi to the windscreen and then adjust the mount until you can see aclear view of the road ahead...

Страница 5: ...sin If usingalarge capacity card 32GB 10 minutesis recommended Exposure S elect 2 3 1 3 0 0 1 3 2 3 1 0 4 3 5 3 2 0 Use thissettingto adjust for varyinglighting conditions Usually 0 0 issuitable for m...

Страница 6: ...e English French S panish Portuguese German Italian S implified Chinese Traditional Chinese Russian Japanese Choose alanguage for the onscreen menu display Frequency S elect 50Hz 60Hz For older televi...

Страница 7: ...e Version Digital Still Camera DSC Mode S ettings Turn on the NAV 502FHDI and pressthe OK button to stop recording Pressthe MODE button until the camera icon appearsin the top left of the LCDdisplay N...

Страница 8: ...nditions Usually 0 0 issuitable for most environments Anti Shaking S elect on off S teadiesthe cameraand letsyou take sharper pictures Quick Review S elect Off 2 seconds 5 seconds Displaysthe photo st...

Страница 9: ...utes It will overwrite the oldest video fileswith new ones Depending on the size of the Micro S DHC card and the speed ratingof the card there may be asmuch asa3 second pause time whilst old filesare...

Страница 10: ...assed under the passenger carpet or under the dashboard 7 12v DC plug is connected to the car s 12v cigarette socket Once the wiringand installationof the NAV 502FHDi havebeen completed please checkth...

Страница 11: ...ssthe flip button to invert the image The suctioncup keepscomingoff Ensure the windscreen and surface areaof the suction cup are clean In wet or very hot weather the suction cup mount may need to be r...

Страница 12: ...ser Product and the type of defect S tep 2a Contact your place of purchase They will assess the nature of the fault and refund or replace the product asper their store refund or warranty policy S tep...

Отзывы: