background image


www.navig8r.com.au


42

NAVIGATION


MENU


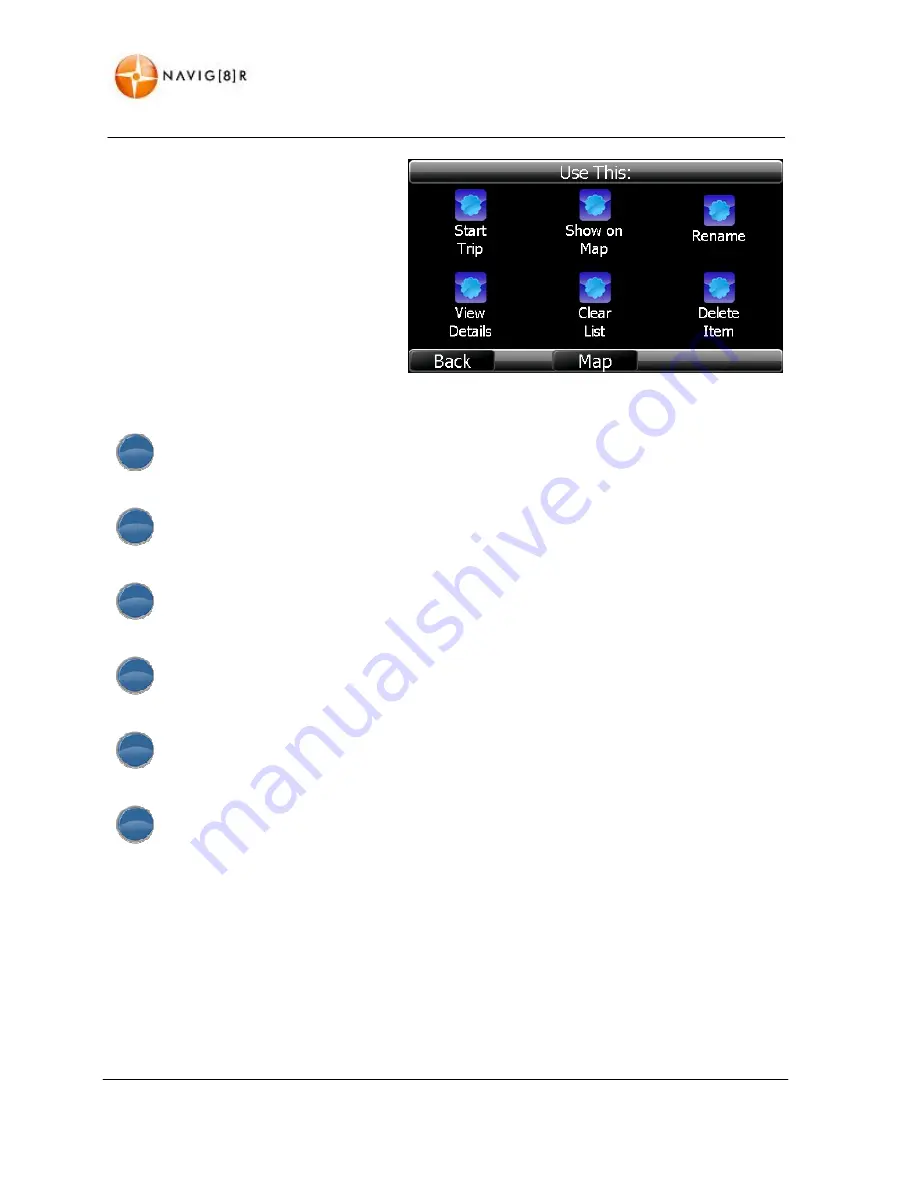
To


manage


the


list


of


Favourites,


tap


on


the


“Actions”


button.


The


menu


with


the


following


options


will


be


shown.


Favourites


can


be


included


by


tapping


the


“Add”


button.


The


menu


items


are


for


an


action


for


the


currently


highlighted


address


in


the


Recent


Places


list.


Start


trip:


Start


the


trip


with


only


the


suburb


or


town


selected.


As


the


location


will


be


positioned


in


the


middle


of


the


area


selected,


the


location


maker


may


not


be


close


enough


to


a


road


to


calculate


a


valid


route


Show


on


Map:


This


option


will


display


on


the


map


the


destination


with


whatever


information


the


system


has


been


given.


Tap


on


the


“Back”


button


to


return


to


the


Option


screen.


Rename:


Rename


a


destination


Such


as


Work


or


home


rather


than


the


address


so


it


is


easily


recognisable


at


a


later


date.


View


Details:


This


will


display


the


address


details


of


your


chosen


destination


including


full


address


and


altitude/longitude


Clear


List:


The


“Clear


List”


Button


will


clear


all


entries


in


the


Recent


Places


list.


If


tapped,


you


will


be


asked


to


confirm


YES


or


NO


before


the


action


is


taken.


Once


the


list


has


been


cleared


it


cannot


be


recovered.


Delete


Item:


The


“Delete


Item”


button


will


remove


only


the


highlighted


address


in


the


“Recent


Places”


list.


You


will


be


asked


to


confirm


the


deletion.


Содержание i50GPS

Страница 1: ...User Manual...

Страница 2: ...11 Main Map Screen 12 Getting to Know the Main Map Screen 12 Next Turn by Name Turn By Turn Menu 14 Low GPS Satellite Signal Warning Message 14 Quick Options Menu 14 GPS Signal Indicator 15 Battery L...

Страница 3: ...Entering Destination Using Quick Step method 30 Changing the Trip 33 Via Waypoints 33 Fine Tuning the Destination 34 Search for Places Points of Inerest or POI 36 Searching By Locality 36 Searching By...

Страница 4: ...g the Software for the Navig8r 61 Adding Your Own POI Data 62 Hardware Main System Menu 64 Main Title Bar 65 Photo Display 65 E Book 65 Time and Date 66 Battery Indicator 66 Bluetooth 66 Music 68 Vide...

Страница 5: ...ded in the software mapping data of this product When leaving your vehicle do not leave the Navig8r on the dashboard of the car It should be removed and placed in a secure place along with the windscr...

Страница 6: ...m Description 1 The Navig8r GPS unit 2 GPS device holder 3 Bracket Windscreen Mount 4 Car Charger 12v DC 5 USB Data Cable Getting to Know Your Navig8r GPS Item Description Item Description 1 Power But...

Страница 7: ...operation Connect the Navig8r GPS unit to power source for a period of 24 hours in the first instance to charge and condition the battery It may take several charge discharge cycles for the device to...

Страница 8: ...ng In a normal driving position adjust the GPS to a position that will be in view whilst driving and does not obstruct your view of the road Once the correct position has been found tighten the two kn...

Страница 9: ...now be started by pressing the power button on top of the device for about 3 seconds When starting the GPS in the vehicle it may take a short period of time for the system to acquire a valid GPS signa...

Страница 10: ...www navig8r com au 9 NAVIGATION NAVIGATION...

Страница 11: ...road ahead and ensure the driver does not have to look away from the road to check the screen Please read the hardware section to ensure that all accessories can be identified and you can assemble the...

Страница 12: ...cense type in to the Navig8r This feature is very useful if the Navaig8r is to be used by different drivers that hold different licence types The Driver profile allows each driver to set their own pre...

Страница 13: ...www navig8r com au 12 MAIN MAP SCREEN MAIN MAP SCREEN Getting to Know the Main Map Screen...

Страница 14: ...layed when within 250 meter of known camera location camera 9 Compass 9 9 Shows current heading in relation to North 10 Exit to Main Menu Button 9 9 Exits Map screen to the main menu 11 Current Speed...

Страница 15: ...is the distance between each turn you must make to follow the route Tap the Back and Map buttons to return to the Main Map screen or the End Trip to stop the calculated route and return to Cruise mod...

Страница 16: ...metre 3 Kilometres or 5 Kilometres and then return to the original route For longer detours it is recommend that the 5 Kilometre option is used and then use the Full Recalc option as this should recal...

Страница 17: ...er hour Heading Shows the bearing in degrees for the current direction of travel The system must be in motion for this reading to be correct Altitude Shows the current altitude in meters above sea lev...

Страница 18: ...the type of action to be taken at the next intersection There are 2 types of icons you can have displayed Please refer to the Look Feel for information about selecting these options Indicator The Indi...

Страница 19: ...Zoom level can be set by the driver to a level that they feel comfortable with and see clearly whist driving When it is not possible to either zoom in or out of the map these buttons will not be shown...

Страница 20: ...route This gives the driver a visual indication of the route to be driven as well as the audio instructions and other information for driving the route 12 Current Speed Indicator Speedo Trip Statistic...

Страница 21: ...ng navigated These pages only function in navigation mode and the data will be reset each time a new destination is chosen The information can be manually reset during the route by tapping the Reset b...

Страница 22: ...Speed screen 13 Current Position Indicator The car shown on the map screen to indicate the position of the vehicle The map is orientated so that direction you are travelling is always towards the top...

Страница 23: ...the responsibility of the driver to be aware of the posted speed limit at all times LaserCo accept no responsibility for the accuracy of this information contained in the SpeedAlert Data Special Speed...

Страница 24: ...the Zoom in and Zoom out button 7 16 to see the map in more detail or from further out When you have finished tap on the back button to return view to the normal position This feature can only be made...

Страница 25: ...ing the trip Add a new waypoint to you journey Start the trip For more information on Waypoints please see page 20 Lane Assist In Navigation mode only this icon may be displayed to show what lane you...

Страница 26: ...This is the Classic menu Select an option as required or tap the Map button to return to the navigation screen Please see 39 for changing menu styles Modern Classic Action 1 Create or select new driv...

Страница 27: ...To add a new driver tap on the Actions button Tap the Stats button to see the Statistics for the selected drivers Tap the Back Button to go back to the previous screen Tap the Action Button to add a n...

Страница 28: ...d Limits are imposed on Learners drivers and holders of Provisional P1 P2 license holders in certain states only If no limits are imposed by the State of Issue please select the type of license you ar...

Страница 29: ...bove Simply tap Back to remove from screen Entering your Destination by an Address There are two ways you can enter the destination address in to the Navig8r Wizard A three step process whereby you en...

Страница 30: ...if you have made a mistake If the correct destination is displayed and highlighted tap the OK button to continue to the next step To display the entire list at any time tap the List button to remove t...

Страница 31: ...rd option Once the correct number or cross street has been entered tap on the Ok button to continue The selected address will be displayed in a map screen with a shown to mark your destination If the...

Страница 32: ...tton or the button to scroll through the options and when you have found the correct address tap it to hightlight it and then press the OK button When entering the destination in either the 3 Step Wiz...

Страница 33: ...the option to add waypoints or change the Trip Options for this particular journey To start your trip to the set destination with the default options press the GO Button Before beginning your trip yo...

Страница 34: ...the Navig8r will always show you the direct route to where you want to go D Toll Road When selected it will allow the system to calculate the route along toll roads between the current and selected d...

Страница 35: ...epeat as required When the list is populated you can alter the order or remove entries by selecting the entry to change and tap the Actions button Only the selected entry will be changed in this menu...

Страница 36: ...is displayed Zooming in to the lowest level will allow you the greatest accuracy for a destination Tap the screen in the correct location to place the destination marker at the desired location and t...

Страница 37: ...ound the Australian Road network Search for Places Points of Inerest or POI The Search for Places feature allows you to search for Points of Interest by Location by the Nearest to your current locatio...

Страница 38: ...s Select the Point of Interest that best suits your requirements and then tap on the OK button Tap Actions to adjust the route settings as explained earlier The selected Point of Interest is displayed...

Страница 39: ...or Use the button or the button to scroll through the options and when you have found the right catergory tap it to hightlight it and then press the OK button Type in the Name of the Point of Interest...

Страница 40: ...the current route Tap on button or the button to scroll through the available Deliveries Deliveries option allows the driver to set a delivery run based in order of entry Navigation is from current po...

Страница 41: ...ly used destination tap on the address and then on the OK button When the destination is shown on the map tap the Confirm button to begin the trip To manage the list of Recent Places tap on the Option...

Страница 42: ...e of the area selected the location maker may not be close enough to a road to calculate a valid route Show on Map This option will display on the map the destination with whatever information the sys...

Страница 43: ...display on the map the destination with whatever information the system has been given Tap on the Back button to return to the Option screen Rename Rename a destination Such as Work or home rather th...

Страница 44: ...The look of these maps should be familiar to users of some map books The maps are easy to read and the colours and layout are designed for easy visibility in daylight Thin Style Daylight Maps 2D These...

Страница 45: ...eedometer will be displayed in a Digital format Please see page 27 for more details Analogue Speedometer When selected the Speedometer will be displayed in the more familiar format Please see page 27...

Страница 46: ...rect route to where you want to go D Toll Road When selected will allow the system to calculate the route along toll roads between the current and selected destination E Camera Alert When on a warning...

Страница 47: ...l areas Please refer http www speedalert com au coverage php for cuurent coverage areas Tap the SpeedAlert button to enter the settings page Dispayed are the options for enabling or disabling the audi...

Страница 48: ...speed limit in your area or turned off While all care is taken compiling the data used in this feature neither SpeedAlert nor Navig8r can guarantee the accuracy of the speed limits or zones as this da...

Страница 49: ...l speed Select the demonstration file you wish to view and then tap the Start button to begin You can end the demonstration at any time by tapping the menu button on the map screen and tapping the End...

Страница 50: ...upport for any reason you may be asked information that is displayed on this page Device ID Is constant so too is the Unique Identifying number of this device The Software is coded to this number Soft...

Страница 51: ...Vehicle registration number Location to suburb 1 Location from suburb 1 Odometer start 8 Odometer finish 2 8 Supervisor Name 8 8 Purpose of trip 8 8 Time start 3 Time finish 3 Time accredited total 8...

Страница 52: ...er input is required Business Driving To record business or work trips or for Taxation purposes tap on the Business Driving icon You will be presented with this screen to enter the trip details The Pu...

Страница 53: ...creen the map button to cancel and return to the map screen or the start button to begin recording Generating Reports Once the trip has been recorded data can be printed out or saved as a PDF document...

Страница 54: ...Select the destination location of the software Click on Browse to select a different location to install the software It is recommended that the path be left as default Click Next to continue A Star...

Страница 55: ...next to continue Confirm the instillation options before installing Click on the back button to go back to make changes or click on the install button to install the software When the installation is...

Страница 56: ...e the software is started it checks for updates to ensure that you always have the latest version available requires an internet connection Please read and follow the onscreen instructions Click on th...

Страница 57: ...as started Set the date range you wish to include on the finished report Click on the icon to display the calendar Change the date as required Once the range is correct click on the Next button Click...

Страница 58: ...bileNavigator XXXX represents the last 5 digits of the Navig8r ID number This is to ensure that data from two different devices can be store separately on the same PC ACCESSING THE RECORDED FILES The...

Страница 59: ...the top menu bar select File and then Open from the drop down menu Step 2 Use the pull down list to change the Files of type option to show GPS gpx loc mps Step 3 Pull down the Look in list to navigat...

Страница 60: ...Step 5 Select the file you wish to display and click on the Open button Step 6 Ensure that all options on the GPS Data Import page are selected and then click on the OK button Your route will now be o...

Страница 61: ...RTH Zooming in will release the points recorded by the Navig8r GPS Double click on any point to see the details For further information on importing gpx or GPS data into Google Earth please refer to t...

Страница 62: ...software for the Navig8r Please refer to the http www Navig8r com au website for detailed information and instructions concerning the update options for the Laser Navig8r GPS system Updates can only...

Страница 63: ...owling Clubs in the OV2 format will be used Connect you Navig8r GPS to your computer as described in the section Connecting the GPS to the computer in the first part of the manual This can be complete...

Страница 64: ...www navig8r com au 63 HARDWARE Hardware...

Страница 65: ...usic Icon Enters Music Playback screen H Video Icon Enters the Video playback screen I Settings Icon Enters the System Settings Menu J GPS Icon Launches the GPS Navigation software Note Prior to launc...

Страница 66: ...ining the images to display Tap the screen to display the control buttons Return to folder view Previous Image Next Image Rotation Zoom In Zoom Out Full Screen Exit C E Book Tap on the E Book icon in...

Страница 67: ...correctly for local time to ensure that Speed Zone information is displayed correctly E Battery Indicator Displays the current battery status Image will cycle during charging F Bluetooth Tap the Blue...

Страница 68: ...n to enter the Phone number direct form the Navig8r Calls can also be made through the phone when connected Enter the number to dial and tap the icon to begin the call When the out going call begins t...

Страница 69: ...Icon to accept the call or the icon to reject the call Private numbers on incoming calls will not be displayed Incoming call list Outgoing Call list Missed Call list Call selected number Delete selec...

Страница 70: ...www navig8r com au 69 MAIN SYSTEM MENU H Video Play Pause Stop Previous file Next file Random Play Repeat Play Tap the screen to toggle control buttons Return folder view Exit...

Страница 71: ...ght Adjusts the backlight level for the LCD screen D Time Date Sets the Time Date and Time Zone E Battery Status Displays the current battery status F FM transmitter Transmits the Audio to an FM radio...

Страница 72: ...the previous screen with out accepting the changes Tap to accept the changes B Langauge Tap the language to be displayed in the main system menu Tap or to return to the previous screen with out accept...

Страница 73: ...s a valid GPS signal Please ensure the Zone is set correctly as this is not updated and can effect data logging as well as SpeedAlert warnings E Battery Displays the current battery level Status bar w...

Страница 74: ...responding or detecting satellites correctly Reset the Hardware defaults of the Navig8r This does not change any settings made in Navigation Software From time to time it may be necessary to recalibra...

Страница 75: ...aker Built In Speaker USB USB2 0 Mass Storage USB connector Mini Port Hot Start 3 sec Open Sky 130dBm Warm Start 32 sec Open Sky 130dBm Cold Start 38sec Open Sky 130dBm Satellite Reacquisition Time Ac...

Страница 76: ...om at least 6 of these satellites GPS satellites transmit signals constantly These signals are aimed at earth based receivers such as GPS navigation systems Each satellite transmits data about its loc...

Страница 77: ...S unit is accurate to within 15 meters The GPS system is only as accurate as the mapping software in the unit If the map data is incorrect the visual representation of you location may not be displaye...

Страница 78: ...cted by computers as Mass Storage devices simular to USB drives Macs running OSX 10 2 or later should be able to access the GPS and SD Card Slot by connecting with the supplied USB cable without the n...

Страница 79: ...ing position without having to turn your head or take your eyes of the road while driving Q I find it hard to enter an address while driving what should I do A The driver of a vehicle should not attem...

Страница 80: ...ge CBD area the GPS drops out or has trouble syncing A CBD areas can have a canyon affect on GPS systems Not only can tall buildings hide the signal from GPS satellites it can also reflect the signals...

Страница 81: ......

Отзывы: