background image

BHM 

01/21/15 

NTV-DOC156 

rB2 


Agreement

End user agrees to use this product in compliance with all State and Federal laws. NAV-TV Corp. would not be held liable for 

misuse of its product.  If you do not agree, please discontinue use immediately and return product to place of purchase. This product is 
intended for off-road use and passenger entertainment only.  

5 | 

P a g e


8.


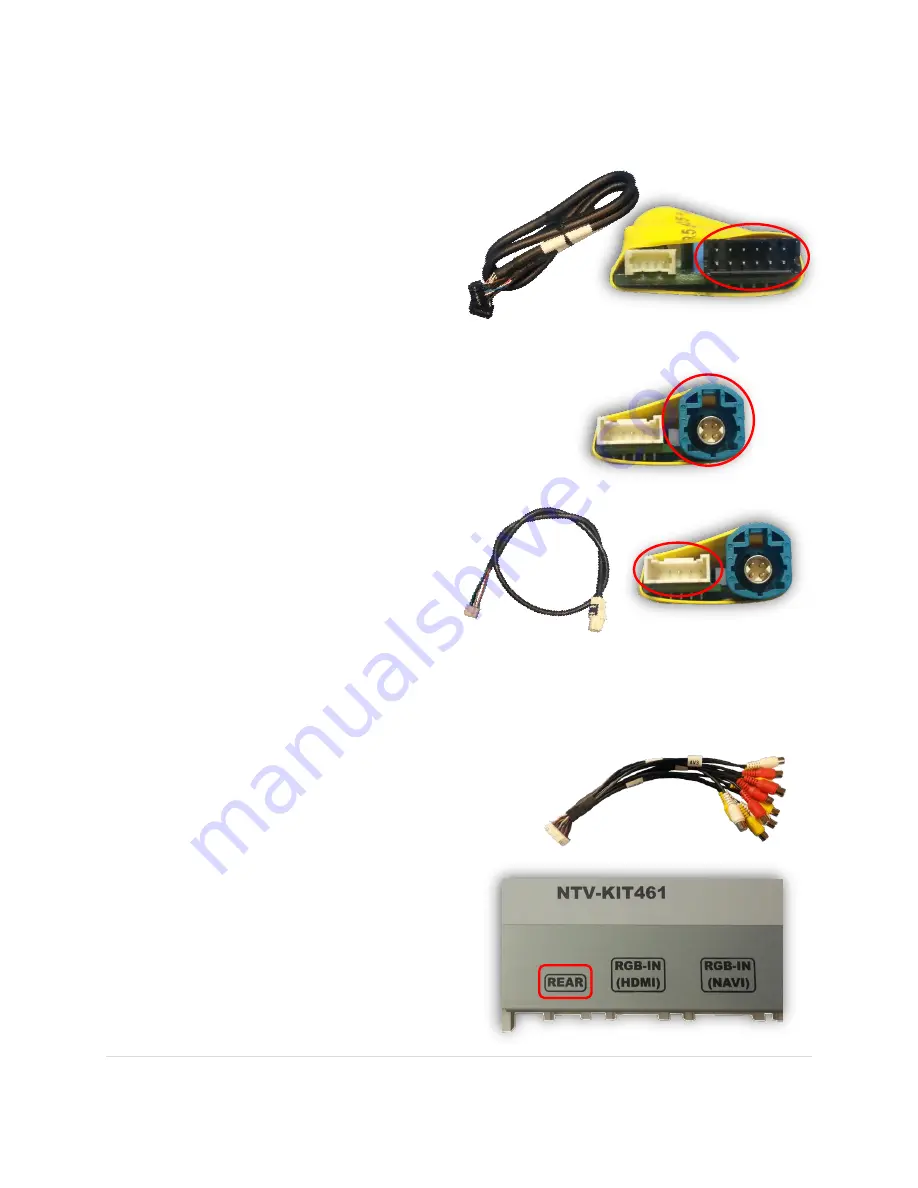
Connect the white 16-pin power connector to the port on the w204 interface 
labeled ‘

Power’

 
9.


Connect the provided 

Sub-board Cable


between the W204-12 interface at the 
port labeled 

‘LVDS OUT’ 

and the 

provided 

SUB-Board

. This connector 

is keyed, and can only fit in one 
direction and one port.  


10.


Connect the factory LVDS Video cable to the 
green LVDS port  on the provided 

SUB-Board:


11.


Connect the supplied 

LVDS Video 

Cable

 to the 5-pin plug on the 

SUB-

Board

 used from step 9 and 

connect the other white end to 
the factory Mercedes screen at the 
appropriate port.  


12.


Connect the AV Input cable to the port on the W204 interface labeled 

‘AV IN/OUT’

If you’re only connecting a reverse camera (and no other 
inputs), the signal input from the camera must 
connect to the RCA labeled 

‘REAR-C’

. Refer to 

the dip-switch settings chart to skip/enable 
AV sources upon toggle switch 
presses (optional. Page 2). 

a.


If you’re installing a Nav-TV 

CAM 6

 or 

Handle Cam

 as well, 

the power connector plugs 
directly into the W204 
interface port labeled 

‘REAR’

.  


Содержание W204-12 DYNAMIC Kit

Страница 1: ...561 955 9760 www nav tv com info nav tv com W204 12 DYNAMIC Kit NTV KIT461 Overview The W204 12 DYNAMIC kit allows the user to add up to 3 video inputs and a backup camera input to the factory media s...

Страница 2: ...g e Interface Connectors Dip Switch Settings Dip SW 1 2 3 4 5 6 7 8 UP Enables RGB Enables V1 Enables V2 Enables V3 For 7 Screen Deactivates R V cam Keep UP DOWN Skips RGB Skips V1 Skips V2 Skips V3 F...

Страница 3: ...and return product to place of purchase This product is intended for off road use and passenger entertainment only 3 P a g e Quick Connection Guide Provided interface video cable LVDS from w204 kit co...

Страница 4: ...he white cover from the black plug by releasing the clip on the side 4 Connect the white cover removed from step 3 to the black male end of the provided Power CAN T Harness 5 Insert the same connector...

Страница 5: ...tor is keyed and can only fit in one direction and one port 10 Connect the factory LVDS Video cable to the green LVDS port on the provided SUB Board 11 Connect the supplied LVDS Video Cable to the 5 p...

Страница 6: ...hing from the W204 interface s menu a While in any AV mode other than factory on the display screen press the MENU button for Menu 1 or hold the left arrow to enter MENU 2 b To switch between AV modes...

Страница 7: ...screen Use the remote OK button to switch modes or use the provided input toggle switch Hold the LEFT ARROW for 3 seconds The Menu of FACTORY will appear on screen v IMAGE MENU The only setting that m...

Страница 8: ...n or screen size Q Displayed image color is not proper too dim or color seems wrong A Try to select INITIAL in OSD menu Q Rear camera image does NOT appear A Make certain Dip Switch 7 in set down for...

Отзывы: