background image

BHM 

10/04/18 

NTV-DOC266  


Agreement

End user agrees to use this product in compliance with all State and Federal laws. NAV-TV Corp. would not be held liable for misuse of its product.  

If you do not agree, please discontinue use immediately and return product to place of purchase. This product is intended for off-road use and passenger 

entertainment only.  

10 | 

P a g e


CHRY MULTI-CAM Programming


Programming the CHRY MULTI-CAM is performed i

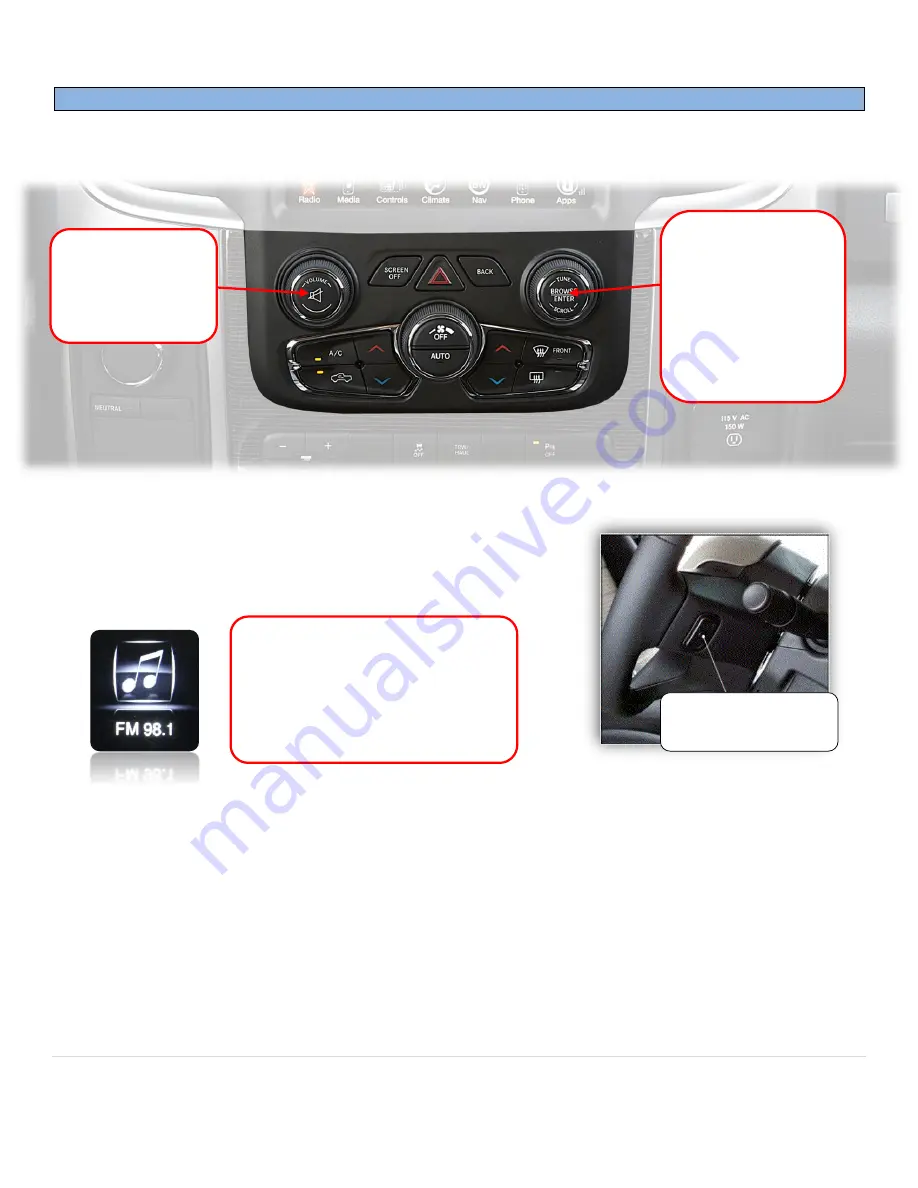
n the vehicle, through the factory dash MUTE button, TUNING KNOB, 

and CLUSTER LCD for feedback (true LCD cluster-equipped vehicles only) 


1.


Before attempting to program, after making connections, let the vehicle perform a CAN-reset: Close all 
doors/trunk/hood, lock the vehicle and waiting 10 minutes before 
proceeding to program.  

2.


Turn the vehicle’s ignition on. Be certain you’re resting in 

FM mode


(see an FM station frequency on the cluster), otherwise the cluster 
information may not display.  


3.


Close all doors (

door status may override NAV-TV settings cluster feedback

).  

4.


View the chart on the next page for settings descriptions and the diagram above to begin programming.  

5.


NAV-TV programming mode will time out (back to factory) after 15 seconds. 

Scroll to the end of the settings 

menu and select 

‘EXIT’

 to exit and save settings. 


Press and HOLD 

(15 seconds) to 

enter NAV-TV 

settings mode 

While in NAV-TV 

settings mode only: 

Rotate clockwise 

(

slowly

, one 

detent/time) to 

scroll through 

options. Press ENTER 

to change setting. 

To show the FM source on the 

cluster

, first clear any messages 

shown (door status, etc) with the UP 

or DOWN arrows on the steering 

wheel. Press the audio source button 

until ‘FM’ is displayed.


Center button: 

Change Audio Source 

Содержание CHRY MULTI-CAM

Страница 1: ...CHRY MULTI CAM Dodge Jeep uConnect RA4 Interface with 6 video inputs NTV KIT764 3950 NW 120th Ave Coral Springs FL 33065 TEL 561 955 9770 FAX 561 955 9760 BHM 10 04 18 NTV DOC266...

Страница 2: ...upgrades UCTv2 KIT762 Add up to 2 additional inputs or 1 input while retaining OEM camera UCTv2 KIT763 Same functionality as the standard system but includes an AVSW for audio integration AV input CH...

Страница 3: ...trol from SVS 6 TX Brown 6 RCA MALE 7 RCA Shield 8 CAN HI Radio Side Brown White 9 CAN HI Car Side Blue White 10 Ground Black 11 OUTPUT 1 Provides 12v ACC OUT White Red 12 OUTPUT 2 when AUX is activat...

Страница 4: ...urchase This product is intended for off road use and passenger entertainment only 4 P a g e Dash Disassembly basic RAM 1 Remove the Torx t20 screw at the right rear of the pocket on the right side of...

Страница 5: ...eft disconnected audio will not pass through the system properly 4 Connect the male VIDEO OUT RCA to the REAR CAMERA RCA among the Plug Play T Harness of the UCTv2 5 Connect the TX wire PIN 14 white b...

Страница 6: ...radio location There are two easily accessible locations for tapping this RVC signal Note If the OEM tailgate RVC signal is cut in half the rearview mirror image will display an error while in reverse...

Страница 7: ...2 Connect the added Cargo Camera signal to the Blue RCA among the provided Plug Play T Harness NOTE This blue RCA is ONLY for use in 2016 RAMs For RAMs 2015 and older connect signal directly to the SV...

Страница 8: ...V Corp would not be held liable for misuse of its product If you do not agree please discontinue use immediately and return product to place of purchase This product is intended for off road use and p...

Страница 9: ...not be held liable for misuse of its product If you do not agree please discontinue use immediately and return product to place of purchase This product is intended for off road use and passenger ente...

Страница 10: ...re proceeding to program 2 Turn the vehicle s ignition on Be certain you re resting in FM mode see an FM station frequency on the cluster otherwise the cluster information may not display 3 Close all...

Страница 11: ...TO STICK AUTO Select this option if the vehicle has an automatic transmission STICK Select this option if the vehicle has a manual transmission SWITCH RELAY AVSW SVS 6 RELAY Uses RCA inputs on the UCT...

Страница 12: ...in these vehicles 1 Open the driver s door and leave it open until step 4 2 After Installing the kit and adjusting the menu for desired options shut down the vehicle with the key or push button Wait...

Страница 13: ...y 13 P a g e Not supported on all vehicle models CHRY MULTI CAM Force Buttons CIM Hold 3 sec to activate not supported for 2016s Force rear camera Press hold 2 sec Truck Chassis RAM Durango or Grand C...

Страница 14: ...activate the AUX screen press and hold both radio SCREEN OFF BACK buttons together for 2 seconds truck chassis or REAR DEFROST car chassis To exit AUX mode press and release radio BACK button 2 secon...

Страница 15: ...CIM will disable automatically after 3 minutes This function will also keep the Cargo Camera enabled for 3 minutes and will reset upon every key cycle NOTE Activating the CIM function will NOT bypass...

Страница 16: ...e 3 5mm audio jack there s no audio A4 Make sure the audio RCAs are connected together on the Plug Play harness Q5 When I place the vehicle into reverse I get a black or blue screen A5 Make sure the c...

Страница 17: ...nce with all State and Federal laws NAV TV Corp would not be held liable for misuse of its product If you do not agree please discontinue use immediately and return product to place of purchase This p...

Отзывы: