background image

WWW.NANLUX.COM

15

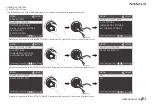
4. AS-CP-QR-EV Evoke Quick Release Clamp Installation

Rotate the adjustable handle to release the clamp.

Align the quick release plate on the power supply with the quick release mount 
on the clamp, a click sound will be heard when the power supply is fastened in 
place.

Mount the quick release clamp on the light stand, then rotate the adjustable handle 
to tighten the clamp.

Press the lock catch on the clamp to remove the power supply from the light stand.

Содержание Evoke 900C

Страница 1: ...Evoke 900C LED RGBLAC Spot Light USER MANUAL Guangdong NanGuang Photo Video Systems Co Ltd...

Страница 2: ...ge the power cable if any damage is found to avoid electric shock 6 Please use the power cable and DC cable provided by the manufacturer as the power is high Dangers like melting cable electric shock...

Страница 3: ...NLUX COM 02 Product Diagram Evoke 900C LED RGBLAC Spot Light Rated Power 940W Input DC 48V 18 75A Max AC 100 240V 50 60Hz Color Temperature 1800K 20000K G M 200 CRI Average 96 TLCI Average 96 Technica...

Страница 4: ...WWW NANLUX COM 03 4 Quick Release Device 5 Lock Catch 7 Yoke 3 NL Mount 6 Eye Bolt 2 USB Port 1 Wire Control Socket 8 COB Protective Cap Product Details...

Страница 5: ...WWW NANLUX COM 04 16 Adjustable Handle 17 Right Knob 18 DMX IN 19 DMX OUT 20 DC IN 9 Display 10 Buttons 11 Left Knob 12 Middle Knob 13 LAN1 14 LAN2 15 Fixture Body Handle...

Страница 6: ...WWW NANLUX COM 05 26 Reflector 24 DC Power Output Socket 25 Quick Release Plate 23 Power Switch 21 Power Supply Handle 22 AC Power Input Socket...

Страница 7: ...ng MODE MENU PRESET and LOCK 11 Left knob For adjusting brightness 12 Middle Knob For adjusting settings for each option 13 LAN 1 Network connecting port 14 LAN 2 Network connecting port 15 Fixture bo...

Страница 8: ...AC Spot Light Guangdong NanGuang Photo Video Systems Co Ltd Evoke 900C 1 Power Supply 1 AC Power Cable 1 User Manual 1 DC Connection Cable 1 Remote Controller 1 Includes USB Flash Drive 1 AS CP QR EV...

Страница 9: ...rive 1 WS RC C2 Remote Controller 1 User Manual 1 Carton Packaging Evoke 900C 1 Yoke 1 Power Supply 1 Reflector 1 DC Connection Cable 7 5M 1 AC Power Cable 6M 1 AS CP QR EV 1 FL 35YK Lens 1 USB Flash...

Страница 10: ...oke 900C 1 Yoke 1 Power Supply 1 Reflector 1 DC Connection Cable 7 5M 1 AC Power Cable 6M 1 AS CP QR EV 1 USB Flash Drive 1 WS RC C2 Remote Controller 1 User Manual 1 CC EV1200 FT Flight Case 1 Evoke...

Страница 11: ...WWW NANLUX COM 10 1 Connection Between Light Fixture and Power Supply Usage...

Страница 12: ...elease the lever and push the lever aside Firmly hold the yoke in place with one hand and pull the quick release lever with the other hand to lock the plate Align and insert the quick release plates t...

Страница 13: ...tening screws on the light stand When disassembling the yoke remove the fixture from the heavy duty light stand first and lay it down on flat ground Press the quick release lever lock catch of the fix...

Страница 14: ...to the plates of the yoke Note Please adjust the plate to right directions when installing the quick release plate then insert them into the mount Mount the yoke on heavy duty light stand and lock the...

Страница 15: ...onet lock to the light s mount rotate the reflector clockwise and fasten the reflector on the light Note if the rotation is not smooth pull the lock catch of the mount and rotate the reflector at the...

Страница 16: ...k release plate on the power supply with the quick release mount on the clamp a click sound will be heard when the power supply is fastened in place Mount the quick release clamp on the light stand th...

Страница 17: ...e as well The ADDRESS needs to be set before operating the remote control via DMX RDM 2 4G LumenRadio Art Net sACN 1 1 ADDRESS Press MENU button to enter the interface 1 ADDRESS DMX including ADDRESS...

Страница 18: ...HING PRESS MENU TO RETURN 1 2 DMX MODE Rotate the right knob to ADDRESS and press the right knob to enter the tertiary menu Rotate the right knob to select address number and press the right knob to s...

Страница 19: ...T RGBLAC 16bit CCT Adv HSI 8bit CCT Adv HSI 16bit PRESS MENU TO RETURN MENU CH 512 SMART ADDRESS DMX MODE DMX REDUCED CHANNELS DMX DIMMING CURVE DMX SMOOTHING PRESS MENU TO RETURN Rotate the right kno...

Страница 20: ...DUCED CHANNELS DMX DIMMING CURVE DMX SMOOTHING PRESS MENU TO RETURN MENU CH 512 SMART ADDRESS DMX MODE DMX REDUCED CHANNELS DMX DIMMING CURVE DMX SMOOTHING PRESS MENU TO RETURN 1 5 DMX SMOOTHING Rotat...

Страница 21: ...d light fixture XLR plug socket and the cable should be connected as picture above Pin1 Pin2 Pin3 for connecting DMX signal Pin4 Pin5 has no connection NOTE When connecting DMX make sure the internal...

Страница 22: ...he DMX RDM console operation manual 2 5 Note For technical data please download from https www nanlux com en h col 274 html 3 RDM Control 3 1 Connect the light fixture to the console with RDM function...

Страница 23: ...N OFF RESET BLUETOOTH PRESS MENU TO RETURN MENU CH 512 SMART BLUETOOTH ON OFF RESET BLUETOOTH PRESS MENU TO RETURN MENU CH 512 SMART OFF ON PRESS MENU TO RETURN 4 WIRELESS CONTROL 4 1 BLUETOOTH Settin...

Страница 24: ...U CH 512 SMART PRESS MENU TO RETURN RESET BLUETOOTH BACK RESET MENU CH 512 SMART PRESS MENU TO RETURN RESET BLUETOOTH BACK RESET Rotate the right knob to RESET BLUETOOTH and press the right knob to en...

Страница 25: ...2 4G SETTINGS and press the right knob to enter the tertiary menu Rotate the right knob to 2 4G ON OFF and press the right knob to enter the next level menu 4 2 2 4G Setting Evoke 900C can be remotely...

Страница 26: ...SS MENU TO RETURN 2 4G WIRELESS PROTOCOL V1 0 V2 0 MENU CH 512 SMART PRESS MENU TO RETURN 2 4G WIRELESS PROTOCOL V1 0 V2 0 Rotate the right knob to select ON or OFF and press the right knob to set The...

Страница 27: ...512 SMART BLUETOOTH SETTINGS 2 4G SETTINGS LUMENRADIO SETTINGS ALL WIRELESS ON OFF PRESS MENU TO RETURN MODE MENU PRESET LOCK Rotate the right knob to WIRELESS CONTROL and press the right knob to ente...

Страница 28: ...ETURN SET MENU CH 512 SMART PRESS MENU TO RETURN MENU CH 512 SMART OFF ON PRESS MENU TO RETURN MENU CH 512 SMART OFF ON PRESS MENU TO RETURN Rotate the right knob to LUMENRADIO SETTINGS and press the...

Страница 29: ...MENU TO RETURN MENU CH 512 SMART LUMENRADIO ON OFF RADIO MODE UNLINK PRESS MENU TO RETURN MENU CH 512 SMART PRESS MENU TO RETURN DO YOU WANT TO UNLINK NO YES Rotate the right knob to RADIO MODE and p...

Страница 30: ...right knob to enter the next level menu Please refer to P28 of this manual or CRMX wireless DMX transmitter manual to connect the fixture set in TRANSMITTER MODE or CRMX wireless DMX transmitter with...

Страница 31: ...12 SMART PRESS MENU TO RETURN Rotate the right knob to select 20dBm 16dBm 11dBm or 5dBm and press the right knob to set 512 MENU Rotate the right knob to select TRANSMITTER MODE and press the right kn...

Страница 32: ...ol will be shortened when set to TRANSMITTER MODE Rotate the right knob to select LINK and press the right knob to set Rotate the right knob to LINK and press the right knob to enter the next level me...

Страница 33: ...RN MENU CH 512 SMART PRESS MENU TO RETURN DO YOU WANT TO TURN ON OR OFF ALL WIRELESS FUNCTIONS NO YES MENU CH 512 SMART PRESS MENU TO RETURN DO YOU WANT TO TURN ON OR OFF ALL WIRELESS FUNCTIONS NO YES...

Страница 34: ...ACN UNIVERSE PRESS MENU TO RETURN MENU CH 512 SMART Automatic Art Net sACN OFF PRESS MENU TO RETURN MENU CH 512 SMART Automatic Art Net sACN OFF PRESS MENU TO RETURN SET MENU CH 512 SMART PRESS MENU T...

Страница 35: ...H 512 SMART PRESS MENU TO RETURN Art Net Universe 001 NET 0 SUB 0 UNI 1 MENU CH 512 SMART PRESS MENU TO RETURN Art Net Universe 002 NET 0 SUB 0 UNI 1 MENU CH 512 SMART PRESS MENU TO RETURN Art Net Uni...

Страница 36: ...sACN Universe 001 MENU CH 512 SMART PRESS MENU TO RETURN sACN Universe 001 MENU CH 512 SMART PRESS MENU TO RETURN sACN Universe 002 MENU CH 512 SMART PRESS MENU TO RETURN sACN Universe 002 Rotate the...

Страница 37: ...cable and switch it on If the power indicator is on that means the power input is normal the screen will display NANLUX 2 MODE button Press the MODE button to enter the lighting mode interface The li...

Страница 38: ...E XY COORDINATES RGBW MODE GEL MODE EFFECT MODE LIGHTING MODE CH 512 SMART CCT MODE ADV HSI MODE XY COORDINATES RGBW MODE GEL MODE EFFECT MODE Rotate the right knob to select the needed lighting mode...

Страница 39: ...MODE GEL MODE EFFECT MODE LIGHTING MODE CH 512 SMART CCT MODE ADV HSI MODE XY COORDINATES RGBW MODE GEL MODE EFFECT MODE 2 1 CCT Mode Press the MODE button to enter the lighting mode list interface MO...

Страница 40: ...ode press the left knob the fixture is off the brightness percentage on the screen will be 0 0 press again the fixture restores the previous state press continuously to switch the fixture betweeen on...

Страница 41: ...ase G M value while counterclockwise to reduce the G M value The screen shows the G M value and the corresponding lighting state range from 200 200 2 2 Advanced HSI Mode Advanced HSI Mode Setting rota...

Страница 42: ...adjustment range of HUE and SAT are the same as in Advanced HSI Mode 2 3 XY Coordinates Mode XY Coordinates Mode Setting rotate the left knob to adjust the brightness rotate the middle knob to adjust...

Страница 43: ...799 X 0 2999 Y 0 1 0 0 0 1 0 2 0 3 0 4 0 5 0 6 0 7 0 2 0 3 0 4 0 5 0 6 0 7 0 8 XY COORDINATES CH 512 SMART XY CHART FOR ROUGH REF Rotate the middle knob to adjust the X coordinate value Rotate the rig...

Страница 44: ...00K CCT Double CTB Rotate the right knob to select red green blue or white Rotate the middle knob to adjust the corresponding red green blue and white value Rotate the left knob to adjust the brightne...

Страница 45: ...e the middle knob to choose 3200K or 5600K Rotate the middle knob to select the effect which can be adjusted circularly 2 6 Effect Mode Evoke 900C has built in effects including HUE Loop CCT Loop INT...

Страница 46: ...ODE CH 512 SMART HUE1 0 HUE2 360 SAT 100 SPEED 8s CYCLE TWO WAY ADD ON OFF DIM 100 0 EFFECT HUE LOOP EFFECT MODE CH 512 SMART HUE1 1 HUE2 360 SAT 100 SPEED 8s CYCLE TWO WAY ADD ON OFF HUE LOOP HUE LOO...

Страница 47: ...e four add on effects in HUE loop OFF FLASH RANDOM FLASH and PULSE rotate the middle knob to select Rotate the middle knob to select cycle mode Note 1 When the cycle mode is in one way or two way pres...

Страница 48: ...SMART CCT1 5600K CCT1 5600K G M 0 SPEED 8s CYCLE TWO WAY ADD ON OFF CCT LOOP CCT LOOP setting rotate the right knob to select CCT 1 CCT 2 G M SPEED range 2s 30s CYCLE or ADD ON and rotate the middle k...

Страница 49: ...rotate the right knob to select COLOR CCT or HSI When the color is CCT rotate the right knob to select CCT G M SPEED range 2s 30s CYCLE DIMMING RANGE or ADD ON and rotate the middle knob to set the p...

Страница 50: ...TERVALS 1 0s FLASH RATIO 50 PAUSE OFF FLASH FLASH setting rotate the right knob to select COLOR CCT or HSI When the color is CCT rotate the right knob to select CCT G M INTERVALS range 0 1s 10s FLASH...

Страница 51: ...2 SMART COLOR CCT CCT 5600K G M 0 PULSES MIN 40 PULSE PULSE setting rotate the right knob to select COLOR CCT or HSI When the color is CCT rotate the right knob to select CCT G M or PULSES MIN range 1...

Страница 52: ...AUSE OFF Rotate the right knob to select CCT FLASH TIMES INTERVAL RANGE or PAUSE Rotate the middle knob to set the parameters STORM STORM setting rotate the right knob to select TRIGGER AUTO or MANUAL...

Страница 53: ...GGER DIM 100 0 TRIGGER MANUAL CCT 5600K FLASH TIMES 3 6 EFFECT STORM EFFECT MODE CH 512 SMART PRESS SELECT TO TRIGGER Rotate the right knob to select CCT or FLASH TIMES Rotate the middle knob to set t...

Страница 54: ...DE CH 512 SMART COLOR BLUE WHITE MODE DOUBLE SPEED 50 DIM 100 0 EFFECT POLICE CAR EFFECT MODE CH 512 SMART COLOR RED BLUE MODE DOUBLE SPEED 50 Rotate the right knob to select COLOR MODE or SPEED Rotat...

Страница 55: ...OR CCT CCT 5600K G M 0 CCT SHIFT 600K SPEED 50 DIMMING RANGE 0 0 100 0 When the color is CCT rotate the right knob to select CCT G M CCT SHIFT range 0K 3000K SPEED range 1 100 or DIMMING RANGE and rot...

Страница 56: ...0 EFFECT PAPARAZZI EFFECT MODE CH 512 SMART CCT 5700K G M 0 SPEED 50 DIM 100 0 EFFECT PAPARAZZI EFFECT MODE CH 512 SMART CCT 5600K G M 0 SPEED 50 Rotate the right knob to select CCT G M or SPEED Rota...

Страница 57: ...IFT 600K DIMMING RANGE 0 0 100 0 FLICKER OFF When the color is HSI rotate the right knob to select HUE SAT SPEED range 1 100 HUE SHIFT range 0 180 DIMMING RANGE or FLICKER and rotate the middle knob t...

Страница 58: ...T AMOUNT 9 SPEED 50 SAT 100 Rotate the right knob to select AMOUNT SPEED or SAT Rotate the middle knob to set the parameters DISCO DISCO setting rotate the right knob to select COLOR DEFAULT or MANUAL...

Страница 59: ...at the bottom of the screen when amount is 2 C1 C2 will display and so on C1 C6 range 0 360 and rotate the middle knob to set the parameters Rotate the right knob to select AMOUNT SPEED or SAT Rotate...

Страница 60: ...T COLOR CCT CCT 5600K G M 0 INTENSITY 50 SPEED 50 When the color is HSI rotate the right knob to select HUE SAT INTENSITY range 1 100 or SPEED range 1 100 and rotate the middle knob to set the paramet...

Страница 61: ...MANUAL DEFAULT or CCT When the color is MANUAL rotate the right knob to select AMOUNT range 1 6 SPEED range 1 100 DECAY range 1 100 or SAT There will be different colors at the bottom of the screen w...

Страница 62: ...DE CH 512 SMART COLOR DEFAULT AMOUNT 9 SPEED 50 DECAY 50 SAT 100 DIM 100 0 EFFECT FIREWORK EFFECT MODE CH 512 SMART COLOR DEFAULT AMOUNT 12 SPEED 50 DECAY 50 SAT 100 When the color is DEFAULT rotate t...

Страница 63: ...MODE CH 512 SMART COLOR CCT CCT 5700K G M 0 CCT SHIFT 600K SPEED 50 DECAY 50 DIM 100 0 EFFECT FIREWORK EFFECT MODE CH 512 SMART COLOR CCT CCT 5600K G M 0 CCT SHIFT 600K SPEED 50 DECAY 50 When the colo...

Страница 64: ...D range 1 100 or DECAY range 1 100 and rotate the middle knob to set the parameters same setting method as in CCT Rotate the right knob to select CCT G M SPEED or DECAY Rotate the middle knob to set t...

Страница 65: ...TRIGGER DIM 100 0 EFFECT EXPLOSION EFFECT MODE CH 512 SMART TRIGGER MANUAL COLOR CCT CCT 5700K G M 0 DECAY 50 PERSS SELECT TO TRIGGER When the trigger is MANUAL and color is CCT rotate the right knob...

Страница 66: ...ob to select COLOR CCT or HSI When the color is CCT rotate the right knob to select CCT G M SPEED range 1 100 DIMMING RANGE or PAUSE and rotate the middle knob to set the parameters Rotate the right k...

Страница 67: ...NETWORK SETTINGS and press the right knob to enter the secondary menu 3 MENU Button Press MENU button to enter the interface Rotate the right knob to select the needed option and press the right knob...

Страница 68: ...ART DHCP Art Net 2 x x x Art Net 10 x x x MANUAL PRESS MENU TO RETURN Rotate the right knob to NETWORK MODE and press the right knob to enter the tertiary menu Rotate the right knob to select the need...

Страница 69: ...TO RETURN Press the right knob to set Rotate the right knob to IP ADDRESS and press the right knob to enter the tertiary menu Rotate the right knob to the bytes and rotate the middle knob to select th...

Страница 70: ...255 254 255 0 MENU CH 512 SMART PRESS MENU TO RETURN SET MENU CH 512 SMART PRESS MENU TO RETURN MENU CH 512 SMART NETWORK MODE IP ADDRESS SUBNET MASK GATEWAY ADDRESS MAC ADDRESS PRESS MENU TO RETURN...

Страница 71: ...SS 192 169 0 100 MENU CH 512 SMART PRESS MENU TO RETURN SET MENU CH 512 SMART PRESS MENU TO RETURN MENU CH 512 SMART NETWORK MODE IP ADDRESS SUBNET MASK GATEWAY ADDRESS MAC ADDRESS PRESS MENU TO RETUR...

Страница 72: ...ATEWAY ADDRESS MAC ADDRESS PRESS MENU TO RETURN Rotate the right knob to FAN CONTROL and press the right knob to enter the secondary menu 3 5 FAN CONTROL Rotate the right knob to MAC ADDRESS and press...

Страница 73: ...FULL SPEED LOW SPEED OFF PRESS MENU TO RETURN Note When the fan is off the built in fan will stop working and the maximum output of fixture is 20 When the fan is in low speed the maximum output is 70...

Страница 74: ...RIGHTNESS MENU CH 512 SMART NETWORK SETTINGS Art Net sACN SETTINGS FAN CONTROL ROTATE SCREEN SCREEN BRIGHTNESS BUTTON BACKLIGHT SET MENU CH 512 SMART PRESS MENU TO RETURN Rotate the right knob to sele...

Страница 75: ...PRESS MENU TO RETURN SET MENU CH 512 SMART PRESS MENU TO RETURN MENU CH 512 SMART PRESS MENU TO RETURN Rotate the right knob to select ON or OFF and press the right knob to set Rotate the right knob...

Страница 76: ...FAT 3 If prompted that THE VERSIONS OF THE TWO FIRMWARE FILES DON T MATCH PLEASE CHECK THE FILES AND TRY AGAIN please check whether the versions of the two firmware files are consistent 4 If prompted...

Страница 77: ...N RESET ALL SETTINGS OF THIS LIGHT NO YES SET MENU CH 512 SMART PRESS MENU TO RETURN Rotate the right knob to RESET ALL SETTINGS and press the right knob to enter the secondary menu Rotate the right k...

Страница 78: ...ww nanlux com MODE MENU PRESET LOCK Rotate the right knob to VERSION and press the right knob to check the current version 3 12 VERSION 4 PRESET Press the PRESET button to enter the interface PRESET C...

Страница 79: ...ONG PRESS PRESET TO PRESET CH 512 SMART EXIT MANAGE LONG PRESS PRESET TO Press the right knob to MANAGE PRESET or EXIT MANAGE 4 1 Save the Settings Long press the PRESET button to enter the preset int...

Страница 80: ...3 4 5 6 7 8 9 0 A B C D E F G H I J K L M N O P Q R S T U V W X Y Z CANCEL SAVE 1 2 3 4 5 6 7 8 9 0 A B C D E F G H I J K L M N O P Q R S T U V W X Y Z CANCEL SAVE Press the right knob to set 1 1 2 3...

Страница 81: ...PRESET CH 512 SMART 1 2 MANAGE PRESET LONG PRESS PRESET TO 4 2 Trigger the Settings Press the PRESET button to enter the interface Rotate the right knob to select preset settings press the right knob...

Страница 82: ...PRESET TO PRESET CH 512 SMART 1 2 MANAGE PRESET LONG PRESS PRESET TO 4 3 Rename or Delete the Preset Settings Press the PRESET button to enter the interface Rotate the right knob to MANAGE PRESET Pres...

Страница 83: ...AGE PRESET LONG PRESS PRESET TO Rotate the right knob to MANAGE PRESET Rotate the right knob to select rename or delete the saved preset setting Press the right knob to EXIT MANAGE PRESET CH 512 SMART...

Страница 84: ...O YES MENU CH 512 SMART PRESS MENU TO RETURN CONFIRM DELETING 2 NO YES Rotate the right knob to YES and press the right knob to delete Press the right knob to select 1 2 EXIT MANAGE PRESET CH 512 SMAR...

Страница 85: ...K CCT G M 5 LOCK Long press the LOCK button to lock the settings at this moment any operation or adjustment on the button and knob will not change the current setting Long press the LOCK button again...

Страница 86: ...agnosis The light won t boot up properly The fixture can be operated manually but DMX control is not working LCD display is on but light cannot be operated The fan doesn t work 1 Please check whether...

Страница 87: ...e Detailed User Manual Nanlux Website Nanlink App This manual has been compiled according to the rigorous testing for Nanlux products Product designs are subject to change without prior notice The lat...

Страница 88: ...WWW NANLUX COM 87 Certification Made in China...

Страница 89: ...WWW NANLUX COM Dongli Section Highway 324 Chenghai Shantou City Guangdong Province China 0754 85300887 info nanlux com 0754 85751187...

Отзывы: