


WWW.NANLUX.COM
20
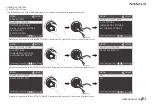
SET
MENU
CH: 512
SMART
PRESS “MENU” TO RETURN
MENU
CH: 512
SMART
OFF
ON
PRESS “MENU” TO RETURN
Rotate the ''right knob'' to select ON or OFF and press the ''right knob'' to set.
2. DMX Control
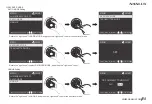
2.1. Connect the light fixture and the DMX512 console using the connection cable, as below.
·5-pin shielded cable with a diameter not less than 0.3mm must be used for connection between light fixture and DMX/RDM console, or between light fixture and
light fixture. XLR plug/socket and the cable should be connected as picture above.
·Pin1, Pin2, Pin3 for connecting DMX signal. Pin4, Pin5 has no connection.
▲NOTE: When connecting DMX, make sure the internal pin is not in contact with the inner case. The fixture can match the DMX512 (1990) control signal.
·5-pin and 3-pin XLR plug/socket conversion
The fixture comes with 5-pin XLR plug/socket. lf a 3-pin XLR plug is used, please follow the instruction below.
DMX IN
DMX OUT
1 GND
2 DATA-
3 DATA+
NC
NC
NC
NC
GND 1
DATA- 2
DATA+ 3
Three Pin
Pin 1:GND(SCREEN)
Pin 2:Signal(-)
Pin 3:)
Five Pin
Pin 1:GND(SCREEN)
Pin 2:Signal(-)
Pin 3:)
Pin 4:N/C
Pin 5:N/C


