Бесплатное руководство по быстрому старту для продукта Nadoli DO503442C-CL доступно для скачивания на нашем сайте. Этот мануал поможет вам быстро и легко настроить и использовать ваше устройство. Посетите manualshive.com для загрузки.
A
B
C
D
90°
02
Enlever la péllicule de plastique protectrice
Remove protective plastic film
01
BASE INSTALLATION
INSTALLATION BASE /
SUITE / CONTINUED
3
03
Страница 1: ...ctangular Opening Shower Door Dimension of shower door Profile adjustment 25mm 1 1850mm 72 13 16 1022 1047mm 40 1 4 41 1 4 819 844mm 32 1 4 33 1 4 Rev April 11 2018 819 844 x 1022 1047 x 1850mm H 32 3...
Страница 2: ...votre douche devrait tre nettoy e avec de l eau et du savon Ceci est particuli rement important dans les districts o l eau dure et le calcium peuvent causer des accumulations insolubles Les d tergent...
Страница 3: ...block M6 screws 14mm Splash guard Anti claboussure Charni re de montage et vis M6 14mm 2 1 1 2 1 1 2 4 8 8 4 1 Magnetic seals Joint magn tique Drip seal Joint d tanch it Handle set Jeu de poign es Rai...
Страница 4: ...emove jambs and drill 6mm holes with drill bit Insert plastic wall plugs 19 that are provided Retirer les montant et percer des trous avec une m che de 6mm et ins rez les chevilles 19 de plastique qui...
Страница 5: ...Ne pas trop serrer cela pourrait endommager les bouchons de rail 9 Astuce Utilisez une petite quantit de silicone sur le bouchon pour le sceller au bouchon int rieur Faite ceci la fin lorsque vous sce...
Страница 6: ...bottom mounting block 5 Try to keep the door 4 as vertical as possible to prevent damage Slide the second mounting block 6 onto the top hinge 7 Make sure that the mounting block is facing the right wa...
Страница 7: ...2 onto the door panel 5 Placez l anti caboussure 12 sur le panneau de la porte 5 Push the drip seal 14 onto the bottom of the coor panel 5 Note that the top flap is on the inside Placez le joint d tan...
Страница 8: ...0 6 6 1 5 2 2 50mm 3 35 64 90mm 21 533mm 42 1067mm 2 3 4 70mm 4 9 16 116mm 16 11 16 424mm 1 1 8 30mm 34 864mm This indentation is designed to ensure the water goes back to the shower base towards the...
Страница 9: ...lors de l installation Avant l installation de la base toute la charpente et les travaux de plomberie doivent tre compl t s conform ment la pr sente feuille d instruction Pour les travaux de r novatio...
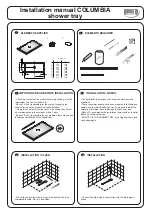
Страница 10: ...A B C D 90 A 02 C 90 D Enlever la p llicule de plastique protectrice Remove protective plastic lm A 01 BASE INSTALLATION INSTALLATION BASE SUITE CONTINUED 3 A 03...
Страница 11: ...SUITE CONTINUED FORET 1 8 1 8 DRILL BIT A 05 A 04 SUITE CONTINUED 4...
Страница 12: ...c ramique Ceramic tiles Gypse Gypsium Silicone Montant mural Wall stud Vis R ef A Screw Ref A VUE SECTIONNELLE SIDE SECTION VIEW A 07 Pellicule Film Base Base Mor er Mortar A 06 Vis Screw SUITE CONTIN...
Страница 13: ...d installer votre porte de douche a n de permettre au mortier et la nition de s cher compl tement WARNING Wait 24h before proceeding with the installa tion of the shower door This will ensure that the...
Страница 14: ...of God or breakage resulting from a shock or mishandling regardless of the part played by the buyer or the installer It also excludes the damages caused by an improper installation NADOLI doesn t cove...
Страница 15: ...rantie ne couvre pas les dommages caus s par les actes de Dieu ou les bris r sultant d un choc ou d une mauvaise manutention Elle exclut aussi les dommages qui r sultent d une mauvaise installation D...