


limited in dynamic range and frequency bandwidth for
the surround channel and thus only requires speak-
ers of far lesser specification compared to the front
channels. Dolby Digital however is a full range sys-
tem, with two independent surround channels and
with dynamics equal to that of the front channels. For
this reason it is advisable to choose loudspeakers
which are similar in power handling and performance
capability to those of the front channels.
For best results, the Surround loudspeakers should
not beam the sound directly at the listener. One way
of achieving this is to use ‘dipole’ Surround speakers
which aim the sound down the walls rather than
directly into the room.
Many film soundtracks rely heavily on very low fre-
quency sound effects which are difficult for normal or
smaller hi-fi speakers to reproduce. To faithfully
reproduce these low frequencies you can use a spe-
cially designed low frequency loudspeaker with its
own built-in amplifier (“active subwoofer”). Because it
is difficult to hear which direction very low frequencies
are coming from, you only normally need one sub-
woofer and this can be placed virtually anywhere in
the room. The Subwoofer output of the T 760 is
designed specifically to drive a subwoofer system.
Dolby Digital uses a dedicated Low Frequency
Effects (LFE) channel. If a subwoofer has been
selected, the LFE channel will be fed to the sub-
woofer output.
Channel Delays:
For the best surround sound performance it is
important that sound from all speakers reach the lis-
tener’s ears at the same time. Because the sur-
round/rear speakers are usually closer to the listener
than the front speakers, there is tendency for the ear
to localise sounds to the rear, because the ear takes
most notice of the sounds that arrive at the head first.
Similarly, the center speaker is often closer to the lis-
tener than the front left and right speakers. To com-
pensate for this, the T 760 can slightly delay the
audio sent to the center and rear (closer) speakers. In
this way, when playing Dolby Digital or Dolby Pro
logic soundtracks, the sound from all speakers
arrives uniformly at the listening position as intended
by the film’s producer.
Each millisecond corresponds approximately with 1
foot or 30.5 centimeters.
NOTE:
The channel delay option is not available in DTS
surround mode.
To set the center channel delay time,
• Call up the SETUP menu of the On Screen
Display (Fig. 7).
• Select the CHANNEL DELAYS menu (Fig. 10).
• Choose CENTER and select the desired delay
time (1, 2, 3, 4 or 5ms).
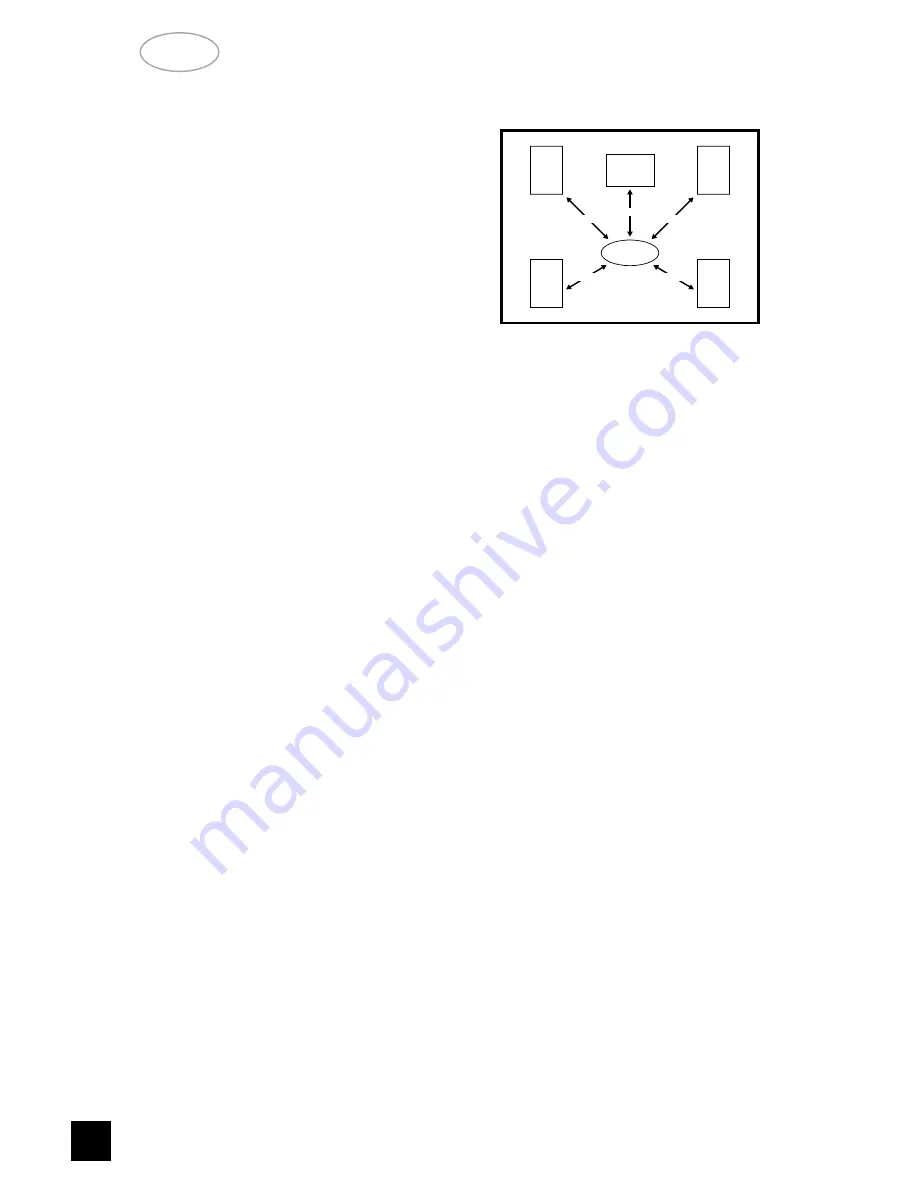
Measure the distance from the listening position to
the center speaker (dC) and to one of the front
speakers (dFL or dFR). Subtract the center channel
distance from the front L or R channel distance. For
example, if the front speakers are 12 feet (3.7 m)
from the listening position and the center speaker is
10 feet (3.0 m), the difference is 2 feet (0.6 m). For
this example the center channel delay is set to 2 mil-
liseconds or ms.
The T 760 can delay the center channel output up
to 5 milliseconds and thus compensates for center
channel speakers that are up to 5 feet (1.5 m) closer
to the listening position than the front left and right
speakers.
NOTES:
In rare system setups, the center channel speaker
is actually further away than the front left and right
speakers. In these cases, set the center channel
delay to 0mS. The center channel delay time adjust-
ment is only available in Dolby Digital surround mode.
To set the rear channel delay time,
• Use the
3
or
4
cursor button (No. 7) to highlight
the REAR.
• Scroll the preset delay time options by
1
and
2
cursor buttons.
Measure the distance from the listening position to
either the left or right rear speaker (dLS or dRS).
Subtract the rear speaker distance from the front
speaker distance (dFL or dFR). The resulting dis-
tance is equivalent to the delay in milliseconds for the
rear delay setting. For example, if your rear speaker
distance is 6 feet (1.8 m) and the front distance is 12
feet (3.7 m), the correct rear channel delay setting is
6 milliseconds. Again, set the rear channel delay to
0mS if the rear channels are further from the listening
position than the front speakers.
In Dolby Digital surround mode, the rear channel
delay time can be set from 0ms to 15ms with 1ms
increments.
LISTENING
POSITION
CENTER
FRONT
LEFT
REAR
LEFT
FRONT
RIGHT
REAR
RIGHT
dC
dFR
dFL
dRS
dFS
NAD
20
GB


