GB
NAD
T 760
• OWNER'S MANUAL
©1999 NAD ELECTRONICS LTD. T 760
Страница 1: ...GB NAD T 760 OWNER S MANUAL 1999 NAD ELECTRONICS LTD T 760 ...
Страница 2: ...lled into the unit or C The unit has been exposed to rain or liquids of any kind or D The unit does not appear to operate normally or exhibits a marked change in performance or E The device has been dropped or the enclosure damaged DO NOT ATTEMPT SERVICING OF THIS UNIT YOURSELF REFER SERVICING TO QUALIFIED SERVICE PERSONNEL Upon completion of any servicing or repairs request the service shop s ass...
Страница 3: ...TINA NÄKTMÄTONTÄ LASERSÄTEILYLLE ÄLÄ KAISO SÄTEESEEN CLASS 1 LASER PRODUCT LUOKAN 1 LASERPLAITE KLASS 1 LASERAPPARAT THIS DIGITAL APPARATUS DOES NOT EXCEED THE CLASS B LIMITS FOR RADIO NOISE EMISSIONS FROM DIGITAL APPARA TUS AS SET OUT IN THE RADIO INTERFERENCE REGULATIONS OF THE CANADIAN DEPARTMENT OF COMMUNICATIONS LE PRESENT APPAREIL NUMVERIQUE N EMENT PAS DE BRUITS RADIOELECTRIQUES DEPASSANT L...
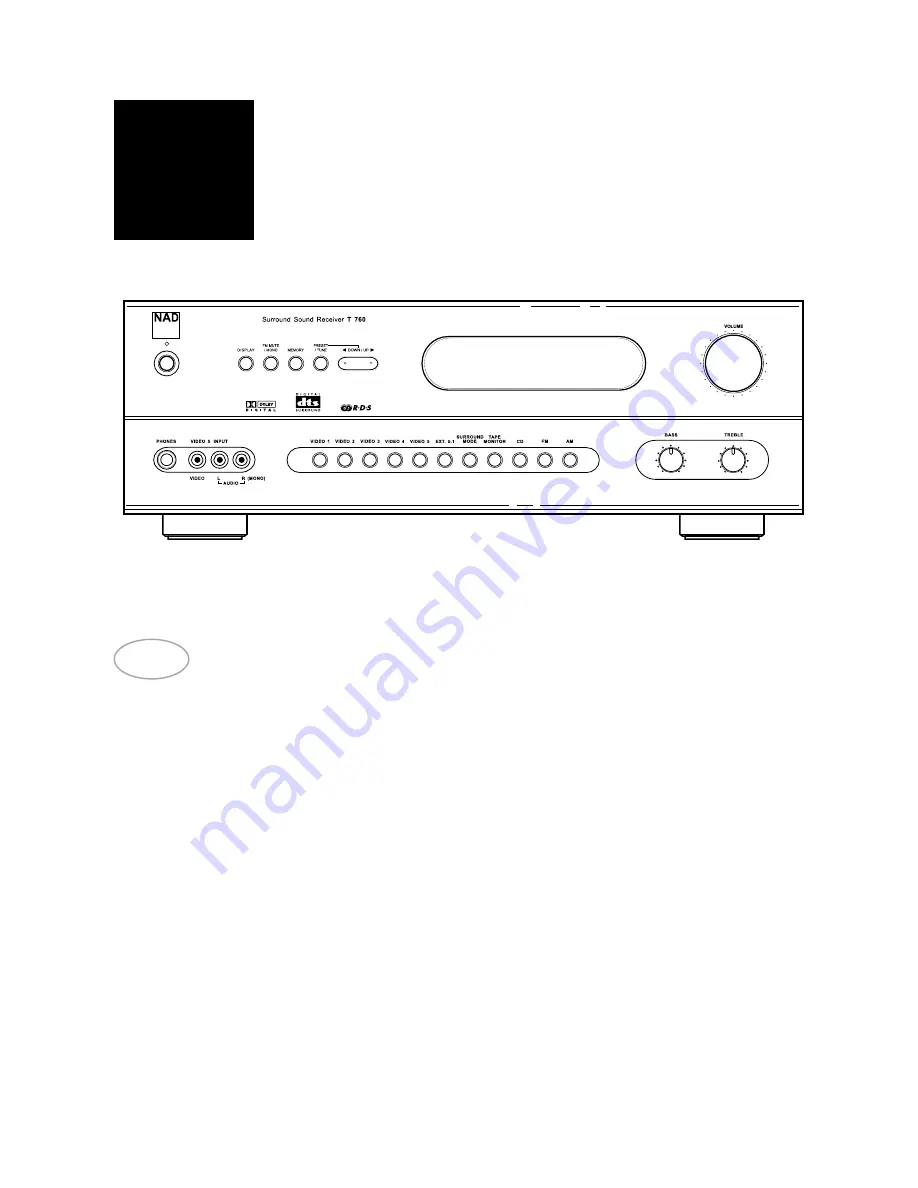
Страница 4: ...REAR PANEL CONNECTIONS Figure 1 7 8 2 1 3 4 11 6 12 5 10 9 14 13 FRONT PANEL CONNECTIONS Figure 2 NAD 4 1999 NAD ELECTRONICS LTD T 760 1999 NAD ELECTRONICS LTD T 760 ...
Страница 5: ...NAD 5 1 2 5 3 4 6 7 8 9 10 11 REMOTE CONTROL Figure 3 NL Batterij niet weggooien maar inleveren als KCA Figure 6 1 2 3 Figure 5 Figure 4 ...
Страница 6: ...TV VIDEO STEREO AUDIO VCR IN OUT TAPE IN OUT CD IN 1999 NAD ELECTRONICS LTD T 760 SOPHISTICATED T 760 SYSTEM Figure B TV VIDEO STEREO AUDIO VCR IN OUT TAPE IN OUT CD IN AUDIO GAMES IN SUBWOOFER 1999 NAD ELECTRONICS LTD T 760 NAD 6 ...
Страница 7: ...DEO OUT 1999 NAD ELECTRONICS LTD T 760 THE OPTICAL DIGITAL INPUT 1 IS LINKED TO THE VIDEO 1 INPUT VIDEO STEREO AUDIO DVD COMPOSITE VIDEO OUT OPTICAL DIGITAL OUT S VIDEO OUT 1999 NAD ELECTRONICS LTD T 760 NAD 7 THE COAXIAL DIGITAL INPUT 2 IS LINKED TO THE VIDEO 2 INPUT ...
Страница 8: ...NTENNA terminal Do not remove the AM loop antenna The antenna cable to the loop antenna must not exceed 3 meters FM ANTENNA A ribbon wire FM antenna is included and should be connected to the FM connector at the rear of the unit Fig 4 using the balun adapter supplied The ribbon aerial should be mounted on a vertical surface and placed so that it forms a T Experiment with placement of the antenna t...
Страница 9: ... signals Refer also to the description of S Video and Video Composite above in this section 6 DIGITAL AUDIO INPUTS The T 760 has three digital audio inputs to allow for connection of DVD CD or other digital sources Digital Audio Input 1 allows for connection of a digi tal source with an Optical output Use a cable termi nated with a TOS Link connector This digital input is linked to the Video 1 inp...
Страница 10: ...AKERS above SURROUND SPEAKER This connects the Surround loudspeakers that are used when the T 760 is operated in Dolby Digital DTS Dolby Pro Logic EARS Surround sound modes or with the 5 1 Ch input selected Connect the surround speakers in the same way as described with FRONT SPEAKERS above NOTE The Center and or Surround speakers must be selected as Large or Small in the Set up menu SPEAKER SELEC...
Страница 11: ...e T 760 uses very little power However it is recommended that you switch the unit totally off if it is not going to be used for more than a couple of days Switch off completely by pressing the POWER button on the front panel No 1 all lights will extinguish Press this button to switch the unit on To switch the unit off press this button again 2 STAND BY This green LED will light up when the receive...
Страница 12: ...er Storing and Recalling Presets for more information 7 DOWN UP 1 and 2 The function of these buttons depends on the tun ing mode selected with the PRESET TUNE button No 6 The PRESET TUNE button toggles between the two operation modes a Preset mode indicated in the display area Press the 1 down button to scroll to a lower number Preset press the 2 up button to scroll to a higher Preset number This...
Страница 13: ...ent to the loudspeakers Tape Video 3 4 and TV monitor out puts Video inputs 1 2 and 3 also select respectively the Digital Inputs 1 2 and 3 The name of the Input and Surround Mode will be shown in the Display Panel VIDEO 1 Video 1 selects the signal from a TV Satellite Cable receiver or DVD player connected to VIDEO 1 as the active input VIDEO 1 is shown in the Display Panel when selected The Digi...
Страница 14: ... ambience of surround sound is added to a normal stereo source such as a CD or FM radio NOTES Dolby Digital or DTS are only available as a Surround Mode if the source is either Dolby Digital or DTS and a Digital Audio input is used An external source such as a decoder or DVD play er with a decoder built in MPEG for instance can be connected to the 5 1Ch input No 4 on the front panel When the EXT 5...
Страница 15: ...ET TUNE button No 6 until PRESET lights up in the display Press either the 1 down or 2 up button No 7 until the right Preset is found and shown in the Display Panel NOTE Any unused Presets will be skipped Deleting a stored Preset You can empty a Preset by deleting the stored information Select the Preset to be emptied Press the MEMORY button No 5 followed by the FM MUTE MONO button No 4 The Preset...
Страница 16: ...for the current speaker Press the TEST button again to leave or cancel the Test mode any changes will be memorized automatically Refer also to chapter On Screen Display and Setting Up the Surround Sound System for more information 7 CHANNEL SELECT Although the T 760 is correctly set up it may some times be desirable to make minor adjustments to suit particular software Pressing the CHANNEL button ...
Страница 17: ...ng the MEMORY button No 5 on the front panel press the VIDEO 1 input selector but ton in section No 11 repeatedly until the desired system is shown in the display area The OSD can be engaged by pressing one of the four cursor buttons on the remote control The SETUP Menu will appear as below Fig 7 Use the cursor buttons on the remote control to navigate select the desired menu and options then pres...
Страница 18: ...EL DELAYS in the SETUP menu and press ENTER on the remote You will see a screen similar to the following Fig 10 Use the 1 or 2 cursor button to change the center channel delay time In Dolby Digital mode T 760 allows the following setting options CENTER 0 1 2 3 4 5ms REAR 0 1 2 3 13 14 15ms 1ms per step In Dolby Pro logic mode only the rear channel delay time can be adjusted as following options RE...
Страница 19: ... OSD on how to access the SETUP Menu of the On Screen Display choose sub menus and change settings The setup procedure is broken down in three sec tions 1 Speaker Settings 2 Channel Balance 3 Channel Delays Speaker Settings First you need to indicate which speakers are con nected to your T 760 Besides the Main speakers Left Right these can include a Center two Surround Speakers and a Subwoofer Cal...
Страница 20: ...he sound from all speakers arrives uniformly at the listening position as intended by the film s producer Each millisecond corresponds approximately with 1 foot or 30 5 centimeters NOTE The channel delay option is not available in DTS surround mode To set the center channel delay time Call up the SETUP menu of the On Screen Display Fig 7 Select the CHANNEL DELAYS menu Fig 10 Choose CENTER and sele...
Страница 21: ...ease the level for the current speaker NOTE There is no output in the Subwoofer during noise sequencer operation therefore it is difficult to adjust the level in test mode The Subwoofer level can be adjusted in the OSD setup menu with musical input The Channel Balance for each speaker can be adjusted in 1dB increments Continue to calibrate the level for each speaker until equal loudness is achieve...
Страница 22: ...ed using digital inputs Connect digital output of source to T 760 WEAK BASS DIFFUSE STEREO IMAGE Speakers wired out of phase Check connections to all speakers in the system REMOTE CONTROL HANDSET NOT WORKING Batteries flat or incorrectly inserted IR transmitter or receiver windows obstructed IR receiver in direct sun or very bright ambient light Check or replace batteries Remove obstruction Place ...
Страница 23: ...NAD ELECTRONICS NEW ACOUSTIC DIMENSION LONDON 1999 T 760 I M PRINTED IN THE PEOPLE S REPUBLIC OF CHINA P N 4301 4851 1 ...