background image

ENGLISH

OPERATION

10

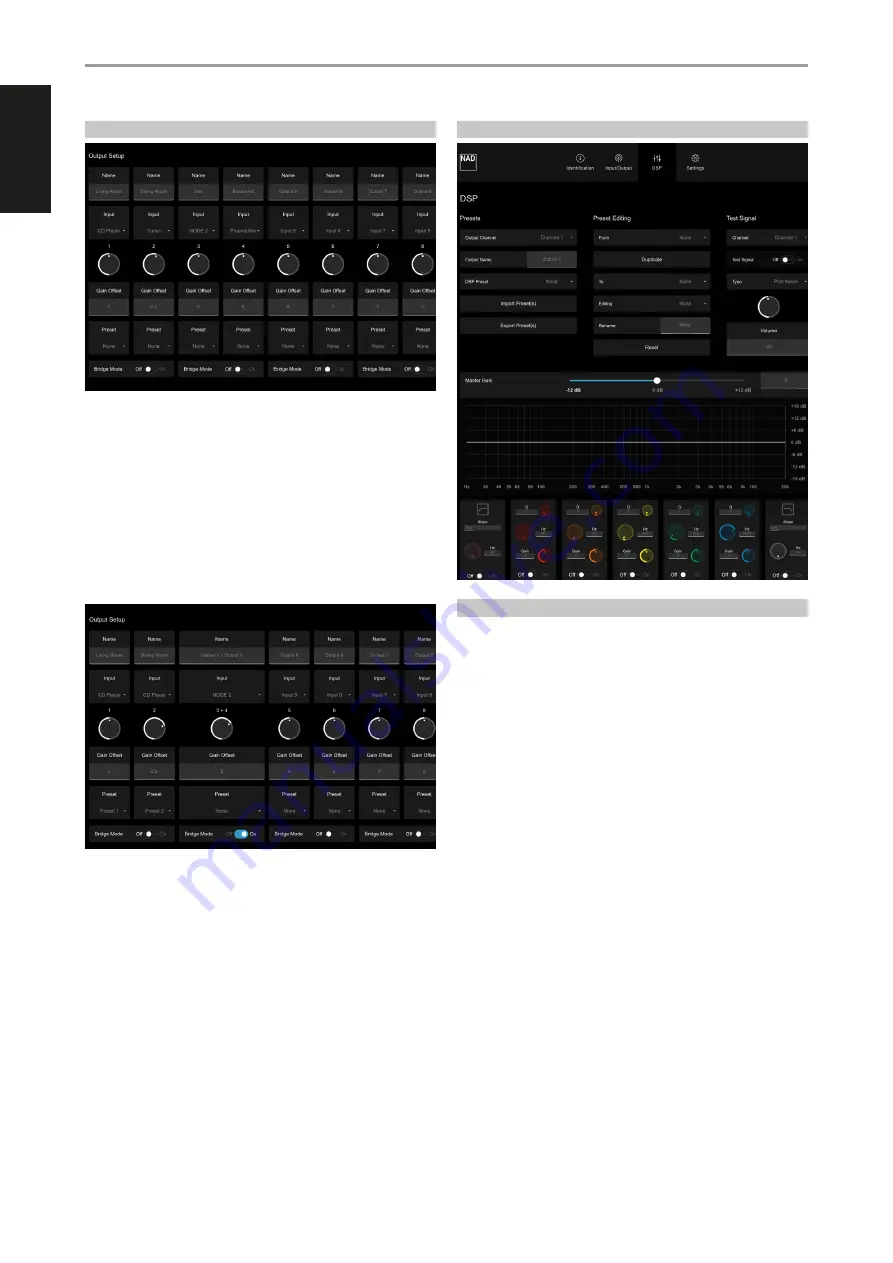
OUTPUT SETUP

NAME
• 

The factory default names of the eight OUTPUT channels are Output 
1 up to Output 8. Each OUTPUT channel can be renamed by directly 
typing over the specific OUTPUT. For example, type over “OUTPUT 1” 
with the desired name or label like “Living Room”.

• 

The eight OUTPUT channels correspond to the SPEAKERS 1 to 8 
respectively. 

INPUT
• 

Each OUTPUT channel can be assigned any of the INPUT channels. 
Assign a particular OUTPUT channel with a source INPUT by selecting 
preferred line INPUT number from the drop down tab. 

GAIN OFFSET
• 

Gain offset allows output channel levels to be adjusted independently. 

• 

Grab the pointer of the GAIN OFFSET knob icon and rotate to adjust 
gain level within ± 6 dB range at 0.5 dB increments. The corresponding 
numerical value of adjusted gain offset level is reflected below the 
knob icon. You can also type directly desired gain offset value in the 
section below the GAIN OFFSET knob icon.

PRESET
• 

Designate a DSP Preset number for the particular Output Channel. 
Ensure that the DSP Preset number you allocate has been previously 
setup and saved.

BRIDGE MODE
• 

Combine both adjacent output channels into Mono output by setting 
“Bridge Mode” to “On”. Set “Bridge Mode” to “Off” to maintain stereo 
output.

• 

Refer also to item about “SPEAKERS (1 - 8)” for further information and 
guideline about Bridge Mode.

DSP

PRESETS

OUTPUT CHANNEL/OUTPUT NAME/DSP PRESET
• 

Output Channel, Output Name and DSP Preset are combination 
settings that can be modified at the PRESETS section of DSP menu or 
OUTPUT SETUP in the INPUT/OUTPUT menu. 

• 

Assign an Output Channel with an Output Name that can either be the 
default name or by typing over desired Output name. Designate a DSP 
Preset number for the particular Output Channel. Ensure that the DSP 
Preset number you allocate has been previously setup and saved.

• 

Any changes in Output Channel, Output Name and DSP Preset settings 
at the PRESETS section of DSP menu will also be reflected in the 
OUTPUT SETUP section of INPUT/OUTPUT menu and vice-versa.

SAVE PRESET(S)

Adjust, set and save Slope, Q, Frequency and Gain settings as desired.

Select “Save Preset(s)”. Select which Preset number (Preset 1 to Preset 9 
or All Preset) the current Preset settings will be saved.

Depending on your web browser, the Preset settings will be saved in 
your Downloads folder or may be prompted to save to a directory of 
your preference. Remember the Preset file name and location.

Repeat above process if you are going to set, allocate and save different 
Preset settings (up to 9 Preset settings).

LOAD PRESET(S) 

Select “Load Preset(s)”. Find and select from the Preset file’s location/
directory the Preset number you would like to load.

Selected Preset number’s applicable Slope, Q, Frequency and Gain 
settings are recalled and loaded upon selection of the Preset file. These 
settings will be reflected in the frequency response graph.

Repeat above process if you are going to load and allocate different 
Preset settings (up to 9 Preset settings) to all 8 output channels.

Содержание CI 8-120 DSP

Страница 1: ...Owner s Manual ENGLISH Multi Channel Amplifier NAD CI 8 120 DSP CI 8 120 DSP ...

Страница 2: ...l the CATV system installer s attention to Section 820 40 of the NEC which provides guidelines for proper grounding and in particular specifies that the cable ground shall be connected to the grounding system of the building as close to the point of cable entry as practical Lightning For added protection for this product during a lightning storm or when it is left unattended and unused for long pe...

Страница 3: ...e mains plug should be disconnected from the mains socket outlet completely Battery shall not be exposed to excessive heat such as sunshine fire or the like Danger of explosion if battery is incorrectly replaced Replace only with the same or equivalent type An appliance with a protective earth terminal should be connected to a mains outlet with a protective earth connection IF IN DOUBT CONSULT A C...

Страница 4: ...gs Bare wire or loose strands from the speaker cables must not touch the rear panel or other speaker terminals After installing the external speaker cables to the supplied SPEAKER terminal blocks plug in the wired up SPEAKER terminal blocks to corresponding SPEAKERS 1 8 rear panel terminals of CI 8 120 Connect corresponding end of the AC power cord to CI 8 120 s AC mains input and the AC power cor...

Страница 5: ...tor will not light up IMPORTANT NOTICE If the selected source is GLOBAL A and or GLOBAL B and there is an active source or input signal at either GLOBAL input terminal all eight LINE INPUT LED indicators will illuminate at the same time 4 GLOBAL A GLOBAL B IN OUT These IN OUT terminals are dedicated only to GLOBAL settings Configure GLOBAL A GLOBAL B via the INPUT OUTPUT menu of the web based CI 8...

Страница 6: ... IN At ON setting and with the 12V TRIGGER IN of CI 8 120 connected to a compatible external device that is equipped with a 12V DC trigger output the CI 8 120 can be switched remotely from standby mode to operating mode and vice versa This is dependent upon the presence or absence of 12V DC supply at 12V TRIGGER IN refer also to item about 12V TRIGGER IN With 12V TRIGGER IN ON OFF switch set to ON...

Страница 7: ... fuse of different type rating or value Failure to observe this precaution may cause damage to the amplifier circuits and may create a fire hazard and or defeat the safety built into the amplifier and may void the warranty 11 AC MAINS INPUT The CI 8 120 comes supplied with two separate AC power cords Select the AC power cord appropriate for your region Before connecting the AC power cord plug to t...

Страница 8: ...among the devices detected 4 Type the IP address into your control device s web browser to access your CI 8 120 s User Interface UI 5 Configure your CI 8 120 s Identification Input Output DSP and Settings parameters via the User Interface FIRMWARE UPGRADE PROCEDURE 1 Upon gaining access to your CI 8 120 s User Interface check immediately for any firmware update by selecting Check for Updates from ...

Страница 9: ...A is set to ON and with GLOBAL B also at ON setting GLOBAL A input becomes the active input over all other active input channels GLOBAL A takes priority over GLOBAL B NAME The factory default names of the eight LINE INPUT channels are Input 1 up to Input 8 Each LINE INPUT channel can be renamed by directly typing over the specific LINE INPUT For example type over Input 1 with the desired name or l...

Страница 10: ...l Output Name and DSP Preset are combination settings that can be modified at the PRESETS section of DSP menu or OUTPUT SETUP in the INPUT OUTPUT menu Assign an Output Channel with an Output Name that can either be the default name or by typing over desired Output name Designate a DSP Preset number for the particular Output Channel Ensure that the DSP Preset number you allocate has been previously...

Страница 11: ...ame test signal to be loaded to all eight channels at the same time TEST SIGNAL Select ON for the test signal to be active for the selected channel Turn off test signal by selecting OFF TYPE The test signal can be a pink noise generator or actual input signal from any of the input channels Select from the drop down tab Pink Noise or Input 1 to Input 8 to serve as for the test signal for specific c...

Страница 12: ...g to Power Button method or unplugging the AC power cord from the mains power outlet Power consumption is more than 80W while the unit remains powered up 12V TRIGGER The function of powering up down the CI 8 120 is dependent upon the presence or absence of 12V DC supply at 12V TRIGGER IN refer also to item about 12V TRIGGER IN Ensure that the rear panel12V TRIGGER ON OFF switch is set to ON so tha...

Страница 13: ...it at operating mode Unit will go to network standby mode after 20 minutes of no active audio source input Network Standby Mode 1 Power Button Method A ECO mode OFF Power mode Switch from other Power Mode Always ON 12VTrigger Signal Sense to Power Button Unit will immediately go to standby mode after the switch to Power Button mode Method B ECO mode OFF Power mode Currently at Power Button and uni...

Страница 14: ...rameters 2 Internal temperature exceeds 70 degrees Celsius The amplifier has been put into protection mode as a result of the temperature exceeding normal working parameters FIRMWARE VERSION AND LAST UPDATE Current firmware version and date firmware was last updated are shown ACTIONS CHECK FOR UPDATES Select Check for Updates to check for any new firmware update If new firmware details are shown c...

Страница 15: ...l channels driven 400W 1 kHz 0 1 THD two channels driven IHF dynamic power all channels driven 8 ohms 125W 4 ohms 200W 2 ohms 180W IHF dynamic power two channels driven 8 ohms 145W 4 ohms 260W 2 ohms 300W IHF dynamic power Bridged mode all channels driven 8 ohms 440W 4 ohms 350W IHF dynamic power Bridged mode two channels driven 8 ohms 480W 4 ohms 380W Peak output current 20 A 1 ohm 1 ms Damping f...

Страница 16: ...t power at 8 ohms all channels driven 1 8 rated power 190 648 195 665 1 3 rated power 415 1416 420 1433 1 2 rated power 600 2048 610 2082 Full rated power 1125 3840 1270 4334 Output power at 4 ohms all channels driven 1 8 rated power 195 665 205 700 1 3 rated power 435 1485 445 1519 1 2 rated power 630 2150 645 2201 Full rated power 1290 4403 1355 4625 Specifications are subject to change without ...

Отзывы: