background image

- 17 -

(Messer muß dabei parallel in  die  Schnitt-
leiste  eindringen).  Bei  Bedarf  das  Messer
vor dem Herunterfahren mit der Messer-
verstellschraube 

 tiefer stellen.

g) Hauptschalter 

 in Position I bringen und

bei hochgefahrenem Messer alle 5 Messer-
schrauben fest anziehen. Zur Probe einen
Papierstapel durchschneiden und das Mes-
ser eventuell über die Messerverstell-
schraube 

 nachjustieren.

Achtung: Das Messer ist extrem
scharf!

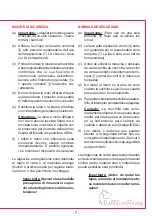
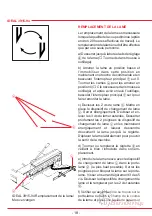
d) If needed the cutting stick 

  can be

turned or exchanged, and should be placed
exactly on the pin (on the left hand side).

e) Place the knife to be exchanged with the
knife changing tool 


c

  mounted, into the

knife carrier 


  up to the top and screw it into

place with the grips. Lightly tighten 3 of the
5 knife screws (with washers), remove the
knife changing tool and lightly tighten the
remaining knife screws (with washers) 


b

.

f) Remove all tools and distribute paper
along the entire cutting length. The knife
should again be lowered as described in
point b). The 3 eccentrics 


a

 should then be

used to lower the blade until the paper is cut
along the entire length of the knife (The knife
must remain parallel to the cutting stick). If
needed, the knife can be lowered using the
knife depth adjustment screw 

; knife must

be in upper position.

g) Turn main switch 

 to position I. The knife

will return to the upper position and the knife
screws should be tightened firmly. Cut a
stack of paper to test; if necessary the knife
can be lowered using the knife depth
adjustment screw 

.

Attention: The knife is extremely
sharp!

KNIFE CHANGE

A reduction in cut quality indicates that a
knife change is necessary (as a rule, after 20
cutting hours). This operation has to be
performed by one person only.

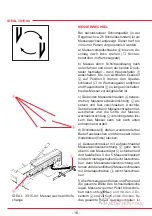
a) Turn the knife depth adjustment screw 

to the left until it stops  (

 Screwdriver found

in tool set).

b) Lower the knife by pressing both cut
buttons. Keep one button pressed and turn
off the main switch 

. The eccentrics 


a

 are

now exposed and should be turned to position
0. Remove the special wrench (

 found in

tool set) and turn on the main switch 

 until

the knife returns to the home position.

c) Remove the 2 knife screws 


b

. Then put

the knife changing tool 


c

  into place and

fasten it to the knife. The remaining screws
should then be removed. Loosening the
grips of the knife changing tool 


c

 lightly will

now allow the knife to be taken downwards
out of the machine.

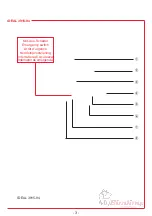
Содержание MBM Ideal 3915-94

Страница 1: ...Provided By http www MyBinding com http www MyBindingBlog com MBM Ideal 3915 94 Paper Cutter Instruction Manual...

Страница 2: ...nbevolen toebehoren Accessori Raccomandati Accesorios Recomendados Nr 9000 115 1 Ersatzmesser 1 spare knife 1 lame 1 reservemes 1 lama di ricambio 1 cuchilla Nr 3915 1100 Unterschrank Cabinet Meuble O...

Страница 3: ...het apparaat a u b deze gebruiksaanwijzing goed door en neemt u de veiligheidsinstructies in acht Distinguido cliente Le estamos agradecidos por haber elegido una m quina de cortar papel IDEAL Con la...

Страница 4: ...3 IDEAL 3915 94 IDEAL 3915 94 Not Aus Schalter Emergency switch Arr t d urgence Noodstopvoorziening Interruttore di sicurezza Interruptor de emergencia...

Страница 5: ...Messer und Schnittleistenwechsel nur bei abgeschaltetem Hauptschalter Vorsicht DasMesseristextremscharf Es darf nie lose liegen sondern mu in der Maschine mit der Messerwechsel vorrichtung oder im IDE...

Страница 6: ...removing covers or during maintenance please remove plug from socket CONSIGNES DE SECURITE a Important Une seule personne la fois est autoris e utiliser le massicot Celui ci ne doit pas tre utilis par...

Страница 7: ...ngen van mes en snijlat alleen bij uitgeschakelde hoofdschakelaar Voorzichtig hetmesisextreemscherp Het mag niet los liggen maar dient in de machine met de hulpstuk t b v mes wisseling of in de IDEAL...

Страница 8: ...usarle per tagliare mate riale duro o che pu ridursi in schegge Importante Staccarelaspinadalla presa prima di rimuovere i coper chiodurantegliinterventidimanu tenzione NORMAS DE SEGURIDAD a Important...

Страница 9: ...ung nach Durchlesen in die vorgesehene Halterung c schieben c R ckanschlagkurbel an der Vorder seite der Maschine festschrauben und den Griff der Hebelschnellpressung aufdre hen Werkzeug und Montagete...

Страница 10: ...ant 220 V monophas 50p riodes Version115Volts 60 p riodes Les indications techniques se retrouvent sur la plaque signalitique de la machine INSTALLATION a Use 2 strong people to lift the machine out o...

Страница 11: ...ijzing na het lezen in de daarvoor bestemde houder c schuiven c De slinger van de achteraanleg aan de voorzijde van de machine vastschroeven en de greep van de persbalk aandraaien gereedschap en onder...

Страница 12: ...tios 60Hz lasespecificacionest cni casexactasest nenlapegatinadeespecifi caciones de la m quina INSTALLAZIONE a Affidare a 2 persone robuste l estrazione dell apparecchio dall imballaggio b L apparecc...

Страница 13: ...chtstrahl des optischen Schnittandeuters zeigt dabei an wo der Schnitt erfolgen wird Durch Herausziehen der R ckanschlagkurbel kann eine ver sehentlicheMa verstellungvermiedenwer den c R ckanschlag un...

Страница 14: ...erformed by pressing the 2 push buttons b c simultaneously UTILISATION a Mettre l interrupteur principal sur I Introduire la cl de contact et la tourner versladroite lacl nepeutplus treretir e Le mass...

Страница 15: ...al van de optische snijaanduiding toont daarbij waar de snede plaats gaat vinden Door het uittrekken van de slinger komt deze vrij te hangen waardoor de maatinstelling niet per ongeluk verandert c Ach...

Страница 16: ...a di procedere al taglio il pressino deve essere spostato a destra e serrato con una leggera pressione Il materiale viene tagliato premendo contemporaneamente i due puls anti b e c USO a Colocar el in...

Страница 17: ...stlichen3Messerschraubenher ausdrehen und die Griffe der Messer wechselvorrichtung c vorsichtig etwas lok kern Das Messer kann nun nach unten entnommen werden d Schnittleiste drehen wenden oder bei Be...

Страница 18: ...length of the knife The knife must remain parallel to the cutting stick If needed the knife can be lowered using the knife depth adjustment screw knife must be in upper position g Turnmainswitch topos...

Страница 19: ...spositif de changement de lame c Serrer nergiquement D visser et en lever les 3 vis de lame restantes Desserrer prudement les 2 poign es du dispositif de changement de lame c en les maintenant nergiqu...

Страница 20: ...ervolgens de resterende 2 mesbouten met onderlegringen b licht vastschroeven f Alle gereedschap verwijderen en papier over de gehele breedte van het snijbereik leggen Mes zoals bij punt b beschreven n...

Страница 21: ...lama Rimuovere le altre viti Allentando le maniglie della protezione per il cambio della lama c possibile estrarre la lama tirandola verso il basso d Se necessario si pu ruotare o sostituire la stecc...

Страница 22: ...tarse fuertemente Cortar una pila de papel para probar si es necesario la cu chilla puede aflojarse utilizando el tornav s de ajuste de profundidad de la cuchilla Atenci n La cuchilla est extre madame...

Страница 23: ...vor dem Zusammenbau noch IDEAL 3915 94 die 2 Gelenkbolzen und die Schubstange b auf Abnutzung SICHERHEITS BERPR FUNGEN Vor jedem Arbeiten und nach jedem Mes serwechsel Abschaltfunktion von Haupt schal...

Страница 24: ...lutch was activated please call customer service ENTRETIEN Le support de la but e arri re a n cessite un graissage hebdomadaire Tous les 6 mois graisser les 14 points de graissage voircroquis Mettrel...

Страница 25: ...aar zetten nog de 2 scharnierpennen en de trekstang b op hun slijtage VEILIGHEIDSCONTROLES Voorelkgebruikennaelkemesverwisseling dienen automatische uitschakelfunctie van hoofdschakelaar en bedienings...

Страница 26: ...nque el motor est funcionando El embrague de seguridad estaba activado porfavor solicite servicio al cliente MANUTENZIONE Oliare o lubrificare la guida della squadra di battuta posteriore a ogni setti...

Страница 27: ...y IDEAL 08 1995 D IDEAL 2600 IDEAL 2601 IDEAL 1000 IDEAL 2000 IDEAL 3000 IDEAL 2401 M IDEAL 2401 L IDEAL Made in Germany IDEAL 3800 IDEAL 3802 IDEAL 4105 IDEAL 4000 IDEAL 4003 IDEAL 4004 IDEAL 3915 ID...

Отзывы: