VJ-1626UH INSTALLATION MANUAL
VJ1626UHE-I-00
10
2
1
3
1
2
1
5mm
3
3
1
2
1
5mm
3
1
3
1
1
1
2
1
2
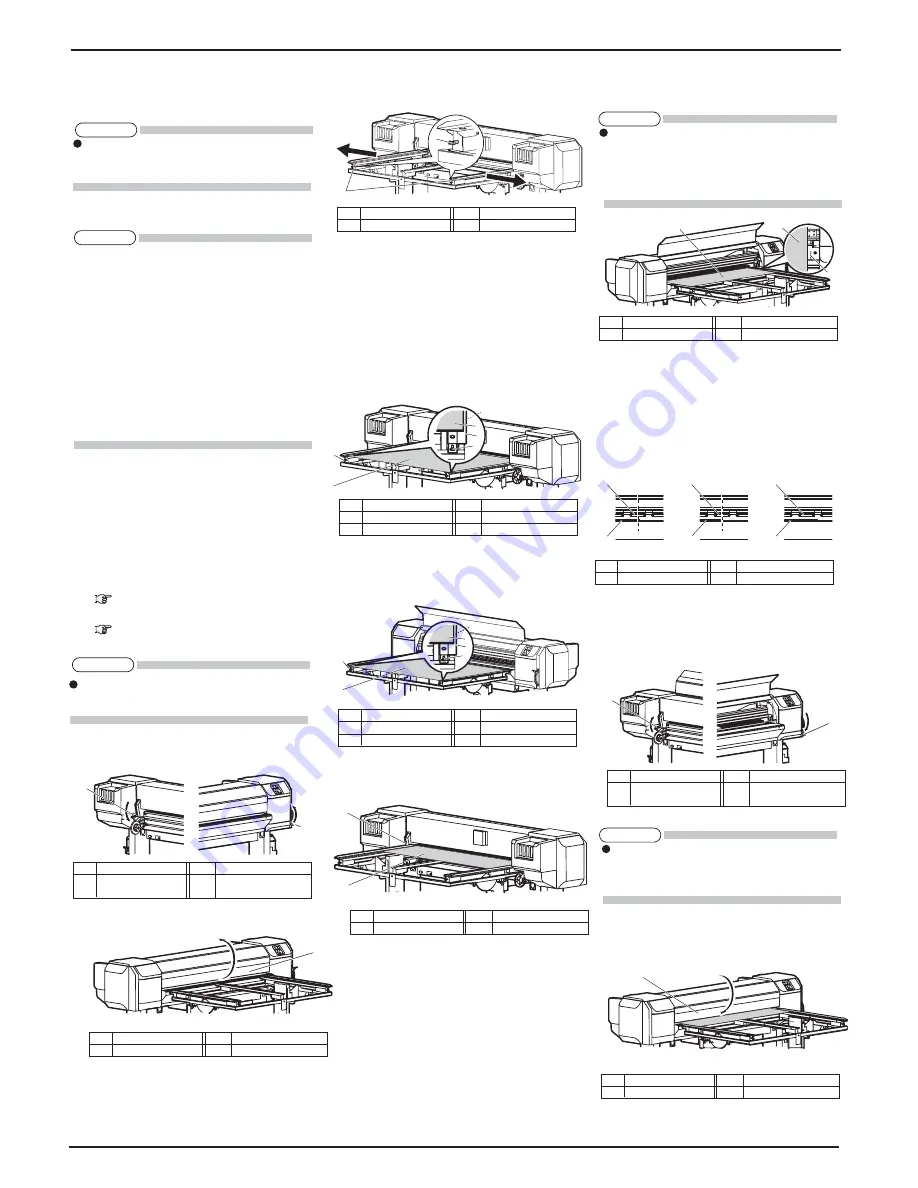
Loosen the rail retaining screw on Media-feed
table (rear side), and widen the rails to the sides so
that you can place the rigid media. Make sure that
the rigid media is set on the center of the printer.
6. Place the rigid media on the rails and tighten the
rail retaining screw at where there is a 5 mm gap
between the stoppers on both sides and the media.
ޓ
Make sure that the rigid media is placed parallel
to the media feeding direction.
ޓ
Make sure that the rigid media is placed on the
ball part on the rails.
ޓ
Adjust and fix the rails so that they are parallel to
the rigid media.
Place the rigid media on Media-feed table (front
side) in the same way, and fix the rails at where
there is a 5 mm gap between the stoppers on both
sides and the media.
8. From the rear side of the printer, insert the rigid
media into Media feed slot.
If the right edge of the roll media goes further
right from the loading mark when seen from the
front, adjust the position of Media-feed table's
rails.
If the both edges of the media do not cover more
than half of Pressurizing rollers, adjust the
position of Media-feed table's rails.
When loading the rigid media so that it does not
cover more than half of Pressuring rollers, make
sure that the both edges of the media does not
cover Pressurizing rollers.
11. Lower Front media loading lever. (Raise Rear
media loading lever)
Media-feed table is excluded from the illustration
for simplicity.
12. Close Front cover.
9 Setting media
This section explains how to set media.
Put the media in the center.
9.1 Loading rigid media
ޓ
See the following for loading the rigid media (only
when adjusting Media-feed table).
ޓ
Spanner: provided with Media-feed table
ޓ
Follow the procedure below to load the rigid media.
1. Turn the printer ON.
2. In Panel setup menu, check if the "media type" for
the User type you're going to use is appropriately
set.
ޓޓޓޓ
Operation Manual
̌
4.3.2 Menu setup
procedure
̍
ޓޓޓޓ
Operation Manual
̌
5.2.2.10 MediaType
men”
3. Raise Front media loading lever (lower Rear media
loading lever).
Open the front cover.
ޕ
1
1
2
1
2
1
2
OK
Bad
OK
1
2
1
You can load the following rigid media on this
printer:
Maximum width: 1,625 mm
Minimum width: 182 mm
Maximum depth: 1,200 mm
Minimum depth: 200 mm
Thickness: 15 mm or less (including media
warpage and unevenness)
Weight: 15 kg or less
Media warpage: Less than 1 mm. (when the
media thickness is uneven, make sure that the
total
ޓ
of the warpage and unevenness is less
than 1 mm. Also, do not print with the warpage
facing up.)
NOTE
ޓޓ
No.
Name
ޓޓޓ
No. Name
ޓ
1
ޓ
Front media loading
2
ޓ
Rear media loading lever
ޓ
lever
ޓޓ
No.
Name
ޓޓޓ
No.
Name
ޓޓ
1
ޓ
Front cover
ޓ
No.
Name
ޓޓޓ
No.
Name
ޓ
1
ޓ
Rail
ޓޓޓޓޓ
2
ޓޓ
Rail retaining screws
ޓޓ
No.
Name
ޓޓޓ
No. Name
ޓޓ
1
ޓ
Rigid media
ޓ
ޓޓ
2
ޓ
Stoppe
T
3
ޓ
Rail retaining screw
ޓޓ
No.
Name
ޓޓޓ
No. Name
ޓޓ
1
ޓ
Rigid media
ޓ
ޓޓ
2
ޓ
Stoppe
T
3
ޓ
Rail retaining screw
ޓ
No.
Name
ޓޓޓ
No.
Name
ޓ
1
ޓ
Rigid media
ޓޓޓޓ
2
ޓޓ
Media feed slot
Loading mark is not used for deciding where the
right edge of the media should be placed.
There should be no problem if the media is placed
away from the line, as long as it does not go
beyond the line.
TIP
ޓޓ
No.
Name
ޓޓޓ
No. Name
ޓ
1
ޓ
Rigid media
ޓޓޓ
2
ޓ
Media loading mark
ޓޓ
No.
Name
ޓޓޓ
No. Name
ޓ
1
ޓ
Rigid media
ޓޓޓ
2
ޓ
Pressurizing roller
ޓޓ
No.
Name
ޓޓޓ
No. Name
ޓ
1
ޓ
Front media loading
ޓ
2
ޓ
Rear media loading lever
ޓ
lever
Push Front media loading lever down and lower
it firmly. For Rear media loading lever, push it
up firmly. If the lever is not firmly lowered or
raised, the media may not be detected.
NOTE
ޓޓ
No.
Name
ޓޓޓ
No. Name
ޓ
1
ޓޓ
Front cover
NOTE
For the roll media that can be attached to the
scroller supplied with this unit, refer to "4.2.1
Loadable media" in the Operation Manual.
If the type of the media you have loaded differs
from that of the user type you have set, the media
may not be detected properly.
NOTE
Содержание VJ-1626UH
Страница 14: ...VJ 1626UH INSTALLATION MANUAL VJ1626UHE I 00 14 MEMO ...
Страница 15: ...VJ 1626UH INSTALLATION MANUAL 15 VJ1626UHE I 00 MEMO ...
Страница 16: ......


