background image

According to the printing environment to be used, three speeds can be speci-
fied for a RJ-6000 Series printer. 
In changing them, you should consider the resolution and printing time
required for the printing.
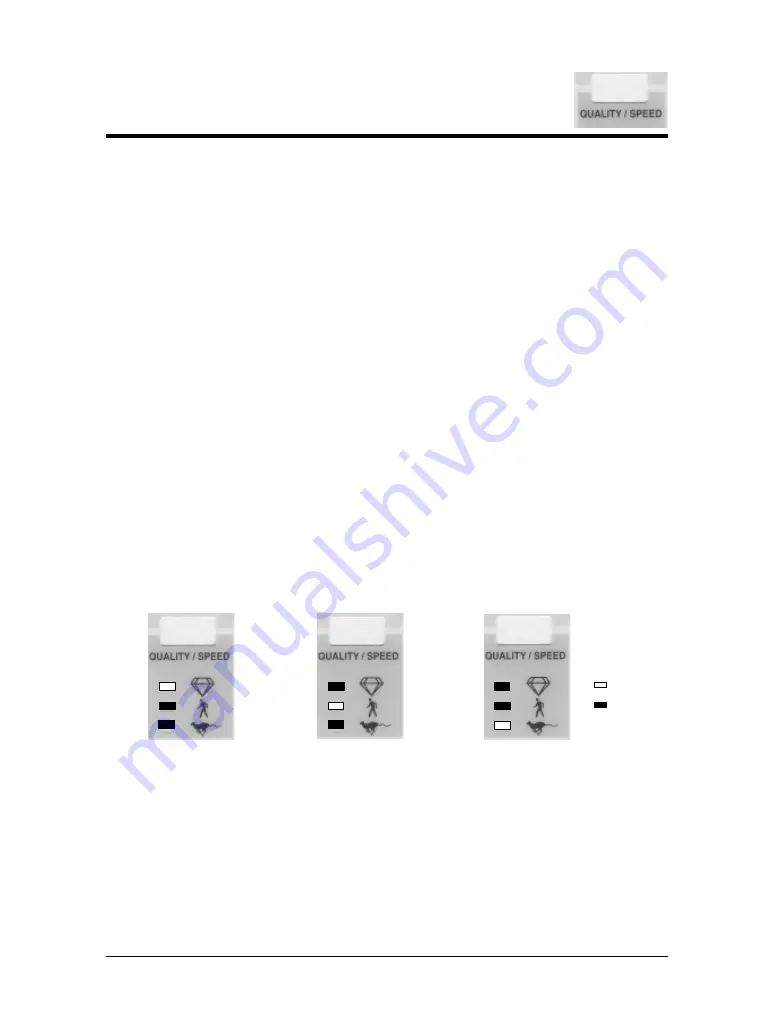
By changing the printing mode, printing may be high quality, normal or high
speed.

* High Quality Printing Mode: The high quality lamp is lit.  The printing is

better than normal printing mode but the
printing speed is slower.

* Normal Printing Mode:

This is the ordinary printing mode.  The
normal printing mode lamp is lit. 

* High Speed Printing Mode:

Printing speed has priority. The high speed
lamp is lit.  Use it for check printing.

When the printing mode is altered, the LED of the selected mode lights up.

Step 1
Press the [QUALITY / SPEED] key once or twice until LED for the desired
printing mode is lit.

Step 2
When the printing mode changes, the LED of the selected mode changes to lit.

High Quality Printing, Normal Printing, High Speed Printing

62

RJ-6000 Series USER GUIDE Basic Edition

For high quality mode

For normal mode

For high speed mode

: Lit

: Not lit

Содержание Falcon Graphics RJ-6000 Series

Страница 1: ...USER GUIDE Full Color Inkjet Printer RJ600EX A 01 RJ 6000 Series Basic Edition Graphics Graphics...

Страница 2: ...1 RJ 6000 Series USER GUIDE Basic Edition USER GUIDE RJ 6000 Series Full Color Inkjet Printer Basic Edition Mutoh Industries Ltd 1 3 Ikejiri 3 chome Setagaya ku Tokyo 154 8560 Japan...

Страница 3: ...printer s functions Information essential for using this printer such as how to use the functions and operations is explained in detail It is easy to look up what does this function do to the printing...

Страница 4: ...to power supply Page 31 Checking ink and safety precautions Page 32 Installing ink car tridges Page 34 Loading media Page 37 Making a test print ing Page 47 Disconnecting power and con necting compute...

Страница 5: ...nics are trademarks or product names of Centronics Data Computer Corp Windows 95 Windows 98 Windows NT 4 0 are trademarks or product names of Microsoft Corp DOS V PC DOS are trademarks or product name...

Страница 6: ...nter It is sure to be useful in case something that you are not sure about should occur while you are using the printer Because the RJ 6000 Series is an inkjet printer it needs to be cleaned and inspe...

Страница 7: ...ead this and work appropriately An explanation of a matter that is useful for you to know or that may affect the printing result You should read this and bear it in mind A reference to where further u...

Страница 8: ...d placing objects on top of the printer or subjecting it to severe vibration or impact Don t tilt or shake the printer when you move it This may cause the ink to spill or the mechanism to malfunction...

Страница 9: ...on t put the hold lever in the up position while the head is moving during printing media size detection media cutting and cleaning etc The head and media keeper blade will touch causing damage or fau...

Страница 10: ...the Printer 24 Check Printer Accessories 29 Connecting the Power Cable 31 Ink Cartridge Precautions 32 Loading the Ink Cartridges 34 Specify the Type of Media 36 Loading the Media 37 Loading Cut Media...

Страница 11: ...k Cartridges 79 Switching Inks 80 Replacing the Cutter 82 Replacing Waste Liquid Absorbent Sheet Waste Box 84 Replacing Waste Liquid Absorbent Sheet Waste Ink Bottle 87 Cleaning the Cleaning Wiper 89...

Страница 12: ...97 Can t go online with Centronics 97 Printed line is blurred 98 White and black bands appear in printing 98 Printed lines do not join 98 Appendix 99 Printer Specifications 100 Interface Specification...

Страница 13: ...12 RJ 6000 Series USER GUIDE Basic Edition...

Страница 14: ...rs that must be attended to before the printer is used Usage Environment PAGE 14 Names of Parts PAGE 16 Control Panel Names PAGE 17 Before Using the Printer 13 RJ 6000 Series USER GUIDE Basic Edition...

Страница 15: ...setting up the printer in a place that conforms to the condi tions in the following table With regard to temperature and humidity in particular even if the conditions fall within the ranges indicated...

Страница 16: ...or Installation The space required for setting up is as shown below 15 RJ 6000 Series USER GUIDE Basic Edition Usage Environment Space Required for Installation Before Using the Printer 200 mm 200 mm...

Страница 17: ...ce anything on top of the cover Names of Parts 16 RJ 6000 Series USER GUIDE Basic Edition CAUTION Cutter Guide Platen Cover Control Panel Waste Ink bottle Media Basket Power Switch Hold Lever Board Bo...

Страница 18: ...Series USER GUIDE Basic Edition Before Using the Printer DATA LED Green ERROR LED Red CLEANING key MENU key Shift key CANCEL key MEDIA WEIGHT key Standard LED Orange Thin LED Green QUALITY SPEED key...

Страница 19: ...MEDIA WEIGHT key Selects the type of media Standard LED Orange Lit Standard media type is specified Thin LED Green Lit Thin media type is specified QUALITY SPEED key Changes print mode to high quality...

Страница 20: ...setting mode advances liquid crystal display menu by one page at a time VALUE key In setting mode moves the menu or parameter on the liquid crystal display forward one by one If a numerical parameter...

Страница 21: ...ion or flashing during processing data If data recep tion starts while the setting menu is displayed operations are enabled but the settings that are made will not take effect until the next printing...

Страница 22: ...E 32 Loading the Ink Cartridges PAGE 34 Specify the Type of Media PAGE 36 Loading the Media PAGE 37 Making a Test Print PAGE 41 Connecting the Interface Cable PAGE 48 To Receive Data from the Computer...

Страница 23: ...each of children or dispose of them appropriately After unpacking check that all necessary parts are present If any of the cartons is missing contact your Mutoh dealer Check the stand carton Stand Car...

Страница 24: ...them tem porarily with hexagonal socket head bolts long After the hexagonal socket head bolts have been re tightened fit the plastic covers over them Assembling the Stand 23 RJ 6000 Series USER GUIDE...

Страница 25: ...ll in the details on the customer registration and and mail it Step 1 Open the printer carton and take out the scroller Remove the styrene foam on the left and right of the printer main unit Step 2 Br...

Страница 26: ...e main unit must be lifted by four people at the places marked 1 to 8 below If it is lifted at other places left and right side covers ink cartridge cover side plates etc the printer may fall and caus...

Страница 27: ...f the white tapes holding the cover and waste liquid box Step 6 Undo the wing screw holding the print ing table and remove the head fasten ing fitting Be careful not to drop the wing screw inside the...

Страница 28: ...r over the media ejection basket shaft and replace the cap Hook the tray hooks over the side stays Wrap the sheet over the upper side stay and fasten it on the outside with hooks 27 RJ 6000 Series USE...

Страница 29: ...as shown in the diagram Step 9 When the assembly of the main unit is completed move the printer to the place where it is to be used and set it up on a firm floor Lock the castors 28 RJ 6000 Series USE...

Страница 30: ...em is missing contact your local MUTOH dealer Power Cable 1 pce Cable Clamp 1 pce User Guide Basic Edition 1 pce User Guide Functions Edition 1 pce this document User Guide Drivers Edition 1 pce Print...

Страница 31: ...ves 1 pair Ink cartridges are not included in printer accessories If you have not arranged for them beforehand please obtain them separately by referring to the List of Optional Items and Supply Items...

Страница 32: ...for about 5 seconds before switching on again Plug the power cable into the power socket on the left side at the back of the printer and insert the power plug into a power outlet that matches the fol...

Страница 33: ...t or flame should be avoided Ink cartridges may leak so they should not be shaken roughly or dismantled If the ink leaks wipe it up with a sponge and discard it in a sealed container Ink cartridges sh...

Страница 34: ...hould not be taken out and re inserted until it needs to be replaced by a new cartridge Ink cartridges should be used within two years of the date that is printed on the package Cartridges that have b...

Страница 35: ...u can see on the left end Type 1 Lc Lm Y M C K Type 2 G O Y M C K Lc and G are shown 6 Lm and O are shown 5 If the print result is reversed between Lc and Lm change the Data Order setup or RIP driver...

Страница 36: ...talled it means that the ink cartridges have not been loaded correctly Take out the cartridge whose color is displayed and reload it correctly If the initial ink filling fails clean the head several t...

Страница 37: ...e media to be loaded is standard media light up standard media If the media to be loaded is thin media light up thin media For thin media For standard media Be careful A paper jam will be caused and t...

Страница 38: ...nvironment for about 30 minutes before printing This acclimatization is called seasoning Inadequate seasoning may cause the printing media to slip crease or jam It also affects the printing quality Wi...

Страница 39: ...middle of the guide line holes The guide line holes is a guide There is a possibility of a media jam if the pressure roller is not holding the left edge of the media and the pressure roller is near th...

Страница 40: ...t media can be loaded either longitudinally or laterally Media has a printing surface and non printing surface Printing on the non printing surface may cause blurring or blemishes The printing surface...

Страница 41: ...er up to load media etc make sure the head is in the stand by position maintenance position The lever can not be put up if the head is not in the stand by position Don t move the head while the hold l...

Страница 42: ...ia Step 4 Remove the movable flange from the scroller Step 5 Loading roll media on the scroller Turn the roll media as shown in the diagram and pass it over the scroller until the media tube fits firm...

Страница 43: ...media loaded to the scroller receiver Hold the fixed flange side with your left hand insert the left side into the scroller support from the inside and press the right side from above Step 7 Remove t...

Страница 44: ...media is on the guide line If this is not so adjust the position of the roll media in accordance with step 9 Step 9 Adjusting roll media position If the guide line holes can be seen the roll media mus...

Страница 45: ...dia and the pressure roller is near the right edge Either hold the left edge of the media com pletely with the pressure roller or slide it so that pressure roller is about 5 mm away from the right edg...

Страница 46: ...before the cover was closed then the media setting is a success If the position of the edge of the media after media detection is offset from the position of the edge of the media before closing the...

Страница 47: ...h the media keeper blade and cause damage and bad printing When putting the hold lever up to load media etc make sure the head is in the stand by position maintenance position The lever can not be put...

Страница 48: ...fter initialization has finished press the Test Print key RESOLUTION VALUE key while you are pressing the shift key Test print pale blue Test print sample paste your test print on this page Making a T...

Страница 49: ...owing diagram with an inter face cable option for the connection system you will use Connect to the host computer with another interface cable The use of an unnecessarily long cable may affect data tr...

Страница 50: ...E1284 compatible Nibble ECP Network Settings Specified if an optional network inter face Ethernet is to be used Input Port Input port means the type of interface port RJ 6000 Series input ports are se...

Страница 51: ...mmand for verification is the MH GL system MH GL GL2 MH GL2 RTL PASS MH GL system commands emulation of Hewlett Packard printer com mands Settings at the time of shipping by Mutoh Command Item Initial...

Страница 52: ...ng other operating systems please consult your local MUTOH dealer Operating Conditions Operating System Windows 95 98 CPU i486SX or higher Pentium 120 MHz or better recommended RAM 32 MB or more at le...

Страница 53: ...ts normally then insert the CD ROM labeled MUTOH PRINTER SOFTWARE in the CD ROM drive of the computer Step 3 Double click Add Printer under Printers in My Computer When the Add Printer window appears...

Страница 54: ...se ENGLISH RJ 6000 and click OK Enter the name of your CD ROM drive instead of X Folder names ENGLISH signifies the English version 95 is for Windows 95 98 and RJ 6000 is the name of the printer Step...

Страница 55: ...s printer as the default printer click Next Step 10 In response to Would you like to print a test page select Yes recommend ed or No and then click Finish If you selected Yes recommended a dialog box...

Страница 56: ...elect the type of media Press the MEDIA key and light the Sheet media LED Step 4 Load the printer with a cut sheet of the size you wish to output Step 5 Start the computer application Step 6 Open a si...

Страница 57: ...t by pressing the Setup Print key MEDIA ENTER key while you are pressing the Shift key Step 5 The setup sheet is printed Since this setting detail sheet will be needed for future mainte nance and repa...

Страница 58: ...ify manual cutting Step 2 Preparations for printing load media online settings etc must be made beforehand Print any image or picture Step 3 When the printer has finished printing the media will be fe...

Страница 59: ...58 RJ 6000 Series USER GUIDE Basic Edition...

Страница 60: ...Specifying the Resolution PAGE 61 High Quality Printing Normal Printing High Speed Printing PAGE 62 Head Cleaning PAGE 63 Cutting the Media PAGE 64 Making a Palette Print PAGE 65 Making a Test Print...

Страница 61: ...sheet Always make sure that the type of media specified on the panel matches the media that is loaded Ink drying times differ according to the type of media 30 sec onds is specified for RJ 6000 Series...

Страница 62: ...ange to 720 dpi If the current resolution setting is 720 dpi then the Low LED and the High LED will be lit and the setting will change to simulated 1440 dpi If the current resolution set ting is simul...

Страница 63: ...er Normal Printing Mode This is the ordinary printing mode The normal printing mode lamp is lit High Speed Printing Mode Printing speed has priority The high speed lamp is lit Use it for check printin...

Страница 64: ...head cleaning operation was performed or since power was switched on if there has been no head cleaning since power was switched on However if the cover is opened during cleaning the cleaning will be...

Страница 65: ...ring data reception DATA LED on Input data is cancelled During data processing DATA LED flashing Processed data is can celled During printing During head movement Printing is forcibly stopped and the...

Страница 66: ...e color output from your CAD system Step 1 Load an A3 size sheet of media and put the hold lever down Step 2 Press the Palette Print key QUALITY SPEED VALUE key while you are pressing the Shift key St...

Страница 67: ...occurs later Keep the Test print on page 47 and the Setup List print on page 56 Step 1 Load an A3 size sheet of media and put the hold lever down Step 2 For the test print press the Test Print key RE...

Страница 68: ...l media by pressing the Media Feed key MENU Menu Down key while you are pressing the Shift key Step 3 Release the Shift key and Media Feed key MENU Menu Down key when the roll media has been fed to th...

Страница 69: ...justment should be made You need a sheet of media of A3 size or larger mounted verti cally for the fine adjustment If a sheet of media smaller than A3 is loaded it may not be possible to obtain a prop...

Страница 70: ...6 Press ENTER key to confirm the value specified for pattern B Step 7 Look at pattern C on your print Use the VALUE and VALUE keys to enter the number of a line with no off set Step 8 Press ENTER key...

Страница 71: ...e cancel key is pressed during fine adjustment printing or it is interrupted by raising the hold lever there will be no input display screen Unless the exclusive media specified by Mutoh is used the i...

Страница 72: ...is section we give a summary explanation about menus for the practical use of the printer functions Menu mode Operation PAGE 72 Menu Structure PAGE 74 Menus 71 RJ 6000 Series USER GUIDE Basic Edition...

Страница 73: ...or the Menu Up key Menu Mode Operation 72 RJ 6000 Series USER GUIDE Basic Edition Menu Down Menu Down Menu Down Menu Down Menu Down Menu Up Menu Up Menu Up Menu Up Menu Up sub menu for detailed settin...

Страница 74: ...y pressing the VALUE or VALUE keys The setting will not change unless the ENTER key is pressed If the set up is complete press the Menu Up key If there is no key opera tion in Menu setting mode for 3...

Страница 75: ...o Manual Off Copy 1 to 99 Ink Density Normal Thin Faint Dist Adj No Clear Change Confirm Mode Centro Bitro Timing A B B A IP Address 000 000 000 000 to 192 034 043 015 to 255 255 255 255 Error Display...

Страница 76: ...Cleaning the Printer PAGE 76 Replacing Ink Cartridges PAGE 79 Switching Inks PAGE 80 Replacing the Cutter PAGE 82 Replacing Waste Liquid Absorbent Sheet Waste Box PAGE 84 Replacing Waste Liquid Absor...

Страница 77: ...ain electrical parts Paper dust is produced when the printer is working This should be wiped off periodically Don t blow it away For stubborn soiling that resists wiping use a lint free cloth moistene...

Страница 78: ...ive roller with a nylon brush Paper scraps on the pressure roller and drive roller may pre vent the media from feeding properly and produce a Jam check error Use a cotton swab to clean dust and paper...

Страница 79: ...Progressive soiling affects the sensitivity of the sensors and may cause media to be detected even when no media is loaded 78 RJ 6000 Series USER GUIDE Basic Edition Cleaning the Printer IMPORTANT...

Страница 80: ...the proper direction for insertion Make sure not to confuse the direction and place for insertion Open the ink cartridge just before you load it into the slot Printing may be blurred if the ink cartr...

Страница 81: ...t the required type of ink cartridges Switching is not possible unless all six inks are of the same type Only genuine ink cartridges can be used They also need to be turned in the proper direction for...

Страница 82: ...ity of waste liquid Have an absorbent sheet waste ink tank ready and dispose of waste fluid in accordance with the Utility Settings Head Wash item of the Functions Edition of the User Guide 81 RJ 6000...

Страница 83: ...i odically Step 1 Switch off the power lower the hold lever and bring the head to the middle Don t move the head with the hold lever up The head and media keeper blade may touch causing damage and poo...

Страница 84: ...de is very brittle Be careful not to bump it or drop it Step 4 Be sure to return the head to the right by hand before switching on the power Cutter life will vary according to the type and thickness o...

Страница 85: ...of water and see a doctor If it is licked gargle with water and wash out straight away If it is swallowed immediately drink plenty of water and consult a doctor without delay If this message appears y...

Страница 86: ...oves and take it out by hand Check beforehand that the thick vinyl bag to be used does not leak Also be careful not to tear the vinyl bag when you are disposing of the waste liquid absorbent material...

Страница 87: ...er Step 5 The alarm will ring and Change Tank No is displayed Press the VALUE or VALUE control panel keys to change the dis play to Yes Step 6 Check that Change Tank Yes is dis played then press ENTER...

Страница 88: ...bottle is about half full Have a new absorbent sheet a thick vinyl bag and a pair of for ceps ready Conditions vary for the waste ink bottle to become half full but it will be after printing about 20...

Страница 89: ...e of it promptly or put it out of reach If you accidentally touch the waste liquid wash with soap and water at once If it should enter your eye wash with plenty of water and see a doctor If it is lick...

Страница 90: ...ds and forwards two or three times with the cloth for cleaning the cleaning wiper an accessory item Clean without your hand coming into direct contact with the head cap unit which is near the cleaning...

Страница 91: ...ng ink etc if it is not returned to the right hand end of the printer After the cleaning wiper has been cleaned if head cleaning does not make the faintness or blemishing in the printing dis appear co...

Страница 92: ...n the case of a service contract please have your contract document available Nothing happens after power is switched on Possible Cause Remedy Reference Page Page 31 Page 14 Page 16 Nothing happens af...

Страница 93: ...SER GUIDE Basic Edition When Trouble Strikes 1 Is the interface cable con nected 2 Are ink cartridges installed 3 Do they contain ink 4 Have you replaced the waste box Refer to Connecting the inter fa...

Страница 94: ...the right position 2 Have you made scale or mirror settings 3 Is an initial position speci fied 4 Is the printing abnormal after ink was filled Load media correctly Cancel scale and mirror set tings...

Страница 95: ...s the ink cartridge cold and frozen 2 Was the power cut during initial filling 3 Sometimes the printer seems unable to print nor mally after initial filling Leave for at least 3 hours at room temperat...

Страница 96: ...Are you using media spec ified by Mutoh 2 Is the hold lever down 3 With cut media is the leading edge aligned with the edge of the printing board 4 With roll media does the right hand edge of the medi...

Страница 97: ...by Mutoh 2 Is the hold lever down 3 Is the media loaded obliquely 4 Does media tend to curl up when it is loaded 5 Are you using the printer in a place outside the usage environment such as in the dr...

Страница 98: ...again Install again after correctly specifying the drive containing the MUTOH PRINTER SOFT WARE CD ROM and the fold er 1 Is the Centronics interface cable connected properly 2 Does the DATA LED on the...

Страница 99: ...specified by Mutoh Check the printing side of the media and load it correctly Try head cleaning Use power ful cleaning 1 Are you using media spec ified by Mutoh 2 Is the hold lever down 3 Is the pres...

Страница 100: ...h printer specifications optional items supply items Printer Specifications PAGE 100 Interface Specifications PAGE 103 List of Optional and Supply Items PAGE 106 Appendix 99 RJ 6000 Series USER GUIDE...

Страница 101: ...S Printing Modes 360 dpi High quality mode 4 pass Uni direction Standard mode 4 pass Bi direction High speed mode 2 pass Bi direction 720 dpi High quality mode 8 pass Uni direction Standard mode 4 pas...

Страница 102: ...quality is assured within standard margins If media wider than 1082 2 mm 43 inch 1361 6 mm 54 inch or 1564 8 mm 62 inch is used the left and right distances shown in the left will be different Media...

Страница 103: ...densation Power Supply Voltage 100 to 120 V AC 10 200 to 240 V AC 10 Input Frequency 50 Hz 1 60 Hz 1 automatic switching Power Consumption Standby 60 W or less Printing 90 W or less 90 W or less 110 W...

Страница 104: ...STROBE RJ Printer 19 SG 2 DATA1 RJ Printer 20 SG 3 DATA2 RJ Printer 21 SG 4 DATA3 RJ Printer 22 SG 5 DATA4 RJ Printer 23 SG 6 DATA5 RJ Printer 24 SG 7 DATA6 RJ Printer 25 SG 8 DATA7 RJ Printer 26 SG 9...

Страница 105: ...1284 bidirectional parallel compatible Cable Type AWG28 x 18 pair twisted pairs Shield Type Metal tapes and braiding double shielded cable Characteristic Impedance 62 104 RJ 6000 Series USER GUIDE Bas...

Страница 106: ...category 5 Protocol TCP IP NetWare V3 1J EtherTalk Mode ftp Remote printer mode Printer name lpr Print server Zone name socket Spool Memory 384 KB Functions Automatic protocol recognition Transmission...

Страница 107: ...inch scroller for 3 inch paper tube RJ60 SR62 03 1 unit Scroller 3 62 inch scroller for 2 inch paper tube RJ60 SR62 02 1 unit Scroller 2 Ink Cartridges 220 ml Name of Item Model Number Qty Pigment in...

Страница 108: ...reresistance cloth RJ6 CLB133 20 1 unit 1 330 mm 20 m Fireresistance cloth RJ6 CLB150 20 1 unit 1 500 mm 20 m Baeklit film RJ6 BL127 30 1 unit 1 270 mm 30 m Foam PET film RJ6 MPET137 30 1 unit 1 370 m...

Страница 109: ...108 RJ 6000 Series USER GUIDE Basic Edition...

Страница 110: ...loading media installing a driver Direct Access Keys The operation of direct access keys that are normally used for effective control of printer functions Menus An overview of menus for applying prin...

Отзывы: