4
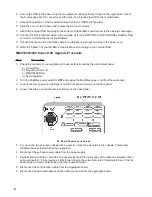
19 Ensure that the boards are seated into the back panel.
20 Ensure that the pc board chassis locks will seat into the boards. Then loosen, pry down and retighten
the screws.
WARNING:
Ensure that the power cable connector pins align with the connector on
the power supply board and that the power cable connector has the
locking notch facing upward. If the cable is misaligned in any way severe
damage may occur to the unit.
21 Connect the pc board power cable to the power supply being careful that the pins are aligned properly.
22 Place the MultiMux on its side and place the internal DSU serial tag to the bottom of the MultiMux
cabinet next to the existing serial tag(s).
23 Place the MultiMux right-side up.
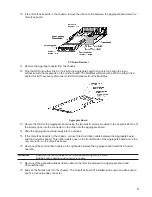
24 Set DIP-switch SW-5 on the Aggregate board for the internal DSU. If an internal DSU was added to link
A, set DIP switch position 2 to the OPEN (UP) position. If an internal DSU was added to link B, set
switch position 3 to the OPEN (UP) position.
25 Connect the RJ48 cable provided in the upgrade kit to the COMPOSITE LINK A and/or B INTERNAL
DSU connector on the backpanel of the MultiMux.
26 Connect the other end of the RJ48 cable into a telephone wall jack.
27 Replace the front panel securing it to the chassis with the four quarter-turn fasterners.
28 Plug the power cord into the power receptacle on the back panel of the MultiMux and AC wall outlet.
29 Place the Power Switch in the ON position.
30 Refer to Chapter 5 of your MultiMux Owner's Manual to configure your internal DSU.


