HTXD6i/STXD6i Trowel • SeTUp, aDJUSTMeNTS aND CalIBraTIoNS — rev. #0 (03/14/13) — page 15
serVice tool setup and connection
wHITeMaN ServICe Tool (wST) INSTallaTIoN
1. Call or e-mail Multiquip Technical Support or Field
Service to obtain the application specific Whiteman
Service Tool (WST) file.
2. Also obtain software license key through Multiquip
Technical Support or Field Service.
3. The WST file will be sent to you as an attachment to
an e-mail.
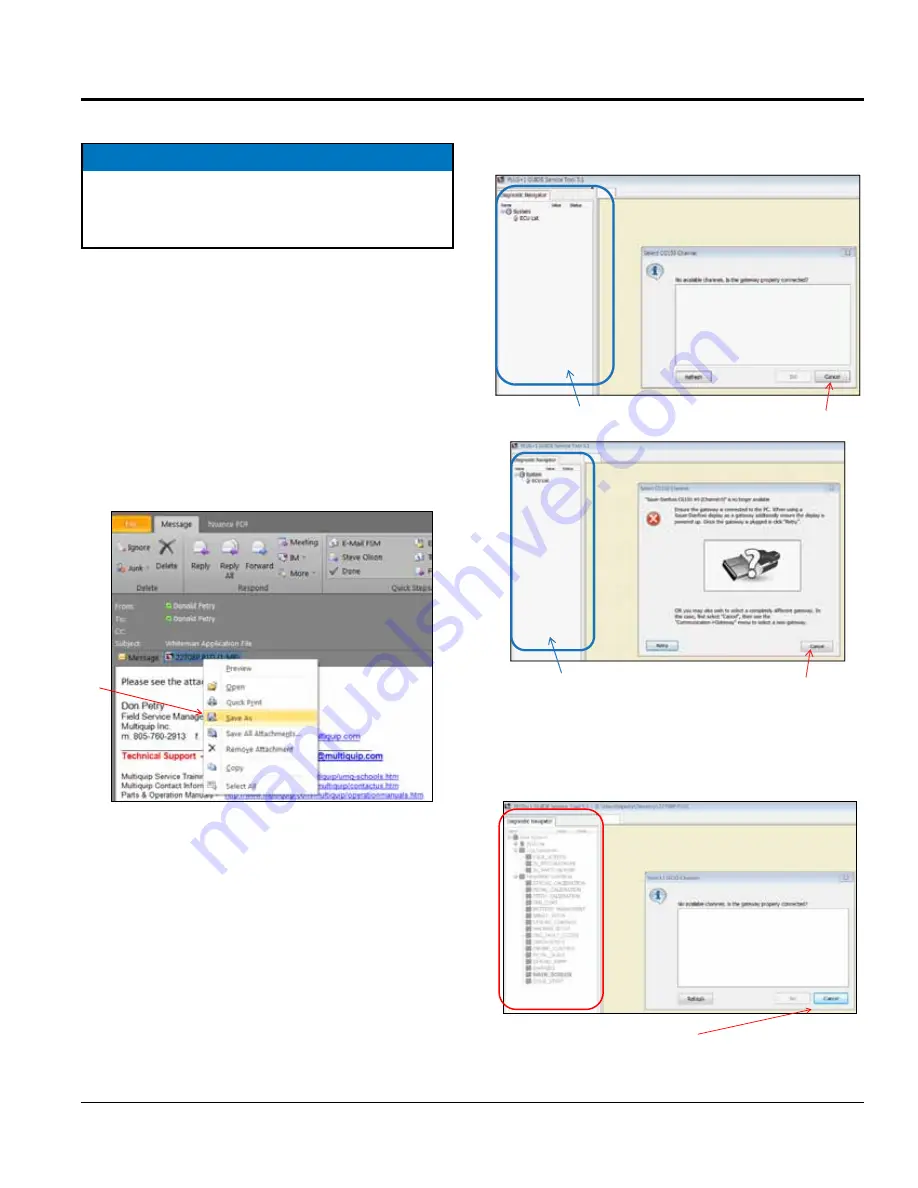
4. Open the e-mail sent by Multiquip and click on the
attachment. On the drop-down menu, select "Save
Target As" (Figure 10).
Figure 10. Saving WST Application File
5. Do not change the file name. Save the file to your
desktop.
6. Locate and verify that the WST application file (22708P)
was saved to your desktop.
NOTICE
Make sure that the Sauer Danfoss Plus Software is
already installed before proceeding with the Whiteman
Service Tool (WST) installation.
Whiteman Application File
17
•
Right click the
attachment file
and on the drop
down menu select
“ Save Target As “.
•
Save this file to the
desktop location.
•
Do not change the
file name.
WST – Whiteman Service Tool
Look for ICON on your computers desktop.
7. Double-click on the 22708P Icon on your desktop. One
of the screens shown in Figure 11 will appear. Click
"Cancel".
Figure 11. WST Navigation Bar (Not Populated)
8. Click "Cancel" again when the new screen (Figure 12)
comes up.
Figure 12. WST Navigation Bar (Populated)
Click “Cancel”
Navigation Bar
is not populated
Click “Cancel”
Naviga
ti
on Bar
is not populated
Whiteman Service Tool Application
Connecting Laptop to Trowel
20
•
After canceling from previous screen, this new screen will
open but the navigation bar is populated.
Click cancel


