Visit
for new product releases!
INST
ALL
ATION
Cop
yrigh
t © 2019 Multilink I
nc
. A
ll righ
ts r
eser
ved • Sp
ecific
ations subjec
t t
o change without notic
e • Re
v. 11/20/2019 •
Page 9
Do
cu
men
t N
o.
O
pti
ma
16
Ins
tal
la
tio
n G
ui
de
4.12 Proper Grommet Seal
Make sure each fiber jacketing/entry
grommet is the appropriate size of the cable
and/or mastic tape applied to accommodate the
diameter being used. Remove the white protective
cover on the mastic tape prior to applying to
the fiber and securing in the grommet. Any drop
grommets not being used
MUST
have a supplied
pin inserted to ensure a water-tight seal.
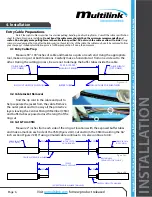
4.15 Fiber Routing & Attach Tie-Wraps
Route the ring cut exposed buffer tubes
around the inside perimeter of the Optima 16
base. Place the slack under the fiber management
clips to hold in place temporary. Then using
the supplied tie-wraps insert into each fiber
management clip on the lower side of the base
and tighten down enough to hold in place but not
directly damage the fiber.
4.13 Install CSM & Cable Grommet
Place the fiber jacketing into the
appropriate sized non-captive grommet. If
necessary build up the diameter to fit within the
grommet using mastic tape. Prior to installation,
use sealant to lubricate the fiber jacketing or
mastic tape as well as the outer edge of the
grommet for a proper seal. Adjust the CSM under
the CSM clamp so that the jacket is barely exposed
and the 2” of CSM doesn’t stick too far out of the
clamp as shown. Once positioned tighten the
screw of the CSM clamp to secure into place.
4.14 Secure Cable to Base
Once your fiber is secured via the CSM
clamp, utilize the supplied tie wraps to secure the
fiber/s to the non-captive entry flange. Tighten
the tie wrap to a “snug” position being sure to not
overtighten to bend or flex the fiber out of the
grommet. Doing so will involve a water leakage to
occur.
Installation (Cont.)


