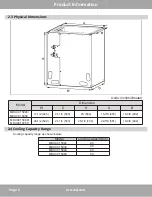
MrCool MDUCC15024 Скачать руководство пользователя страница 11

Page 10

mrcool.com

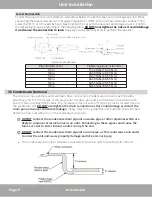
Unit Installation - OPTIONAL: No-Vac

®

 Quick Connect

®

 Line Set 

INSTRUCTIONS FOR USE WITH


NO-VAC™ QUICK CONNECT® LINE SET


SOLD SEPARATELY

KINK RESISTANT, PRECHARGED, SIMPLE SECURE QUICK CONNECT, 100% CONNECTION GUARANTEE

www.mrcool.com

v01-28-2021

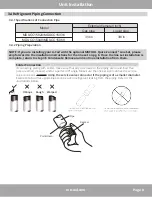
Please read and follow the instruc�ons and diagram below

*

 :

1.

Take out matching male connectors 

M1

 and 

M2

.

2.

Remove 

protec�ve cap with the copper gasket at each stop valve on the 

DC INVERTER

 and ensure the threads are clean and complete.

3.

Tighten 

the 

M1 

connector to the 

cutoff valve *1 

with a �ghtening force of 37 �/lb (50 N).

Tighten 

the 

M2 

connector to the 

cutoff valve *2 

with a �ghtening force of 52 �/lb (70 N).

4.

Repeat 

step 3 for 

AIR HANDLER 

at the other end of the 

LINE SET

.

5.

Unroll and route the 

LINE SET 

between the 

AIR HANDLER

 and the 

DC INVERTER

.

6.

Remove 

the protec�ve caps of the valves at both ends of the 

LINE SET.

 Verify that all threads are clean and complete.

7.

Tighten 

the 

LINE SET F1 

valve to the 

M1 Connector 

(a�ached in step 3) with a force of 33 �/lb (

45 N)

Tighten 

the 

LINE SET F2 

valve 

to the 

M2 Connector 

(a�ached in step 3) with a �ghtening force of 48 �/lb (

65 N)

.

8.

Repeat 

this process for the 

AIR HANDLER 

at the other end of the 

LINE SET

.

Connec�ons must be made exactly as specified to avoid system leaks and /or da

mage

9.

At the 

OUTDOOR UNIT remove 

the 

protec�ve cap 

at the 

cutoff valve switch 

and 

open 

the 

cutoff valve 

with a hex wrench to

run the refrigera�on circuit.  

If 

there is any fizz, grease or other 

leakage

close 

the valve 

immediately 

and 

check 

that 

steps 

3 and 7 

were done properly.  

Otherwise

, immediately 

apply soapy water 

for micro-leakage detec�on.  Soak the joints using 

a sponge or spray bo�le. 

If any bubbles form

close 

the valve 

immediately 

and 

check 

that 

steps 3 and 7 

were done properly.

10.

A�er 

the correct connec�on, 

re-�ghten 

the 

cutoff 

valve’s 

protec�on cap 

and 

cover 

the M1, M2 and F1, F2 connec�ons 

with the grey 

insula�ng sleeve 

to help 

prevent condensa�on

.

*

Failure to follow the instructions provided could result in severe harm to you, this product, or other property. 

  The manufacturer, distributor, and seller are not responsible for any harm resulting from the failure to follow 

  instructions and the failure to follow these instructions will void any and all warranties express or implied.

37 ft/lb

37 ft/lb

52 ft/lb

52 ft/lb

M1

F1

M1

F1

M2

F2

M2

F2

*1

*1

*2

*2

3/8”

3/8”

3/4”

3/4”

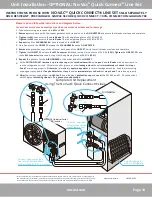
Complete Unit Replacement 

Using The No Vac® Quick Connect® Lines  

Air Handler

Open the stop valve 

only after connecting 

the refrigerate lines

A-coil Precharged 

with 410 Refrigerate    

Connect using precharged 

line set with quick connect 

fittings in length 15, 25, 35, 50 feet

MRCOOL Universal Series 

DC Inverter

Содержание MDUCC15024

Страница 1: ...hank you for choosing MRCOOL Please read this manual carefully before installation and keep it for future reference Due to updates and constantly improving performance the information and instructions...

Страница 2: ...ting Evacuating and Charging 11 3 6 Ductwork 11 3 3 8 Sealing Ducts 11 Optional Quick Connect Line set Installation 10 3 3 A Coil Orientation Position Options 7 2 1 Product Description 4 2 2 Main Comp...

Страница 3: ...the requirements of the NEC and CEC by authorized personnel only Consult local building codes and NEC for special requirements The quali ed installer or agency must use factory authorized kits or acce...

Страница 4: ...RCOOL technical support at 270 366 0457 6 If the product is malfunctioning and or is inoperable please contact MRCOOL technical support at the aforementioned number as soon as possible and provide the...

Страница 5: ...erating sound levels and value for money The evaporator unit uses the environmentally friendly refrigerant R410A which is chlorine free to help prevent damage to the ozone layer 2 2 Main Components 2...

Страница 6: ...A B MDUCC15024 MDUCC15036 17 1 2 445 21 1 4 540 23 584 15 7 8 403 19 3 8 492 MDUCC15048 MDUCC15060 24 1 2 622 21 1 4 540 28 1 2 724 22 7 8 581 19 3 8 492 2 4 Cooling Capacity Range Cooling capacity ra...

Страница 7: ...talled in accordance with such codes and or any prevailing local codes regulations The manufacturer assumes no responsibility for any equipment installed in violation of any codes or regulations NOTE...

Страница 8: ...Application Return Air ow Supply Air ow to Ductwork A Coil Modular Blower Return Air ow Supply Air ow to Ductwork Up ow Application Return Air ow Supply Air ow to Ductwork Horizontal Right Application...

Страница 9: ...on pg 8 Once the line set installation is complete return to step 3 5 Condensate Removal and continue installation from there Solder Connection If connecting piping with solder make sure that any cuts...

Страница 10: ...it DO NOT connect the condensate drain pipe into a rain pipe as this could cause rain water to enter the unit and cause property damage and or personal injury The condensate drain pipe should be conne...

Страница 11: ...ctly as speci ed to avoid system leaks and or damage 9 At the OUTDOOR UNIT remove the protec ve cap at the cuto valve switch and open the cuto valve with a hex wrench to run the refrigera on circuit I...

Страница 12: ...stallation instructions provided with those units before the coil can be installed Position the cased coil on top of the furnace or air handler cabinet and secure it using eld provided screws NOTE If...

Страница 13: ...blower motor speed that will provide 300 450 CFM per 12 000 Btu h of cooling capacity wet coil Refer to the table 1 below for the recommended air ow volume Table 1 Cabinet Recommended Volume CFM Mode...

Страница 14: ...e life of the unit 5 1 Condensate Drain Pipe 5 2 Checklist Before Seasonal Use Check inlet outlet of indoor units for clogs Check that lter screen is securely in place Check that unit is securely inst...

Страница 15: ...Installation and rst run of the unit should be performed by professional personnel from a MRCOOL appointed service center The services of a professional are NOT required when the MRCOOL Quick Connect...

Страница 16: ...UNIVERSAL A Coils...

Отзывы: