background image

WDR-3124A 

Web Console Configuration 


3-44 

Trap 

Traps can be used to signal abnormal conditions (notifications) to a management station. This trap-driven 
notification can make your network more efficient. 

Because a management station usually takes care of a large number of devices that have a large number of 
objects, it will be overloading for the management station to poll or send requests to query every object on 
every device. It would be better if the managed device agent could notify the management station by sending 
a message known as a trap for the event. 

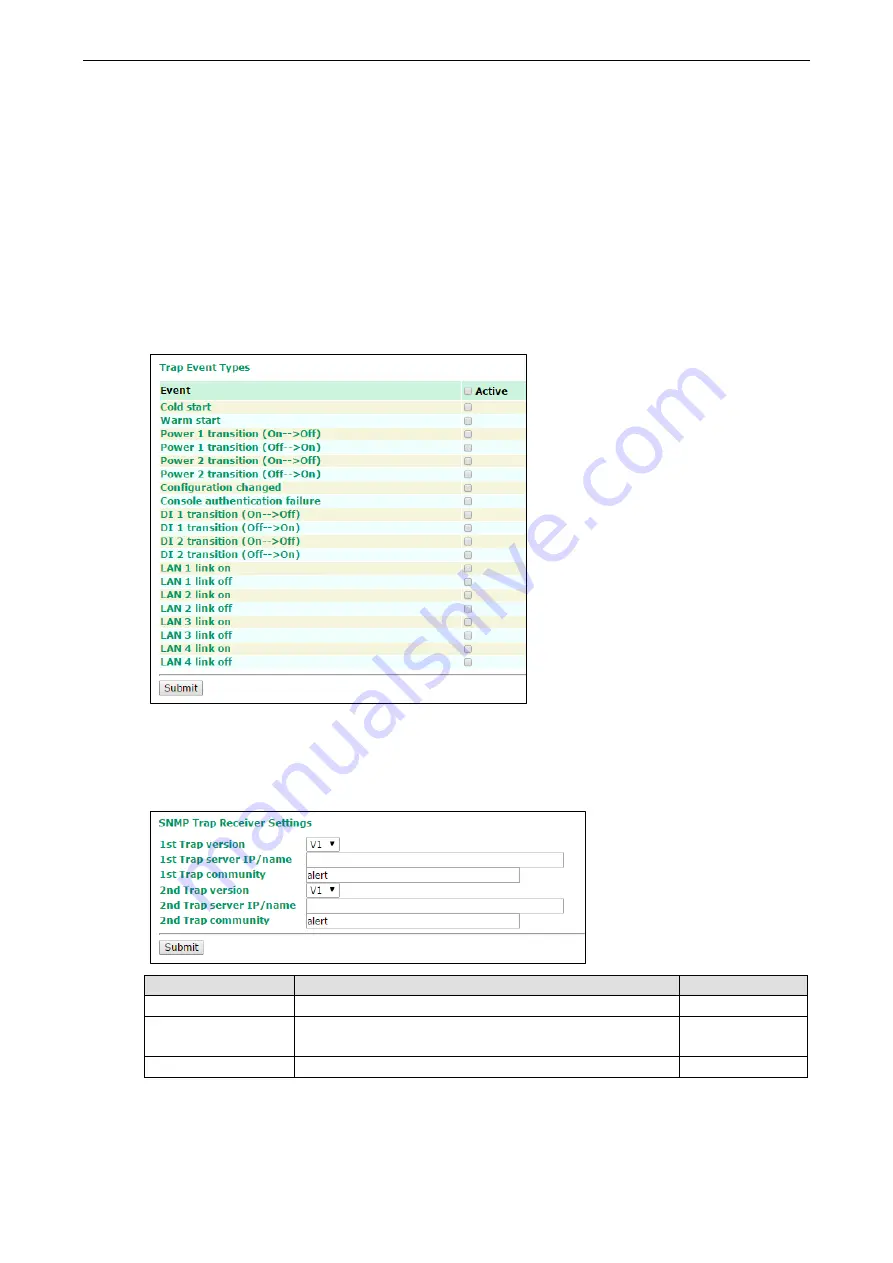
Trap Event Types 

Select 

Active 

to enable traps for the event types.  

For information on the event types, refer to the 

System Log Event Types

 section. 


SNMP Trap Receiver Settings 

SNMP traps are defined in SMIv1 MIBs (SNMPv1) and SMIv2 MIBs (SNMPv2c). The two styles are basically 
equivalent, and it is possible to convert between the two. You can set the parameters for SNMP trap receivers 
through the web page. 


Field 

Description 

Factory Default 

1

st

/2

nd

 Trap version 

Select an SNMP version to define traps.  

V1 

1

st

/2

nd

 Trap server 

IP/name 

Enter the IP address or server name of the trap server.   


1

st

/2

nd

 Trap community  Enter a community (up to 31 characters) for authentication. 

alert 

Содержание WDR-3124A

Страница 1: ...WDR 3124A User s Manual First Edition May 2015 www moxa com product 2015 Moxa Inc All rights reserved ...

Страница 2: ...ight to make improvements and or changes to this manual or to the products and or the programs described in this manual at any time Information provided in this manual is intended to be accurate and reliable However Moxa assumes no responsibility for its use or for any infringements on the rights of third parties that may result from its use This product might include unintentional technical or ty...

Страница 3: ... Options 2 2 Wireless Search Utility 2 2 Web Console 2 2 Telnet Console 2 2 SSH Console 2 3 Serial Console 2 3 3 Web Console Configuration 3 1 Accessing the Web Console 3 2 Overview 3 3 SIM Status 3 4 Basic Settings 3 4 System Info Settings 3 4 Network Settings 3 5 Time Settings 3 6 Cellular Settings 3 7 Cellular WAN Settings 3 7 GuaranLink 3 8 GPS Settings 3 10 OnCell Central Manager Settings 3 1...

Страница 4: ...efault 3 53 Password 3 53 Misc Settings 3 53 Remote SMS Control 3 54 Save Configuration 3 55 Restart 3 56 Logout 3 56 4 Software Installation and Configuration 4 1 Overview 4 2 Wireless Search Utility 4 2 Installing the Wireless Search Utility 4 2 Configuring the Wireless Search Utility 4 4 A References A 1 Beacon A 2 DTIM A 2 Fragment A 2 RTS Threshold A 2 B Supporting Information B 1 Firmware Re...

Страница 5: ...0 to 70 C for wide temperature models and is rugged enough for any harsh industrial environment The following topics are covered in this chapter Overview Package Checklist Product Features Product Specifications Appearance Device Dimensions Connecting the Hardware Wiring Requirements Installing a SIM Card Device Mounting DIN Rail Mounting Wall Mounting optional Grounding the WDR 3124A Wiring the R...

Страница 6: ...R 3124A 1 GPS connector terminator 2 dual band omni directional antennas 2 dBi RP SMA male 1 2G 3G omni directional antennas 2 dBi SMA male 5 plastic RJ45 protective caps for serial console and Ethernet ports Quick installation guide printed Warranty card NOTE The above items come with the standard WDR 3124A model but the package contents may vary for customized versions Product Features All WDR 3...

Страница 7: ...ps QPSK 18 12 Mbps BPSK 9 6 Mbps 802 11n 64QAM 300 Mbps to BPSK 6 5 Mbps multiple rates supported Operating Channels central frequency WDR 3124A EU 2 412 to 2 472 GHz 13 channels 5 180 to 5 240 4 channels WDR 3124A US 2 412 to 2 462 GHz 11 channels 5 180 to 5 240 4 channels 5 745 to 5 825 GHz 5 channels Security SSID broadcast enable disable 64 bit and 128 bit WEP encryption WPA WPA2 Personal and ...

Страница 8: ... 5 5 Mbps 84 dBm 11 Mbps 802 11g 87 dBm 6 Mbps 86 dBm 9 Mbps 85 dBm 12 Mbps 82 dBm 18 Mbps 80 dBm 24 Mbps 76 dBm 36 Mbps 74 dBm 48 Mbps 72 dBm 54 Mbps 802 11n 69 dBm MCS15 20MHz 71 dBm MCS7 20MHz 5 GHz 802 11a 87 dBm 6 Mbps 86 dBm 9 Mbps 85 dBm 12 Mbps 82 dBm 18 Mbps 80 dBm 24 Mbps 76 dBm 36 Mbps 74 dBm 48 Mbps 72 dBm 54 Mbps 802 11n 69 dBm MCS15 20MHz 68 dBm MCS15 40MHz 71 dBm MCS7 20MHz 70 dBm M...

Страница 9: ...PN Max Tunnel Number 5 Responder Initiator IPSec DES 3DES AES MD5 SHA 1 DH2 DH5 PSK X 509 RSA GPS NMEA Others DDNS Management Software Moxa Proprietary GuaranLink 4 tier heart beat for reliable and persistent cellular connectivity OnCell Central Management Large scale centralized device management over private cellular IPs Search Utility Simple device configuration and management SIM Interface Num...

Страница 10: ...ty MTBF mean time between failures 382 851 hours Warranty Warranty Period 5 years Details See www moxa com warranty ATTENTION The WDR 3124A is NOT a portable mobile device and should be located at least 20 cm away from the human body The WDR 3124A is NOT designed for the general public A well trained technician should be enlisted to ensure safe deployment of WDR 3124A units and to establish a wire...

Страница 11: ...e SMA 3 Grounding screw M5 4 Terminal block two digital input and one digital relay 5 Terminal block PWR1 and PWR2 6 WIFI antenna ports female RP SMA 7 RS 232 serial console RJ45 8 LED display 9 10 100 1000 BaseT X Ethernet ports RJ45 10 DIN rail mounting kit 11 Reset button 12 Dual SIM SIM2 13 Dual SIM SIM1 ...

Страница 12: ...ature Caution Be careful when handling the device When plugged in the device internal components generate heat and consequently the casing may feel hot to the touch You should also take note of the following guidelines Use separate paths to route wiring for power and devices If power wiring and device wiring paths must cross make sure that the wires are perpendicular at the intersection point Note...

Страница 13: ... to the right 4 Install the screw to secure the SIM card slot cover To remove a SIM card complete the following steps 1 Remove the screw to open the SIM card slot cover 2 Push down the SIM card tray to unlock it 3 Rotate the SIM card tray to expose the SIM card slot 4 Remove the SIM card from the SIM card tray Device Mounting There are two ways to mount the WDR 3124A DIN rail mounting and wall mou...

Страница 14: ...sing a screwdriver 2 Slightly pull the WDR 3124A forward 3 Lift up to remove the WDR 3124A from the DIN rail Wall Mounting optional For some applications it may be more convenient to mount the WDR 3124A to a wall The following figure shows the DIN rail kit dimensions unit mm inch 1 Remove the aluminum DIN rail attachment plate from the WDR 3124A and then attach the wall mount plates with M3 screws...

Страница 15: ...d in a Restricted Access Location such as a dedicated computer room Access can only be gained by SERVICE PERSONS or by USERS who have been instructed about the fact that the metal chassis of the equipment is extremely hot and may cause burns Service persons or users should pay special attention and take special precautions before handling the equipment Access should be controlled with lock and key...

Страница 16: ... connecting the WDR 3124A to the DC power inputs make sure that the DC power source voltage is stable Wiring the Relay Contact The WDR 3124A has one relay output which consists of the two contacts of the terminal block on the WDR 3124A s top panel Refer to the Specification section for detailed electrical requirement The relay contacts are used to indicate user configured events The two wires atta...

Страница 17: ...s Pin Signal 1 TRD 0 2 TRD 0 3 TRD 1 4 TRD 2 5 TRD 2 6 TRD 1 7 TRD 3 8 TRD 3 Serial Connection The WDR 3124A has one RS 232 8 pin RJ45 console port located on the front panel Use either an RJ45 to DB9 or RJ45 to DB25 cable to connect the WDR 3124A s console port to your PC s COM port You may then use a console terminal program to access the WDR 3124A for console configuration Console Pinouts for 1...

Страница 18: ... indicate cellular signal level when connected to a cellular network with an IP address Signal LED 1 0 RSSI 12 Signal LED 2 12 RSSI 20 Signal LED 3 20 RSSI 31 WIFI SIGNAL 3 LEDs Green On Off WiFi signal level Client Router mode only Signal LED 1 0 SNR 23 Signal LED 2 23 SNR 47 Signal LED 3 47 SNR SIM1 Amber On Off SIM 1 is active or inactive Blinking SIM 1 is not inserted or PIN code is incorrect ...

Страница 19: ...lar Signal LEDs are off after the WDR 3124A is powered on for several minutes check the following APN information Username and password Antenna connection Cellular network coverage is available at the current location Beeper The beeper emits two short beeps when the system is ready Reset Button You can reboot the WDR 3124A or reset it to factory default settings by pressing the RESET button with a...

Страница 20: ... address This chapter describes how to configure the IP address and describes the various configuration options The following topics are covered in this chapter Static and Dynamic IP Addresses Factory Default IP Address Configuration Options Wireless Search Utility Web Console Telnet Console SSH Console Serial Console ...

Страница 21: ...a private IP address are not directly accessible from a public network For example you cannot ping a device with a private IP address from an outside Internet connection Configuration Options This section describes the various options you can use to configure the WDR 3124A Wireless Search Utility You may configure your WDR 3124A with the bundled Wireless Search Utility on Windows Please refer to A...

Страница 22: ...tor which is available free of charge as part of the PComm Lite suite You may use a different terminal emulator utility although your actual screens and procedures may vary slightly from the following instructions 1 Turn off the WDR 3124A 2 Use an RJ45 to DB9 serial cable to connect the WDR 3124A s serial console port to your computer s RS 232 serial port then turn on the WDR 3124A 3 On the comput...

Страница 23: ...e Console login screen will appear Log into the RS 232 console with the login name default admin and password default root if no new password is set 8 The WDR 3124A s device information and Main Menu will be displayed Please follow the description on screen and select the administration option you wish to perform ...

Страница 24: ...is chapter describes the configuration options and screens in the web console The same configuration options are also available through the Telnet and serial consoles The following topics are covered in this chapter Accessing the Web Console Overview Basic Settings Cellular Settings Wireless Settings Advanced Settings Auto Warning Settings Status Maintenance Save Configuration Restart Logout ...

Страница 25: ... 192 168 127 xxx range NOTE If you reset the WDR 3124A to the factory default settings the IP address will be reset to 192 168 127 254 3 Open a web browser on the computer and enter the IP address of the WDR 3124A in the address field The following figure shows an example 4 The web console login page appears Enter the user name the default is admin and password the default is root and click Login ...

Страница 26: ...corner The following figure shows an example To activate the changes click Restart and then Save and Restart after you change the settings It may take up to 30 seconds for the WDR 3124A to complete the reboot procedure Overview The Overview page displays a summary of the current WDR 3124A status To display detailed 802 11 information click the SSID The following figure shows an example ...

Страница 27: ...e System Info page makes it easier to identify the WDR 3124A on your network Information especially the device name and description on the System Info page is displayed and included on the Overview page in SNMP information and in notification emails The following table describes the fields Field Description Factory Default Device name Enter a descriptive name up to 31 characters for the WDR 3124A ...

Страница 28: ...example http ap11 abc com in your browser s address field instead of entering the IP address The Secondary DNS server will be used if the Primary DNS server fails to connect None Secondary DNS server The IP address of the secondary DNS Server used by your network After entering the DNS Server s IP address you can input the WDR 3124A s URL for example http ap11 abc com in your browser s address fie...

Страница 29: ...ke the changes take effect click Set Time An Updated text appears to indicate that the change is complete Note Set the time zone before you configure the current local time Time zone Select a time zone from the drop down list The default option is GMT Greenwich Mean Time Note Changing the time zone automatically changes the Current local time We strongly recommend that you set the time zone before...

Страница 30: ...ce provider to unlock the SIM card Note To change the PIN code you need to use a cell phone SIM 1 2 band To allow the WDR 3124A to automatically negotiate with the base station with an appropriate band select Auto Otherwise select Manual SIM 1 2 ppp config Select Enable to configure PPP authentication manually Otherwise select Disable SIM 1 2 ATD Enter the number the WDR 3124A uses to dial onto th...

Страница 31: ...k feature enables reliable connectivity with 4 tier intelligent connection checks without sending excessive and costly cellular packets GuaranLink Recovery Process With the GuaranLink feature the WDR 3124A automatically tries to re establish a connection when a connection failure has occurred The WDR 3124A performs one of the following actions depending on the number of enabled SIM cards One SIM c...

Страница 32: ...live check Depending on your ISP cellular connection is terminated if there is no active data transmission for a period of time Select Enable to set the WDR 3124A to keep the cellular connection alive by performing a DNS lookup or remote host Ping if no data is transmitted within the timeout period If the connection check fails after the number of retries specified in the Cellular connection alive...

Страница 33: ... system before starting the GuaranLink recovery process 5 GPS Settings Setting Description Factory Default GPS Enable or disable the GPS function Disable A GPS Enable or disable the A GPS function A GPS will improve the startup performance by downloading Almanac and or Ephemeris data if the cellular network can be accessed Disable Report protocol Select TCP client or UDP protocol to configure the ...

Страница 34: ...to the OnCell Central server 10 Management information port Enter the port number to send status information to the OnCell Central server Make sure that you enter the same port number as specified on the OnCell Central server and that the port number is not already used by another service 63201 Management configuration port Enter the port number to send configuration information to the OnCell Cent...

Страница 35: ...s to establish a connection from the Ethernet interface to the OnCell Central server 63204 Act Select this check box to enable the selected service forwarding rule To enable all entries select the check box in the header Eth Device Name Enter a descriptive name for the Ethernet device connected to the WDR 3124A Eth Device IP Enter the IP address of the Ethernet device connected to the WDR 3124A Po...

Страница 36: ...ccess point Select Client Router to set the WDR 3124A to operate as a wireless client router AP Basic Wireless Settings You can add or edit an SSID in the Basic Setting Selection screen An SSID is a unique identifier that wireless networking devices use to establish and maintain wireless connectivity Multiple access points on a network or sub network can use the same SSIDs To configure an SSID com...

Страница 37: ...d when IEEE 802 11a clients are on the network N Only 5 GHz Sets the WDR 3124A to operate in 5 GHz IEEE 802 11n mode Note In legacy mode 802 11a b g the WDR 3124A receives and transmits data only through antenna port A To protect the connectors and the RF module all radio ports should be terminated by either an antenna or a terminator It is strongly recommended that you use a resistive terminator ...

Страница 38: ...ty Settings The WDR 3124A provides four wireless security modes Open WEP Wired Equivalent Privacy WPA Wi Fi Protected Access and WPA2 Several security modes are available in the WDR 3124A by selecting Security mode and WPA type Open No authentication no data encryption WEP Static WEP Wired Equivalent Privacy keys must be configured manually WPA WPA2 Personal Also known as WPA WPA2 PSK You will nee...

Страница 39: ...type is used when WEP data encryption is run with authentication When WEP is enabled as a security mode the length of a key so called WEP seed can be specified as 64 128 bits which is actually a 40 104 bit secret key with a 24 bit initialization vector The WDR 3124A provides 4 entities of WEP key settings that can be selected to use with Key index The selected key setting specifies the key to be u...

Страница 40: ...rsion of 802 11i The initial vector is transmitted encrypted and enhanced with its 48 bits twice as long as WEP The key is regularly changed so that true session is secured Even though AES encryption is only included in the WPA2 standard it is widely available in the WPA security mode of some wireless APs and clients as well The WDR 3124A also supports AES algorithms in WPA and WPA2 for better com...

Страница 41: ...keys should be changed The security level is generally higher if you set the key renewal value to a shorter number which forces the encryption keys to be changed more frequently The default value is 3600 seconds 6 minutes Longer time periods can be considered if the line is not very busy WPA WPA2 Enterprise for AP mode By setting WPA type to Enterprise you can use EAP Extensible Authentication Pro...

Страница 42: ...erver None Key renewal Setting Description Factory Default 60 to 86400 seconds 1 minute to 1 year Specifies the time period of group key renewal 3600 seconds WPA WPA2 Enterprise for Client mode When used as a client the WDR 3124A can support three EAP methods or EAP protocols EAP TLS EAP TTLS and EAP PEAP corresponding to WPA WPA Enterprise settings on the AP side Encryption method Setting Descrip...

Страница 43: ... PEAP work in a similar way First they establish a TLS tunnel EAP TLS for example and validate whether the network is trustworthy with digital certificates on the authentication server This step establishes a tunnel that protects the next step or inner authentication and consequently is sometimes referred to as outer authentication The TLS tunnel is then used to encrypt an older authentication pro...

Страница 44: ...inner authentication None PEAP There are a few differences in the TTLS and PEAP inner authentication procedures TTLS uses the encrypted channel to exchange attribute value pairs AVPs while PEAP uses the encrypted channel to start a second EAP exchange inside of the tunnel The WDR 3124A provides MS CHAP V2 merely as an EAP method for inner authentication Inner EAP protocol Setting Description Facto...

Страница 45: ...get power to mask the maximum output power Refer to the product datasheet for the maximum output for each transmission rate 10 Beacon interval The field is available for AP mode Select the frequency interval of the beacon 100 ms DTIM interval Select how often the WDR 3124A sends out a Delivery Traffic Indication Message DTIM 1 Fragmentation threshold Enter the maximum packet size allowed before th...

Страница 46: ... issued by Shows the certificate issuer Certificate expiration date Indicates when the certificate has expired You can import a new WLAN certificate in Import WLAN Certificate by following these steps in order 1 Input the corresponding password or key in the Certificate private password field and then click Submit to set the password 2 The password will be displayed in the Certificate private pass...

Страница 47: ... device to force negotiation between the WDR 3124A and the base station Dual SIM cards Reset the cellular module without rebooting the device and establish a cellular connection using the second SIM card account Configuring GuaranLink Settings In the navigation panel click Network Settings GuaranLink Settings to display the configuration screen Advanced Settings You can use the Advanced Settings s...

Страница 48: ...AN alive check Select Enable to set the WDR 3124A to ping a remote host on the WLAN interface to test the connection Disable WLAN ping host 1 2 Enter the IP address of a remote host for the WLAN interface ping test WLAN alive check duration Enter the number of seconds the WDR 3124A is to ping a remote host for the alive check If the WDR 3124A cannot ping a remote host after the timeout the WDR 312...

Страница 49: ...HCP requests from clients The IP related parameters you set on this page will also be sent to the client You can also assign a static IP address to a specific client by entering its MAC address You can configure up to 16 entries in the Static DHCP mapping list on the WDR 3124A NOTE To view IP address assignments click Status DHCP Client List The following table provides the field descriptions Fiel...

Страница 50: ......

Страница 51: ...o filter ATTENTION Make sure that you configure the MAC address filter properly Drop no entity on list is activated all packets are allowed Accept no entity on list is activated all packets are denied IP Protocol Filter The WDR 3124A s IP protocol filter is a policy based filter that can allow or filter out IP based packets with specified IP protocol and source destination IP addresses The WDR 312...

Страница 52: ...CP UDP port filter is a policy based filter that can allow or filter out TCP UDP based packets with a specified source or destination port The WDR 3124A provides 32 entities for setting the range of source destination ports of a specific protocol In addition to selecting TCP or UDP protocol you can set either the source port destination port or both The end port can be left empty if only a single ...

Страница 53: ...following table Select the security mode and level that will be used to communicate between the SNMP agent and manager Protocol Version Setting on UI web page Authenticati on Type Data Encryption Method SNMP V1 V2c V1 V2c Read Community Community string No Use a community string match for authentication V1 V2c Write Read Community Community string No Use a community string match for authentication...

Страница 54: ...rithms where the minimum requirement is to use an 8 character password No Auth Admin privacy type Select Disable for no data encryption Select DES to use DES based data encryption Select AES to use AES based data encryption Disable Privacy key Enter the key up to 63 characters for data encryption Private MIB information Device object ID The object ID OID is the enterprise value for the WDR 3124A T...

Страница 55: ...ing across a single private network some of the links between nodes that are part of a VPN use open network connections or virtual circuits on a larger network such as the Internet With the help of VPNs cellular devices acting as a VPN client can initiate a connection with a VPN server Once the connection is established cellular devices can communicate with other network devices on the same privat...

Страница 56: ...ing table provides the field descriptions Field Description Factory Default IPSec setting enable Select Enable to activate the IPSec feature Disable NAT Traversal Select Enable to activate the NAT traversal feature that allows IPSec traffic to traverse through NAT enabled devices Make sure that the remote VPN device supports this feature Disable Action Click Edit to configure a VPN tunnel Click De...

Страница 57: ...reate a VPN tunnel for static local and remote subnets Site to Site any Select this option to create a VPN tunnel between a static local subnet and a dynamic remote subnet Site to Site Startup mode Select Start in Initial to set the WDR 3124A to initiate a connection with the remote VPN gateway Select Wait for Connecting to set the WDR 3124A to wait for a remote VPN gateway to initiate a connectio...

Страница 58: ... allowed reconnect times when startup mode is initiated If the number is 0 this tunnel will always try connecting to the remote gateway when the VPN tunnel is not created successfully 0 IKE life time Enter the number of minutes for the VPN IKE SA phase 1 Lifetime This is the period of time to pass before establishing a new IPSec security association SA with the remote endpoint 60 Rekey expire time...

Страница 59: ...omplete the following steps 1 In the Tunnel Settings screen select RSA Signature from the Authentication mode drop down list 2 Generate or import a local private key Perform one of the following actions Click Generate Local Private Key The WDR 3124A creates a private key and displays the key information in the Local private key field Click Import Local Private Key and select a key file to import A...

Страница 60: ...e A Device B 1 Generate Root CA 2 Generate Local Certificate 3 Click PKCS 12 Export to export the local certificate local_CA_A p12 4 Click Certificate Export to export the local certificate file local_CA_A pem 5 Click VPN X 509 Local Certificate Upload and import the local certificate local_CA_A p12 6 Click VPN X 509 Remote Certificate Upload to import the remote certificate local_CA_B pem 1 Gener...

Страница 61: ...owing steps 1 In the Certificate Generation screen enter information in the fields under Root Certificate Generation Field Description Certificate days Enter the number of days the certificate is valid for Certificate password Enter a password to create a password protected certificate Country name Enter the country State or province name Enter the state or the province Locality name Enter the cit...

Страница 62: ...Export to export the private key file for local certificates on the WDR 3124A You can import the local certificate in the Local Certificate Upload screen Local Certificate Upload If you configure X 509 authentication mode for VPN tunnel setup you must import a local certificate on the WDR 3124A You can add or delete a local certificate in the Local Certificate Upload screen 1 Click Advanced Settin...

Страница 63: ...ent VPN Diffie Hellman group mismatch VPN name Ignore initial Aggr message Ignore aggressive requests from a remote VPN gateway VPN name Maybe ID format error Invalid local or remote VPN ID format VPN name we require peer ID differ from peer declares ID Remote ID mismatch VPN name no suitable connection for peer No corresponding VPN connection for a remote peer from the VPN responder VPN name conn...

Страница 64: ...from an AP Config related events Event is triggered when Configuration Changed A configuration item has been changed Configuration file import via Web Console The configuration file is imported to the WDR 3124A Console authentication failure An incorrect password is entered Firmware upgraded The WDR 3124A s firmware is updated Power events Event is triggered when Power 1 2 transition On Off The WD...

Страница 65: ...ers for your Syslog server on the Syslog Server Settings screen Field Description Factory Default Syslog server 1 2 3 Enter the IP address of the 1st 2nd 3rd Syslog Server Syslog port Enter the UDP port for the syslog server 514 E mail E mail Event Types Select Active to enable the event types For information on the event types refer to the System Log Event Types section ...

Страница 66: ...hese parameters are given after the following figure Field Description Mail server Enter the IP address of the mail server User name Enter the user name use on the mail server Password Enter the password for the user account on the mail server From e mail address Enter the e mail address that is displayed in the From field in a notification e mail To e mail address 1 2 3 4 Enter the e mail address...

Страница 67: ...sending a message known as a trap for the event Trap Event Types Select Active to enable traps for the event types For information on the event types refer to the System Log Event Types section SNMP Trap Receiver Settings SNMP traps are defined in SMIv1 MIBs SNMPv1 and SMIv2 MIBs SNMPv2c The two styles are basically equivalent and it is possible to convert between the two You can set the parameter...

Страница 68: ...DR 3124A to send SMS notifications to up to four phone numbers and select a message encoding format in the SMS Alert Settings screen Field Description Factory Default To phone number 1 2 3 4 Enter the phone numbers to which the WDR 3124A sends SMS notifications Encode format Select an encoding format from the drop down list Text ASCII 7 bits Encode SMS messages in 7 bit format 160 bytes per packet...

Страница 69: ...t operation modes As a result Current BSSID and Signal strength are not available in AP mode It is helpful to use the continuously updated information on this page such as Signal strength to monitor the signal strength of the WDR 3124A in Client mode DNS Information The DNS information screen displays the DNS server to which the WDR 3124A is connected and the DNS server information SIM Status The ...

Страница 70: ...us Network Statistics The Network Statistics screen displays information on each interface Routing Table The Routing Table screen displays the list of routes the WDR 3124A uses to send packets on each interface Possible flags include U route is up D route is down G use gateway default gateway T static route H target is a host ...

Страница 71: ... click Select all to select all the content in the list for further editing You can click Refresh to update the list DHCP Client List for AP mode only The DHCP Client List shows all the clients that require and have successfully received IP assignments You can click the Refresh button to refresh the list You can press Select all button to select all content in the list for further editing ...

Страница 72: ...ar Log button to clear the log contents and the Refresh button to refresh the log Relay Status The status of user configurable events can be found under Relay Status If an event is triggered the event is included on this list After you have addressed an event click Acknowledge Event DI and Power Status You can view the digital input DI and power input information in the DI and Power Status screen ...

Страница 73: ...s provide the administrator with tools to manage the WDR 3124A and wired wireless networks Console Settings You can enable or disable access permission for the following consoles HTTP HTTPS Telnet and SSH connections on the LAN and WAN interfaces For security reasons we recommend that you only allow access for the HTTPS and SSH consoles ...

Страница 74: ...owing figure Firmware Upgrade The WDR 3124A can be enhanced with more value added functions by installing firmware upgrades The latest firmware is available at Moxa s download center Before running a firmware upgrade make sure the WDR 3124A is off line Click Choose File to select the firmware image file and click Firmware Upgrade and Restart to start the firmware upgrade After the progress bar rea...

Страница 75: ...ng tool For MIBs click MIB Export to save the MIB file to a storage media The configuration file is a my file and you can import it with a general SNMP tool to remote control or set WDR 3124A To download the configuration to the WDR 3124A complete the following steps 1 Turn off the WDR 3124A 2 Connect ABC 01 to the WDR 3124A s RS 232 console 3 Turn on the WDR 3124A 4 The WDR 3124A detects ABC 01 d...

Страница 76: ...efore you set up a new password you must input the current password and reenter the new password for confirmation For your security do not use the default password root and remember to change the administration password regularly Misc Settings Additional settings to help you manage your WDR 3124A are available on this page Reset button Setting Description Factory Default Always enable The WDR 3124...

Страница 77: ...assword Enter a password 4 to 16 characters Auth type To restrict access to the WDR 3124A select the Caller ID authentication type None Caller ID If you use the caller ID authentication type enter the caller ID number that can send SMS messages to control the WDR 3124A Action Select this check box to perform the SMS control action Acknowledge Select this check box to send a reply to the SMS sender...

Страница 78: ...anges must be saved to flash memory before restarting the WDR 3124A This also means the new changes will not work unless you run either the Save Configuration function or the Restart function After you click on Save Configuration in the left menu box the following screen will appear Click Save if you wish to update the configuration settings in the flash memory at this time Alternatively you may c...

Страница 79: ... will reboot the WDR 3124A directly and all setting changes will be ignored Clicking the Save and Restart button will apply all setting changes and then reboot the WDR 3124A If you run the Restart function without changing any configurations or saving all your changes you will see just one Restart button on your screen You will not be able to run any of the WDR 3124A s functions while the system i...

Страница 80: ... 4 Software Installation and Configuration The following topics are covered in this chapter Overview Wireless Search Utility Installing the Wireless Search Utility Configuring the Wireless Search Utility ...

Страница 81: ...s accessible over the network the WDR 3124A User s Manual and Quick Installation Guide Wireless Search Utility Installing the Wireless Search Utility Click the INSTALL UTILITY button in the WDR 3124A Installation CD auto run window to install the Wireless Search Utility Once the program starts running click Yes to proceed 1 Click Next when the Welcome screen opens to proceed with the installation ...

Страница 82: ...xt to create the program s shortcut files to the default directory or click Browse to select an alternate location 4 Click Next to select additional tasks 5 Click Next to proceed with the installation The installer then displays a summary of the installation options ...

Страница 83: ...er locating a WDR 3124A you will be able to change its IP address Since the Broadcast Search function searches by TCP packet and not IP address it doesn t matter if the WDR 3124A is configured as an AP or Client In either case APs and Clients connected to the LAN will be located regardless of whether or not they are part of the same subnet as the host 1 Start the Wireless Search Utility program Wh...

Страница 84: ...tility to manage the WDR 3124A The WDR 3124A will unlock automatically if the password is set to the default Otherwise you must enter the password 6 Go to Tools Login Options to manage and unlock additional WDR 3124A units 7 Use the scroll down list to select the MAC addresses of those the WDR 3124As you would like to manage and then click Add Enter the password for the WDR 3124A and click OK to s...

Страница 85: ...sword for the Wireless Search Utility To modify the configuration of the selected WDR 3124A click the Web icon to open the web console where you can make all configuration changes Refer to Chapter 3 Using the Web Console for information on how to use the web console Click Telnet if you would like to use telnet to configure your WDR 3124A ...

Страница 86: ...es how many times to retry the search Retry interval ms The time to wait between retries Connection Connection timeout secs Use this option to set the waiting time for the Default Login Locate Assign IP Upload Firmware and Unlock to complete Upgrade timeout secs Use this option to set the waiting time for the connection to disconnect while the firmware is upgrading Use this option to set the waiti...

Страница 87: ...3124A Software Installation and Configuration 4 8 Misc Search on start Checkmark this box if you would like the search function to start searching for devices after you log in to the Wireless Search Utility ...

Страница 88: ...ormation about wireless related technologies The information in this chapter can help you administer your WDR 3124A units and plan your industrial wireless network better The following topics are covered in this appendix Beacon DTIM Fragment RTS Threshold ...

Страница 89: ...ng while preventing your PC from dropping into power saving sleep mode Higher settings allow your PC to enter sleep mode thus saving power Fragment A lower setting means smaller packets which will create more packets for each transmission If you have decreased this value and experience high packet error rates you can increase it again but it will likely decrease overall network performance Only mi...

Страница 90: ...mation about this product You can also learn how to contact Moxa for technical support The following topics are covered in this appendix Firmware Recovery DoC Declaration of Conformity Federal Communication Commission Interference Statement R TTE Compliance Statement ...

Страница 91: ...4A s firmware from Moxa Website 4 Change firmware file name to the WDR 3124A1131a rom 5 Connect to the WDR 3124A s RJ45 Ethernet port If setting is correct you will see the following message shown on the terminal emulator and the WDR 3124A will reboot when the firmware recovery process has been finished Trying eth0 Using eth0 device TFTP from server 192 168 127 1 our IP address is 192 168 127 253 ...

Страница 92: ...paratus WDR 3124A complies with the essential requirements and other relevant provisions of Directive 1999 5 EC This equipment complies with all the requirements of DIRECTIVE 1999 5 CE OF THE EUROPEAN PARLIAMENT AND THE COUNCIL OF 9 March 1999 on radio equipment and telecommunication terminal equipment and the mutual recognition of their conformity R TTE The R TTE Directive repeals and replaces in...

Страница 93: ...its desired server name WDR 3124A in the illustration according to the option 12 standard 2 The DHCP server replies with the IP address that is assigned to the WDR 3124A along with the domain name moxa com in the illustration and the IP addresses for the DNS server and gateway 3 If the WDR 3124A has authorization to update the DNS server it will register its FQDN Fully Qualified Domain Name with t...

Страница 94: ...er C 2 The above screenshot shows how DHCP can be set up to update the DNS Currently the WDR 3124A supports DNS service as provided by DynDNS For detailed information on this option please visit http www noip com or https www dyndns com ...

Отзывы: