Moultrie Mobile DELTA Скачать руководство пользователя страница 8

CAMERA SETTINGS

Once you have successfully taken and transmitted a test image, go to the website 
or app to update your camera settings.

CHANGE SETTINGS

•  Go to the "Devices" tab on the Moultrie Mobile website or "Cameras" 
     tab on the app.

•  Select "View Cameras" for a list of cameras on account. Select desired 
     camera for update.

•  Choose "Camera Settings" on the website or "Edit Settings" on the app. 
     Update camera settings as well as desired upload frequency and press SAVE.

NOTE: 

There are icons next to each setting that when clicked will display 

descriptions and useful tips. 

NOTE: 

This camera can be set to record video.  When selected, your camera will upload 

a thumbnail image from the video.  The image will be marked with a camera icon if viewing 
from the app, or the word "Video" if viewing from the website.  Simply expand the image 
and select Request Video and your camera will upload that video to your account on 
the camera's next connection.

IMPORTANT: 

After camera settings are selected and saved, the settings will be 

changed on the camera the next time the camera connects to Moultrie Mobile. 

To manually connect, press the CONNECT/STATUS button to connect to 

Moultrie Mobile and update settings immediately. 

Confirm status of camera using the LED indicators before leaving your camera. 

Thread mounting strap through slots on back of camera case. 
Mount camera to a tree or pole approximately three (3) feet 

from ground. You may need to adjust for uneven terrain. 

For added security, you can attach the camera to a tree with 

a Master Lock Python


TM

 cable locking system or Moultrie 

Security Box. Cameras are also equipped with 1/4"-20 inserts 
for use with Moultrie EZ Tree Mount or Camera Stake 
accessories. Visit MoultrieFeeders.com to view and purchase 

mounting accessories. 

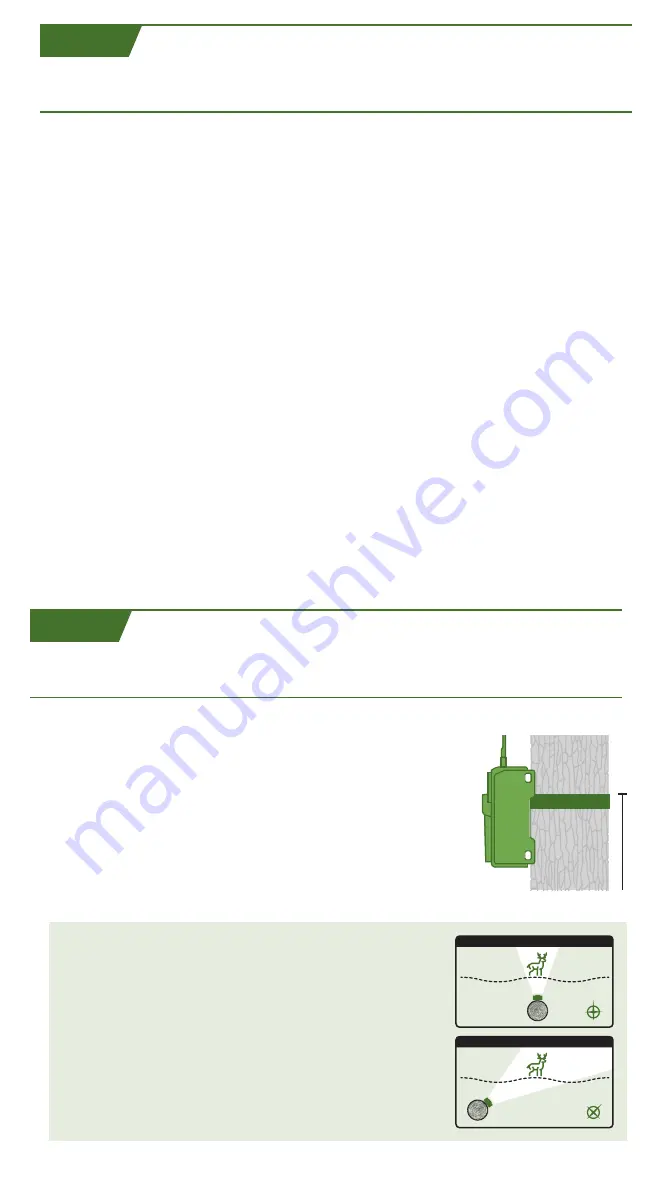
Face the camera North or South to avoid over-
exposure from the sun. Clear brush away from 
the front of the camera to avoid false-movement 
triggers. When covering a game trail, face camera 
looking down the trail instead of directly at it. 
(See graphics at right.) 

MOUNTING & PLACEMENT TIPS

TIPS FOR BEST PHOTOS

3FT

N

INCORRECT

N

CORRECT

D9

D8

Содержание DELTA

Страница 1: ...THE MOST POWERFUL CELLULAR TRAIL CAM EVER BUILT CELLULAR TRAIL CAMERA OWNER S OPERATION MANUAL YOUR BEST SEASON STARTS HERE ...

Страница 2: ...t to activate camera Please select plan after activation 12 AA batteries and a compatible SD card are required we recommend an 32GB or smaller Class 10 SD card Do not use SDXC cards Micro Mini cards Ultra Capacity or High Speed cards NOTE see section D4 for important battery information Each time you insert an SD card be sure to format the SD card in your camera to ensure it will work properly See...

Страница 3: ...CHMENTPOINT 1 4 20TRIPODMOUNTINGPORT MOUNTINGSUPPORTS 11 12 13 14 15 12 ANTENNA AIMLED AMBIENTLIGHTSENSOR 940NMHIGHPOWERIRLED LENSANDIMAGESENSOR PIRSENSOR CABLELOCKATTACHMENTPOINT DOORLATCHWITHCABLELOCK ATTACHMENTPOINT 12VEXTERNALPOWERJACKINPUT MICROPHONE 1 2 3 4 5 6 7 8 9 10 KEY COMPONENTS OF THE DELTA CELLULAR TRIAL CAMERA D1 ...

Страница 4: ...SD CARD NOTE THIS WILL PERMANENTLY ERASE ALL CONTENT ON SD CARD During the 15 second delay after powing on the camera press and hold FORMAT SD button untile the SD CARD LED blinks yellow LED will turn green once process is complete STEP 4 CAPTURE A TEST IMAGE Press and hold the CONNECT STATUS button for at least 5 seconds Status LEDs will remain lit during image transmission Refresh app website to...

Страница 5: ...uccessfully connected to the server please contact customer service by visiting the Support section from the Moultrie Mobile website or app IMPORTANT After submitting your registration you will receive an email You will not be able to log in to your account until you have confirmed your registration through this email Please check your spam clutter or junk folders for this email INSTALL BATTERIES O...

Страница 6: ...wer camera on by press and holding ON OFF button for about 5 seconds until LEDs illuminate Please follow the steps below 1 Press and hold the FORMAT SD CARD button until the SD CARD LED blinks yellow 2 Once the card is formatted the SD CARD LED will turn solid green indicating success 3 If the SD card LED turns solid red the SD card was not formatted Repeat the process until SD card LED is solid g...

Страница 7: ...on to Moultrie Mobile and display LED status TRANSMIT TEST IMAGE PRESS AND HOLD CONNECT STATUS BUTTON FOR 5 SECONDS Status LEDs will illuminate to display status refer to table in Section D6 for color definitions SIGNAL and SERVER LEDs will flash yellow until connection is established then illuminate to indicate status See table in Section D6 for color definitions Test image is taken and successfully...

Страница 8: ...r camera settings are selected and saved the settings will be changed on the camera the next time the camera connects to Moultrie Mobile To manually connect press the CONNECT STATUS button to connect to Moultrie Mobile and update settings immediately Confirm status of camera using the LED indicators before leaving your camera Thread mounting strap through slots on back of camera case Mount camera t...

Страница 9: ...High Medium and Low sensitivity settings Adjust camera settings via app or website Avoid pointing the camera into the sun east west the warm sunlight can create false triggers Avoid placing the camera in an open field during the summer Heat related triggers in open fields disappear when the temperature drops Don t place camera on smaller trees that can easily blow in the wind Place the camera 4 feet...

Страница 10: ...ke sure that Push Notifications are enabled ON YOUR PHONE iPhone Go to Settings Notifications Moultrie Mobile Allow Notifications and select alert options Android Go to Settings Notifications and turn on notifications for Moultrie Mobile Force close the app Uninstall and reinstall the app Restart your phone MOULTRIE LIMITED WARRANTY This product has been thoroughly tested and inspected before shipment ...

Отзывы: