background image

4.9

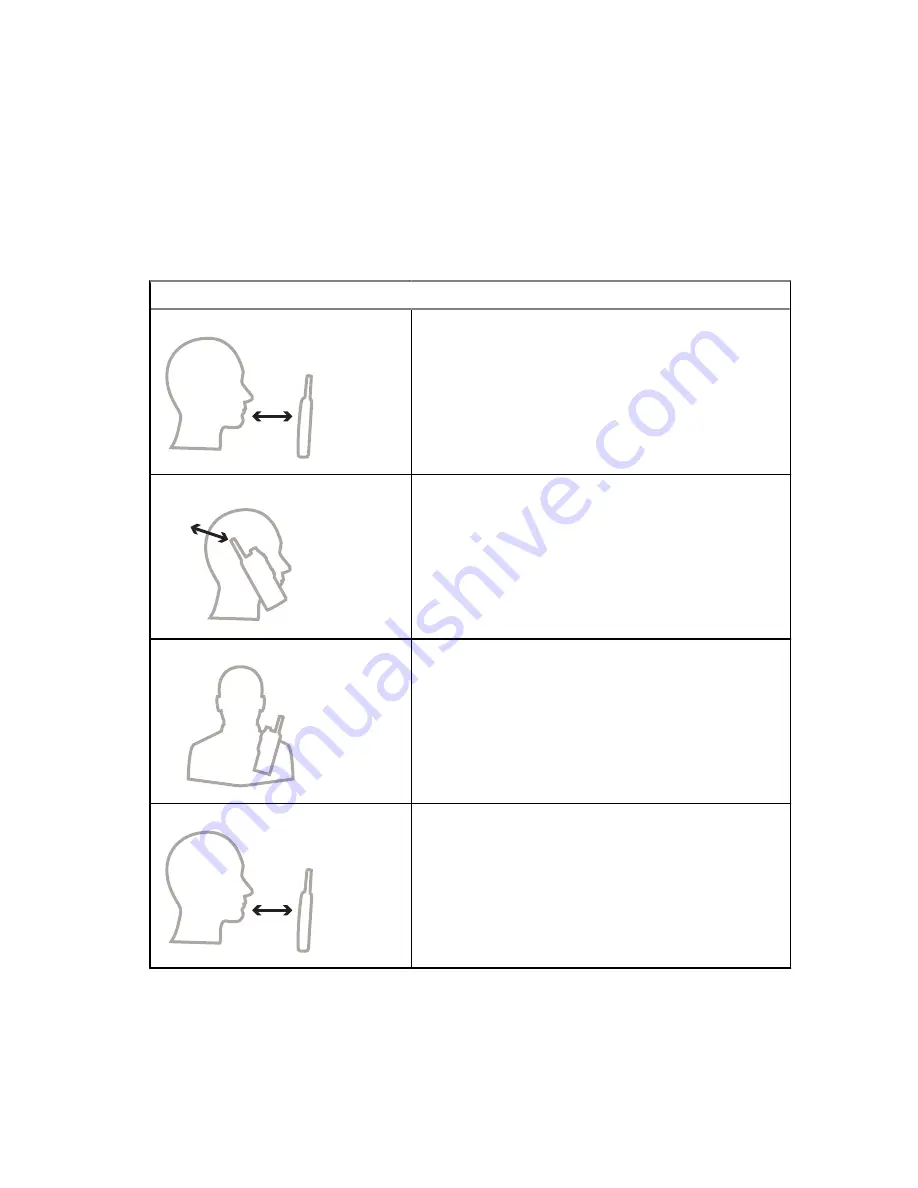
Holding Your Radio

Your radio has three microphones. The top microphone is for simplex dispatcher or private calls. The
bottom microphone is for duplex telephone-like calls. The third microphone is at the back of your radio
for the optional noise cancellation feature.

Procedure:

Depending on the purpose, hold your radio accordingly to the following options:

Option

Actions

Simplex Calls

5–10 cm

• When using high audio, hold your radio vertically

with the top microphone 5–10 cm away from your
mouth.

• Speak into the top microphone.

• Listen through speaker.

• Keep the antenna at least 2.5 cm from your head

and body.

Duplex Calls

2.5 cm

• When using low audio, hold your radio as you

would a telephone.

• Speak into the bottom microphone.

• Listen through the earpiece.

• Keep the antenna at least 2.5 cm from your head

and body.

Lapel or Shoulder Use

• For Group and Private Calls, turn your head to-

wards your shoulder or lapel, and speak into the
top microphone.

• Listen through the speaker.

Speakerphone Use

30–60 cm

• Place your radio 30–60 cm away from you.

• In a noisy environment, move the radio closer to

you for better transmission.

4.10

Recommended Wearing Position

If an accessory is attached to your radio, you can optimize the performance of the antenna by the way
you wear your radio with the accessory.

MN006360A01-AE
Chapter 4:  Getting Started

42  

Содержание MXP600

Страница 1: ...MXP600 Feature User Guide Mobile Release 2021 2 MN006360A01 MN006360A01 AE JULY 2021 2021 Motorola Solutions Inc All rights reserved ...

Страница 2: ...tions 20 2 7 Battery Information 20 Chapter 3 MXP600 Radio Overview 21 3 1 One Touch Buttons 25 3 1 1 One Touch Button Features 25 3 1 2 One Touch Dial 28 Chapter 4 Getting Started 29 4 1 Attaching or Removing the Antenna 29 Attaching the Antenna 29 Removing the Antenna 29 4 2 Installing or Uninstalling the MicroSD Card 29 Installing the MicroSD Card 29 Uninstalling the MicroSD Card 32 4 3 Install...

Страница 3: ...ons 51 7 1 Status Icons 51 7 2 Talkgroup Icons Selection 55 7 3 Menu Icons 56 7 4 Text Entry Icons 57 7 5 Messages Icons 58 7 5 1 Inbox Icons 58 7 5 2 Outbox Icons 59 7 5 3 Call Out Icons 60 7 5 4 Radio Messaging System Icons 60 7 5 5 WAP Icon 61 7 6 Bluetooth Icons 61 7 7 Wi Fi Icons 61 7 8 Contacts 62 Chapter 8 Keypad Overview 64 8 1 Alphanumeric and Symbol Keys 64 8 2 Idle Keys 65 8 3 Functions...

Страница 4: ...s on the Radio 74 11 2 Making Calls from Messages 76 Calling Numbers from Messages 76 Making Group Calls on the Talkgroup of the Message Sender 76 11 3 Receiving Calls on the Radio 76 11 4 Dialing Short Numbers 77 11 5 Viewing the Talkgroup Speed Number 77 11 6 Selecting Talkgroups by Index 78 Chapter 12 Viewing DGNA Talkgroups 79 Chapter 13 Emergency Operations 80 13 1 Entering and Exiting Emerge...

Страница 5: ...14 10 1 Viewing a Status Message Number 93 14 10 2 Sending Status Messages 93 14 10 3 Sending Targeted Status Messages 93 14 11 Managing Additional Address 94 14 12 Setting Call Out Availability 95 Chapter 15 Contacts 97 15 1 Creating Contacts 97 15 2 Editing Contacts 97 15 3 Deleting Contacts and Numbers 98 Deleting Contacts 98 Deleting Numbers 98 15 4 Checking Capacity 98 15 5 Dialing through th...

Страница 6: ...3 Setting Volume 110 19 4 Setting Language 111 19 5 Setting Data Function 111 19 6 Setting Audio 112 19 7 Setting Tones 113 19 8 Setting Display 114 19 9 Setting Time and Date 115 19 10 Setting Energy Economy 117 19 11 Selecting Transmission Power Class 117 19 12 Selecting Accessory Setup 118 19 13 Editing Book On Settings 118 19 14 Setting Rotary Knob 118 19 15 Entering Car Kit Settings 120 19 16...

Страница 7: ...e Browsing 129 21 2 7 Selecting Saved Pages 129 21 3 Managing Bookmarks 129 21 4 Managing Saved Pages 130 21 5 Managing Documents 130 21 6 Searching for Visited URLs 131 21 7 Inserting URLs 131 Chapter 22 Group Setup 132 22 1 Operation Parameters 132 22 1 1 Determining Radio Mode At Radio Startup 132 22 1 2 Determining Talkgroup At Radio Startup 132 22 1 3 Determining Talkgroup When Switching Mode...

Страница 8: ... the MicroSD Card 142 Chapter 26 Recent Calls 143 26 1 Viewing Recent Calls 143 26 2 Calling from Recent Calls 143 26 3 Storing Recent Calls into the Contact List 144 26 4 Deleting Recent Calls 144 Chapter 27 Shortcuts 146 27 1 Creating Menu Shortcuts 146 27 2 Managing Menu Shortcuts 146 Chapter 28 Logging On or Off Radio User Identity 147 Logging On Radio User Identity 147 Logging Off Radio User ...

Страница 9: ... 4 Viewing OPTA 157 32 5 Setting the OPTA Filter 157 32 6 Starting Crypto Registration 157 32 7 Turning Encrypted Audio On or Off 157 32 8 Setting DMO Encryption Mode 158 32 9 Selecting Encryption Keys for SDS 158 Chapter 33 Wi Fi 159 33 1 Turning Wi Fi On or Off 159 Turning Wi Fi On 159 Turning Wi Fi Off 159 33 2 Connecting to Networks Through Scan 159 33 3 Connecting to Networks Through Network ...

Страница 10: ...Chapter 35 Contact Address 164 MN006360A01 AE Contents 10 ...

Страница 11: ...XP600 Top and Bottom View 24 Figure 4 Desktop Charger 39 Figure 5 Car Charger 40 Figure 6 Travel Charger 40 Figure 7 Recommended Wearing Position 43 Figure 8 Wearing Position to Avoid 44 Figure 9 Default Home Screen with Icons 45 Figure 10 Charger Mode Screen 49 MN006360A01 AE List of Figures 11 ...

Страница 12: ...Mode Operation DMO Icons 51 Table 14 General Icons 52 Table 15 TMO Talkgroup Icons 55 Table 16 DMO Talkgroup Icon and General Icons 55 Table 17 Menu Icons 56 Table 18 Text Entry Mode Icons 57 Table 19 Text Entry Method Icons 57 Table 20 Inbox Icons 58 Table 21 Outbox Icons 59 Table 22 Call Out Icons 60 Table 23 Radio Messaging System RMS Icons 60 Table 24 Wireless Application Protocol WAP Icon 61 ...

Страница 13: ...e copyrights patents or patent applications of Motorola Solutions except for the normal non exclusive royalty free license to use that arises by operation of law in the sale of a product Open Source Content This product may contain Open Source software used under license Refer to the product installation media for full Open Source Legal Notices and Attribution content European Union EU Waste of El...

Страница 14: ... Industry Canada regulations this radio transmitter may only operate using an antenna of a type and maximum or lesser gain approved for the transmitter by Industry Canada To reduce potential radio interference to other users the antenna type and its gain should be so chosen that the equivalent isotropically radiated power e i r p is not more than that necessary for successful communication This ra...

Страница 15: ...sion at hand but is not CAUTION or WARNING There is no warning level associated with the IMPORTANT statement NOTE NOTICE contains information more important than the surrounding text such as exceptions or preconditions They also refer the reader elsewhere for additional information remind the reader how to complete an action when it is not part of the current procedure for instance or tell the rea...

Страница 16: ...splays the following messages Table 2 Displayed Messages Message Message Description Attachment Failed Your radio could not perform talkgroup attachment It keeps on trying If it does not succeed try another talk group Authenticate Failure Your radio could not register on an authenticated system for example the Authentication Key is incorrect or au thentication is disabled Call Barred The call is b...

Страница 17: ... its storage is inaccessible See File Storage Not Available File Invalid The picture you are trying to open is damaged File Storage Not Available or No Picture Storage Memory for file storage is inaccessible Possible reasons the microSD card is formatted incorrectly or is not installed at all the internal radio memory is damaged there is not enough available space to save a file your radio is con ...

Страница 18: ... list No Group Attachment failed Your radio detached from current talkgroup Please wait until it attaches again to the cur rent talkgroup Displayed when you are out of the normal coverage area of your selected talkgroup Please select a new talkgroup that is valid for your working location Indicates a favorite group was removed from the My Groups folder No List The network list is empty No New or O...

Страница 19: ... LMR OTAP job before trying again Single TalkGroup Only There is only one programmed entry in the scrolling list TalkGrp cannot be deleted Your service provider set this group so you cannot delete it from the favorite talkgroup folder This group already exists The group you are attempting to add exists in the My Groups folder Try Again Later The requested service is temporarily unavailable Unit is...

Страница 20: ...ry operation is from 0 C to 45 C in charger mode During charging if the temperature is out of range the battery might not be fully charged as the charging is temporarily stopped until the temperature becomes suitable 2 6 Additional Battery Warnings Cautions To prevent injury do not allow metal objects to touch the battery contacts Do not disassemble Do not throw in fire Do not dispose of battery i...

Страница 21: ...ion Annotation Name Description 1 Display Features a high resolution of 240 x 320 pixels and 65 536 colors Supports scalable fonts and high colored images 2 Top Microphone Activated in Simplex and high audio calls such as Group Calls 3 Earpiece The earpiece is active in low audio Duplex calls The earpiece allows you to hear voice from low audio calls 4 Soft Key The Left or Right soft key selects t...

Страница 22: ... Calls 9 Keypad Enters alphanumeric characters for dialing con tact entries and text messages The keys 0 9 and support the One Touch Button feature Press and hold a key to activate a one touch function assigned to it 10 Bottom Microphone Activated in Duplex and low audio calls such as Private Calls 11 Backlight Sensor The backlight sensor measures ambient light in tensity When the display backligh...

Страница 23: ...by default set to 0 1 second 14 Near Field Communication Tag Near Field Communication NFC key ex change allows your radio to seamlessly pair with approved Motorola Solutions Bluetooth ac cessories 15 Push To Talk Button PTT Press and hold to talk in Simplex calls Release it to listen 16 GCAI Mini Connector Provides connection with accessories NOTE Turn off your radio before con necting accessories...

Страница 24: ... Dust Cover Reduces the ingress of dust and dirt Figure 3 MXP600 Top and Bottom View 23 25 24 Table 6 Top and Bottom View Description Name Description 23 Emergency Button Press and hold the Emergency button to start Emergency Operations By default when your radio is turned off press and hold to power on in Emergency Operations 24 LED Status Indicator Shows the status of your radio See LED Status I...

Страница 25: ...all Bluetooth devices connected to your radio Display Bluetooth Gener ic Attribute Profile GATT Sensors Battery Levels Displays the battery levels of all paired Bluetooth GATT based sen sor devices Display GATT Service Da ta Displays the GATT based sensor data Display Heart Rate Displays the heart rate value received from the connected GATT based heart rate sensor Display Operational Tacti cal Add...

Страница 26: ...adio Scan for Bluetooth Devi ces Activates scanning for Bluetooth devices after the OTB assigned to the Add Bluetooth Device function is pressed Select Talkgroup Network Shortcut Displays the Select Talkgroup Network menu Selecting Audio Profiles Changes the audio profile of your radio Send Double Push PTT Tone D PTT Sends the D PTT tone to the currently used talkgroup Send Predefined Template PDT...

Страница 27: ...rpiece and the main speaker Hi or Low Audio is the default function for the lower Side button This feature is supported in emergency Full Duplex Private Calls FDPC mode Press the One Touch Button to toggle high or low audio state during incoming or outgoing emergency FDPC Toggle Horn and Lights Toggles the horn and lights indication Available only in Car Kit mode if the Horn and Light feature is e...

Страница 28: ...ases the volume by one level Volume Up Increases the volume by one level Wi Fi Turns Wi Fi connection on or off 3 1 2 One Touch Dial The One Touch Dial feature allows you to call by pressing and holding one of the numeric keys 1 9 If you press an unassigned key your radio displays a negative indication message NOTE If the One Touch Button feature is disabled One Touch Dial is disabled as a consequ...

Страница 29: ...dure 1 Turn the antenna anti clockwise 2 Remove the antenna from your radio 4 2 Installing or Uninstalling the MicroSD Card NOTE The microSD card slot has a delicate construction You must avoid installing or uninstalling the microSD card unnecessarily as this action can damage the mechanism of the reader For copying files from your radio you can use the USB Mass Storage Mode Installing the MicroSD...

Страница 30: ...r Scoop Area B SIM microSD connector plastic door 3 Flip open the microSD card holder 4 Insert the microSD card into the microSD card holder ensuring that the gold contact area is facing down MN006360A01 AE Chapter 4 Getting Started 30 ...

Страница 31: ...5 Close the microSD card holder and slide it to the lock position MN006360A01 AE Chapter 4 Getting Started 31 ...

Страница 32: ...ocedure 1 Remove the battery 2 Flip open the SIM microSD connector plastic door from the finger scoop area NOTE Avoid pressing on the SIM microSD connector plastic door 3 Flip open the microSD card holder 4 Remove the microSD card from the microSD card holder MN006360A01 AE Chapter 4 Getting Started 32 ...

Страница 33: ...ninstalling the SIM card unnecessarily as this action can damage the mechanism of the reader For copying files from your radio you can use the USB Mass Storage Mode Installing the SIM Card Prerequisites Your radio is equipped with a SIM card slot Procedure 1 Remove the battery 2 Flip open the SIM microSD connector plastic door from the finger scoop area NOTE Avoid pressing on the SIM microSD conne...

Страница 34: ... Finger Scoop Area B SIM microSD connector plastic door 3 Flip open the SIM card holder 4 Insert the SIM card into the SIM card holder ensuring that the gold contact area is facing down MN006360A01 AE Chapter 4 Getting Started 34 ...

Страница 35: ...5 Close the SIM card holder and slide it to the lock position MN006360A01 AE Chapter 4 Getting Started 35 ...

Страница 36: ...d Procedure 1 Remove the battery 2 Flip open the SIM microSD connector plastic door from the finger scoop area NOTE Avoid pressing on the SIM microSD connector plastic door 3 Flip open the SIM card holder 4 Remove the SIM card from the SIM card holder MN006360A01 AE Chapter 4 Getting Started 36 ...

Страница 37: ...or plastic door 7 Install the battery 4 4 Attaching or Removing the Battery Attaching the Battery Procedure 1 Insert battery into the compartment until the contacts align and the battery hooks in place 2 Press down the battery until it clicks in place MN006360A01 AE Chapter 4 Getting Started 37 ...

Страница 38: ...r radio Procedure 1 Slide the Battery Latch to the right and hold it 2 Lift the battery 3 Remove the battery from the compartment 1 2 3 NOTE Pressing the latch while slide will cause battery hard to be removed MN006360A01 AE Chapter 4 Getting Started 38 ...

Страница 39: ...the charger to a power source according to the specification of the charger NOTE The charger must be connected to a power outlet that is nearby and easily accessed 2 Depending on the type of charger use one of the following options Option Actions Using desktop chargers a Insert the battery or your radio with a battery into the slot of the charger b Ensure that the battery or radio is connected to ...

Страница 40: ...l reconnection to MUC the battery may be damaged or have reached end of life Postrequisites The battery can heat up when charging After charging and before using your radio ensure that the battery and your radio are in the operating temperature range 4 6 Turning Your Radio On or Off Turning Your Radio On Procedure Press and hold the On key MN006360A01 AE Chapter 4 Getting Started 40 ...

Страница 41: ...Emergency Calls and adjust the volume level with the Rotary Knob For radios with BSI PIN authentication you cannot take any action The default value of the PIN is 0000 4 8 Unblocking Your Radio If you have entered the incorrect PIN code for more than three times by default use the PIN Unblocking Key PUK to unblock your radio The PUK is a master code provided by your service provider For radios wit...

Страница 42: ...enna at least 2 5 cm from your head and body Duplex Calls 2 5 cm When using low audio hold your radio as you would a telephone Speak into the bottom microphone Listen through the earpiece Keep the antenna at least 2 5 cm from your head and body Lapel or Shoulder Use For Group and Private Calls turn your head to wards your shoulder or lapel and speak into the top microphone Listen through the speak...

Страница 43: ...ce you must ensure that the accessory cable is away from the antenna of your radio Figure 7 Recommended Wearing Position Avoid overlapping the accessory cable with the antenna of your radio MN006360A01 AE Chapter 4 Getting Started 43 ...

Страница 44: ...Figure 8 Wearing Position to Avoid MN006360A01 AE Chapter 4 Getting Started 44 ...

Страница 45: ...ult home screen and keys elements of your radio 5 1 Default Home Screen Figure 9 Default Home Screen with Icons 1 3 2 4 Annotation Description 1 Status icon area 2 Text display area 3 Soft key area 4 Menu Context sensitive icon MN006360A01 AE Display and Keys 45 ...

Страница 46: ...ed Pale Blue Radio Messaging Service RMS Gray Radio User Identity RUI or Radio User Assign ment RUA Table 9 Soft Key Changes During a Call During a call label of the right Soft Key indicates the next possible change Accessory default setup is Soft Key Label Audio Setting Spkr Audio goes to the main speaker Speaker HIGH is displayed Erpce Audio goes to the earpiece Speaker LOW is displayed PHF Audi...

Страница 47: ... also subject of the Configurable Idle Screen settings Depending on the font size and icon bar the idle screen displays three or four lines of information By default the information displayed on your idle screen are as follows Line 1 Network No Service or Mobile Country Code MCC Mobile Network Code MNC or Networks Alias Line 2 Selected Group Folder Line 3 Selected Group Line 4 5 Home Mode Display ...

Страница 48: ...tton toggles the on off state of the backlight The backlight is also turned off automatically when the backlight timer runs out Auto Pressing any key automatically turns on the backlight Disabled The backlight is disabled for a dimmed display The backlight remains on until the backlight timer runs out or if a provisioned One Touch Button is pressed to turn it off You can also toggle between the mo...

Страница 49: ...0 or 20 of remaining capacity by your service provider The default setting is 5 The service provider also configures how frequently the alert repeats When your radio is charging it displays the Charger Mode screen The screen displays an appropriate Battery Charge Progress icon and charging progress expressed in percentage Figure 10 Charger Mode Screen Table 10 Battery Icons 0 5 5 15 15 25 25 40 40...

Страница 50: ... Radio interference in DMO Not applicable Blinking orange Incoming private or phone call Battery is on standby to rapid charge No indication Radio powered off Radio in Covert Mode Not applicable NOTE When you charge your radio in a multi unit charger and the battery is at the 90 100 charge level the LED indicators on your radio and on the multi unit charger differs LED on your radio blinking green...

Страница 51: ...stronger the signal Migration Your radio is registered to a foreign network Broadcast Call Your radio is in a Broadcast Call Scan Talkgroup scanning is activated on your radio Packet Data or Multi Slot Packet Data MSPD The more blue sections on the icon the faster the data transfer Four gray sections Context activated and data idle One blue section Packet Data is active Two blue sections Multi Slo...

Страница 52: ...iption All Ring Tones Off The volume is set to zero when Volume Adj Mode is set to Common Both Simplex and Duplex ring volume is set to zero when Volume Adj Mode is set to Individual Simplex Ring Mut ed The Simplex ring volume is set to zero Duplex ring volume is set to more than zero Duplex Ring Muted The Duplex ring volume is set to zero The Simplex ring volume is set to more than zero Vibrate O...

Страница 53: ...peration Solid The Emergency Operation starts Blinking Your radio is in emergency receiving state Disaster Alert Call Your radio is in a Disaster Alert Call List Scrolling The Rotary Knob is in list scrolling mode New Message Has Arrived Your radio receives a new message New Message in Inbox You have unread messages in your inbox Unread WAP Mes sage A new page is loaded to the browser Man Down Act...

Страница 54: ...cked Indicates that keys are locked Non Secured Call in TMO Blinking Air encryption is not available when your radio is in TMO and attempts to connect to a gateway Non Secured Call in DMO Blinking Air Encryption is not available when your radio is in DMO This icon appears after you press the PTT button Non formatted SD Card Solid The microSD card is not formatted at all formatted incorrectly or da...

Страница 55: ...Displayed in TMO and DMO When the selected talkgroup is a SIM TMO talkgroup and is not registered to a SIM network A single network is availa ble Displayed in DMO When the selected talkgroup is a SIM TMO talkgroup A single network is availa ble Not displayed Displayed in TMO and DMO When the selected talkgroup is a normal TMO talkgroup A single network is availa ble Displayed in TMO Displayed in T...

Страница 56: ...list Pictures Allows you to browse and manage photos Bluetooth Allows you to manage Bluetooth settings Browser Starts the WAP browser Man Down Allows you to activate the Man Down feature Security Lets you turn on off and verify security features and change passwords Setup Allows you to customize your radio Group Setup Contains additional menu items for Scanning Talkgroups fea tures Individual Setu...

Страница 57: ... displayed on the text entry icon indicates the amount of characters that can be entered Press the key to toggle through the text entry modes Table 18 Text Entry Mode Icons Primary Icon Secondary Icons Description Indicates all lower case TAP text entry meth od Indicates all upper case TAP text entry meth od Indicates first letter upper case TAP text entry method Indicates all lower case iTAP text...

Страница 58: ...w or old incoming messages The Messages sub menu indicates the number of the messages For example the indication 2 4 means that two unread and four read messages are in the inbox Table 20 Inbox Icons Icon Description Regular Messages Message is unread Message is read Protected Messages Protected Message is unread Protected Message is read Secured Messages Secured Message is unread Secured Message ...

Страница 59: ... Description Regular Messages Message delivery is in progress Message delivery is accomplished Message delivery failed Outgoing message is successful Outgoing message failed Protected Messages Protected Message delivery is in progress Protected Message delivery is accomplished Protected Message delivery failed Outgoing Protected Message is successful Outgoing Protected Message failed Secured Messa...

Страница 60: ...essage failed 7 5 3 Call Out Icons Table 22 Call Out Icons Icon Description Call Out folder Call Out Message in the inbox is unread Call Out Message in the inbox is read Protected Call Out Message in the inbox is unread Protected Call Out Message in the inbox is read Call Out Message in the outbox is read Protected Call Out Message in the outbox is read 7 5 4 Radio Messaging System Icons Table 23 ...

Страница 61: ...oth device paired with your radio and when listed during discovery and radio scan Table 25 Bluetooth Icons Icon Description Bluetooth data Bluetooth earpiece Bluetooth accessory with PTT Bluetooth sensor 7 7 Wi Fi Icons Table 26 Wi Fi Signal Strength Icons Icon Description Wi Fi operation in progress Wi Fi Signal Strength Wi Fi signal is excellent Wi Fi signal is good MN006360A01 AE Chapter 7 Icon...

Страница 62: ...oor for secured networks Wi Fi signal is unavailable for secured networks Wi Fi Signal Strength for Open Networks Wi Fi signal is excellent for open networks Wi Fi signal is good for open networks Wi Fi signal is average for open networks Wi Fi signal is poor for open networks Wi Fi signal is unavailable for open networks 7 8 Contacts The Contacts menu stores all your contact numbers Each contact ...

Страница 63: ...annot have a speed dial number Mobile Home Work PABX Other Pickers Indicate more than one number in a contact number Each contact entry must contain a number Speed Shows the default Speed Dial number You can accept or change it Simplex Private only Shows the hook method for simplex calls Duplex Private only Shows the hook method for duplex calls MN006360A01 AE Chapter 7 Icon Indications 63 ...

Страница 64: ... 6 7 8 9 0 Numeric Key View ABC DEF GHI JKL MNO PQRS TUV WXYZ Alphabetic Key View _ 0 1 _ x x Symbol Key View Table 28 Alphanumeric and Symbol Keys Numeric Keys Alphabets Symbols 1 Not applicable 0 1 _ 2 A B C a b c _ 3 D E F d e f 4 G H I g h i 5 J K L j k l 6 M N O m n o 7 P Q R S p q r s 8 T U V t u v 9 W X Y Z w x y z 0 Not applicable MN006360A01 AE Chapter 8 Keypad Overview 64 ...

Страница 65: ...re main text area Up Navigation In TAP press to reject word completion and scroll up In TAP press to change the previous letter from lowercase to uppercase Down Navigation In TAP press to reject word completion and scroll in the text area In TAP press to change the previous letter from uppercase to lowercase Left Navigation Press to navigate to the left Press and hold to repeat In TAP if a word co...

Страница 66: ...AP timeout 0 Press to run through single shift uppercase and lowercase func tions Press to insert a space In TAP press to reject word completion and insert a space Press to enter a new word into the user dictionary Press and hold to enter a carriage return Press once to run through Symbol Numeric Primary and Sec ondary entry modes Press and hold to return to the default entry mode MN006360A01 AE C...

Страница 67: ...ent when you use one language and sometimes wish to switch to another one NOTE In the text entry screen you can also press key repeatedly to toggle through the entry modes 9 1 2 Selecting Text Entry Methods and Languages Prerequisites Your radio displays the text entry screen Procedure 1 Press Menu Entry Setup 2 Use the Right or Left navigation key to select one of the following options TAP Enter ...

Страница 68: ...utomatically changes the entry mode to Numeric 9 Press 3 and 2 keys 10 Press and hold 1 key until 0 at the end changes to The alternative row highlights 232 11 Scroll the alternative row by pressing the Right Navigation key to reach the required symbol 12 Press Select You have entered David 232 9 1 4 Writing in TAP Alphanumeric Prerequisites Your radio displays the text entry screen Procedure 1 Pr...

Страница 69: ...ing alphanumeric abbreviation can be formed Procedure 1 Create the word in the dictionary Once you enter a word followed by space it is automatically stored in the dictionary NOTE The word appears as a choice whenever you press the same key combination in the future 9 2 Locking or Unlocking the Keys or Buttons Procedure 1 Press Menu key and key NOTE The Emergency button is not locked Entering Emer...

Страница 70: ...ign a function to the second press of the One Touch button to Return to previously selected talkgroup Restart the predefined time No action 3 When the timer expires potentially after being restarted a number of times the radio switches to the previously selected talkgroup 9 3 2 Selecting Talkgroups by Index Procedure 1 From the home screen enter talkgroup speed number and 2 Press Attach NOTICE To ...

Страница 71: ...o 10 cm away from your mouth 2 Speak into the top microphone and listen through the internal speaker Keep the antenna at least 2 5 cm from your head and body 9 4 2 Using Low Audio When and where to use Placing or receiving a Phone PABX or Duplex Private call Procedure 1 Hold your radio as you would a telephone 2 Speak into the bottom microphone and listen through the earpiece Keep the antenna at l...

Страница 72: ...n Direct Mode Operation DMO you have different options to communicate with other radios in the same talkgroup through the gateway or repeater Procedure 1 From the home screen press Options 2 Select Config 3 Select a DMO communication by using one of the following options Option Actions To communicate in your radio range only Select MS MS To communicate with the infrastructure using the first avail...

Страница 73: ...unicate with the gateway and repeater even if a talkgroup to use them is configured your radio attempts MS MS communication When your radio detects the gateway repeater or both the respective icon appears solid 10 3 Enabling Network Monitor Procedure 1 From the home screen press Options 2 Select Network Monitor 10 4 Setting Monitor Option Procedure 1 From the home screen press Options 2 Select Mon...

Страница 74: ... Calls Phone or PABX Calls Phone Calls allow you to call a landline telephone number or a cellular mobile phone number PABX Calls allow you to call local office extension num bers Broadcast Calls Broadcast Group Calls are high priority group calls from the console operator to all radios at one or more sites Your radio can monitor a Broadcast Call but you cannot talk back 11 1 Making Calls on the R...

Страница 75: ...s To initiate a From the home screen enter a number b Press Ctype until you see Private call type c If Private Call Hook Customization is enabled select Menu Hook Method required hook method Done d To start the call press the Send key To end the call press the End key Phone or PABX Calls To initiate a From the home screen perform one of the following actions Enter a number and press Ctype until yo...

Страница 76: ...umbers including the number of the sender 5 To call select the required number and do one of the following Press the PTT button Press the Send key 6 Press Ctype to select one of the following type of calls Private Phone PABX 7 Do one of the following to initiate the call Press the PTT button Press the Send key Making Group Calls on the Talkgroup of the Message Sender When and where to use To make ...

Страница 77: ...ber of the radio is 4282564 Procedure 1 Dial 564 instead of the full number 2 To start the call press PTT or the Send key 11 5 Viewing the Talkgroup Speed Number With Talkgroup Speed Dial you can join a talkgroup by dialing the index of the talkgroup You need not choose the talkgroup from talkgroup folders and lists Procedure 1 From the home screen press Options 2 Search talkgroups by using one of...

Страница 78: ...ing Talkgroups by Index Procedure 1 From the home screen enter the talkgroup speed number and 2 Press Attach You can start a group call by pressing the PTT button MN006360A01 AE Chapter 11 Types of Radio Calls 78 ...

Страница 79: ...radio over the air interface by transmitting data to your radio Prerequisites Your radio receives the DGNA message Procedure 1 To view the added talkgroups details press View 2 Scroll through the list to select required talkgroup 3 To select the DGNA group press Attach MN006360A01 AE Viewing DGNA Talkgroups 79 ...

Страница 80: ...e to alert the operator regarding emergency condition Emergency Call Calls initiated in Emergency mode are known as Emergency Calls Emergency Call is the highest pre emptive priority call Available Emergency Call types Emergency Call There are 2 types of Emergency Calls available Tactical Group Call Your radio sends an emergency alarm and or makes an Emergency Call on the current channel Non tacti...

Страница 81: ...ill stay in or switch to TMO when Silent Emergency Mode is activated Emergency Alert Allows your radio to send emergency alerts to other radios within DMO and TMO without TMO coverage by pressing the Emergency button Emergency Destination in LST This is a Software Selling Feature Allows your radio to send emergency requests to a different destination while in local site trunking mode 13 1 Entering...

Страница 82: ...o and the predefined ISSI is configured Emergency Hot Mic To enter Press and hold the Emergency button To restart transmission press Emergency button To talk Speaks clearly into the microphone To exit If configured press the PTT button If the PTT button is held your radio will continue PTT op eration in Emergency Group Call mode Press the End key Press the End soft key Emergency Alternating Hot Mi...

Страница 83: ...able Procedure Press and hold the Emergency button Initiating Disaster Alert Procedure 1 From the home screen press the Menu key 2 Select Services Disaster Alert 3 To start the call press PTT button Your radio displays Disaster Alert In Use MN006360A01 AE Chapter 13 Emergency Operations 83 ...

Страница 84: ...when connection is restored Collaborative Messaging External devices connected through Bluetooth or cable can send and receive messages when your radio application is enabled Radio Messaging System Receive and send messages through the TETRA network The RMS Box is available in the Messages menu if RMS is enabled NOTE This is a Software Selling Feature 14 1 New Messages The New Message menu allows ...

Страница 85: ...d Forward Messages a Press the Menu key and select Message Set up On Offline users b Create a message and press Send c Select Private or Phone d Enter the recipient number or choose from contacts by pressing abc 4 Perform one of the following actions Select Send Press the Send key Press the PTT button 14 1 2 Configuring Delivery Reports Prerequisites Contact your service provider to enable Deliver...

Страница 86: ...the Store and Forward server Message Delivered A Delivery Report is requested and the recipient receives the message Message Read The Consumed Delivery Report is requested and the recipi ent opens the message Message Failed The Delivery Report is requested and the recipient does not receive the message within the stipulated time Saves the Delivery Report and a copy of the message in the Outbox Aft...

Страница 87: ...box 14 2 2 Storing Numbers from Messages You can save the sender s number or embedded number from a message to a new or existing contact Prerequisites Contact your service provider to enable the Embedded Number feature Procedure 1 From the home screen press the Menu key 2 Select Messages Inbox 3 Highlight the required message and select Read 4 Press the PTT button 5 Radio displays a list of the nu...

Страница 88: ...message as a tem plate a Select Store b Change the default name of the template and press OK Deleting the message a Select Delete b To confirm select Yes Deleting all messages in the In box or Outbox a Select Delete All b To confirm select Yes Invoking the edit screen with the original message as default text and the message originator as the recipient a Select Reply and edit the text b To send pe...

Страница 89: ...ct Delivery Status NOTE Applicable only for Outbox Protecting the message and avoid deleting or overwriting it Select Protect Removing protection from the message Select Unprotect NOTE Message protection is enabled in the Inbox and Call Out Inbox You can only delete unprotected messages 14 5 Entering the Call Out Box The Call Out CO Box contains incoming and outgoing Call Out messages Your radio p...

Страница 90: ...2 Select Messages Send RMS FMS 3 Perform one of the following actions Press and hold a required key for RMS status 0 9 Press the required two keys combination for RMS status 10 99 Scroll to the required RMS status Type out a message using RMS Free Text available in SDS TL only 14 7 Entering the WAP Box Each Wireless Application Protocol WAP Push message can be loaded immediately or stored as a mes...

Страница 91: ...of the following options Option Actions Viewing the template Select View Deleting the template Select Delete Editing the template a Select Edit Text b Edit the text c Press the Menu key and select Save Changes To save the edited template Store To save the edited template as a new template Editing the name of the template a Select Edit Name b Edit the template name and press OK 14 8 2 Sending User ...

Страница 92: ...edefined 3 Highlight the required template and press Menu key 4 Select View 14 9 2 Sending Predefined Templates Procedure 1 From the home screen press the Menu key 2 Select Messages Predefined 3 Highlight the required template You can edit the predefined template before you send it Press the Menu key and select Edit The edit screen opens with the template text You are only allowed to replace the e...

Страница 93: ... Messages Send Status 3 Send status messages by using one of the following options Option Actions Sending existing status mes sages in your radio a Select the required status message b Perform one of the following actions Press Select Press the PTT button Press the Send key Sending status messages using a status number or if the status list is empty a Enter a 5 digit status message number b Press ...

Страница 94: ... Managing Additional Address The Additional Address feature allows the radio to send Radio Messaging System RMS messages and Local Information Protocol LIP reports to additionally defined recipients Procedure 1 From the home screen press the Menu key 2 Select Messages Additional Address 3 Manage additional addresses by using one of the following options Option Actions Enabling or disabling Additio...

Страница 95: ...ble only for User Defined po sitions a Select Select Address b Scroll to select the alias of the Additional Address you wish to edit c Press Menu key d Select Edit e Press Change key f Enter new values of the Alias and ISSI ITSI GSSI fields press Done key The changed alias appears in the list of available ali ases There is no possibility to have two Additional Address items with the same Additiona...

Страница 96: ...Procedure 1 From the home screen press the Menu key 2 Select Messages Call Out Availability 3 Select one of the following options Available Not available MN006360A01 AE Chapter 14 Messages 96 ...

Страница 97: ...pe of your contact If Private is selected you can set the hook method for Simplex and Duplex calls if the respective Private Call Hook Customization is enabled 5 Highlight number and press Change Enter the number of your contact and press Ok 6 If needed highlight Speed and press Change Enter the speed dial number 1 1000 and press OK NOTE If the entered number exist the radio displays Overwrite Pre...

Страница 98: ...Yes Deleting Numbers Procedure 1 From the home screen press Contacts key 2 Select a contact you want to edit 3 Highlight the required number you want to delete 4 Press Menu 5 Select Delete number NOTE If an entry contains only one number deleting the number deletes the entry 6 Press Yes 15 4 Checking Capacity When and where to use To see how many numbers are stored in the radio Procedure 1 From th...

Страница 99: ...t or enter up to 12 characters of the contact name 3 If the contact has more than one number use Left and Right Navigation keys to select the required number 4 To initiate a simplex call press the PTT button with a Private number Otherwise use the Send key to initiate a duplex call MN006360A01 AE Chapter 15 Contacts 99 ...

Страница 100: ...vigate the Picture Browser in Multi Picture View by using one of the following options Option Actions Highlighting another item Press the Navigation keys or rotate the Rotary Knob To move from the first to the last item press the Left Down Navigation key or rotate the Rotary Knob anticlockwise To move from the last to the first item press the Right Down Navigation key or rotate the Rotary Knob clo...

Страница 101: ...ey 16 3 Navigating in Full Screen View Procedure 1 Navigate the Picture Browser in Full Screen View by using one of the following options Option Actions Displaying the previous picture Press the Left navigation key Displaying the next picture Press the Right navigation key Zooming in a picture by one level Perform one of the following actions Press the key Rotate the Rotary Knob clockwise NOTE Zoo...

Страница 102: ...characters If the Digital Fingerprint feature is active or the picture exceeds 3 MB adding and editing comments are disabled Procedure 1 From the home screen press the Menu key 2 Select Pictures 3 Highlight the required picture and press the Menu key 4 Select Comment 5 Perform one of the following actions Enter a new comment Edit an existing comment 6 Confirm changes by pressing Save MN006360A01 A...

Страница 103: ...s a predefined angle value No movement is detected in a predefined time interval 17 1 Setting Man Down Procedure 1 From the home screen press the Menu key 2 Select Man Down 3 Select one of the following options On Activates the feature Off Deactivates the feature 17 2 Exiting Man Down Procedure To exit Man Down do one of the following Press and hold the Exit soft key Press the PTT button MN006360A...

Страница 104: ...t code Customers are strongly advised to change the default PIN code in order to protect devices from unauthorized access Protecting the Radio with a PIN Code Procedure 1 From the home screen press the Menu key 2 Select Security PIN Protect 3 Select On 4 Enter the PIN code Postrequisites Each time you turn on the terminal PIN code is required Changing PIN Codes NOTE This feature is only available ...

Страница 105: ...c Keylock Delay Procedure 1 From the home screen press the Menu key 2 Select Security Keylock Setup Delay 3 Use Up and Down Navigation keys to change the minutes and press Done Setting Keylock on Startup Procedure 1 From the home screen press the Menu key 2 Select Security Keylock Setup Start Locked 3 Select one of the following options Option Description On Enables keypad lock on the radio at nex...

Страница 106: ... and the service provider must manually restore it 18 4 Verify Key Validity Key K is a secret key the infrastructure uses to authenticate your radio in the system providing service confidentiality between your radio and the system Static Cipher Key SCK is a secret key used for the Air Interface Encryption Class 2 It is used to encrypt calls and data in TMO and DMO The SCKs used in TMO are called T...

Страница 107: ...ions Yes To change the key No To leave the key 18 5 Setting Covert Mode NOTE This is a Software Selling Feature Covert Mode enables you to completely shut down all visible and audible alerts and notifications making the radio unnoticeable even in a silent and dark environment Activating Covert Mode Procedure 1 From the home screen press the Menu key 2 Select Security Covert Mode 3 Select one of th...

Страница 108: ...e Control There are two types of remote control Short Data Service SDS Remote Control and Status Remote Control Only one type of remote control can be active on your radio NOTE SDS Remote Control is a Software Selling Feature When and where to use To toggle remote control Procedure 1 From the home screen press the Menu key 2 Select Security Remote Control 3 Select On to enable or Off to disable re...

Страница 109: ...calls configure vibrate settings by performing one of the following actions Option Actions Phone PABX and Duplex Private Call a Select Duplex Calls b Select one of the following options Vibe then Ring Vibe Only Ring Only Simplex Private Call a Select Simplex Calls b Select one of the following options Vibe then Ring Vibe Only Ring Only Group Call a Select Group Call b Select one of the following o...

Страница 110: ...implex To set a new ring style for all incoming Direct Mode Operation DMO simplex calls The display shows the current ring style used 4 Scroll to the desired style and press Select The new ring style is played immediately for a few seconds If necessary adjust the volume level 19 3 Setting Volume Procedure 1 From the home screen press the Menu key 2 Select Setup Set Volume 3 Select Speaker or Earpi...

Страница 111: ...3 Select desired language 19 5 Setting Data Function You can set up your radio to transmit and receive data from an external device NOTE When set to Voice Only the built in data modem is disabled to conserve battery power Prerequisites Connect your radio accessory connector to an external device using the PMKN4127 or PMKN4129 cable The external device must run an application complying with TETRA s...

Страница 112: ...oise suppression mode a Select Noise Suppr b Select one of the following options Disabled Disable noise suppression Basic Enable basic noise suppression Advanced1 Enable dual microphone noise sup pression Wind Suppr 1 Enable dual microphone noise suppression with wind suppression capability Controlling audio routing be tween the speaker and ear piece for private or group call a Select Audio Toggle...

Страница 113: ...n or Off Tone indication when pressing the PTT button a Select Talk Permit b Select Tone On or Tone Off Tone indication when a recipi ent is ready to receive transmis sion a Select Clear to send b Select Tone On or Tone Off Tone indication for missed calls unread messages and low battery level a Select Periodic Alert b To actiate or deactivate periodic tones select Alert c To indicate the time bet...

Страница 114: ... on the home screen a Select Screen Saver b Perform one of the following actions To display the screen saver when your radio is inactive for a pre determined period select Activate Auto To disable to screen saver select Acti vate Disabled To set the text on the screen saver select Text NOTE The color display tones down to eight colors in screen saver mode Adjusting backlight a Select Backlight b P...

Страница 115: ...ght select Automatic Adjusting the display timer a Select LCD Off b Set the timer to determine how long the display remains on in idle by selecting one of the follow ing options Disabled 30 seconds 1 minute 2 minutes 5 minutes 15 minutes 30 minutes NOTE When you set the timer to Disa bled the display remains on all the time Enabling or disabling the wallpa per for the home screen a Select Wallpape...

Страница 116: ...Format Format Date b Select one of the following options DD MM YY MM DD YY DD MON YY YY MM DD Setting the time and date manual ly a Select Set b Select one of the following options and adjust the value with the Navigation keys or keypad Set Time Set Date Time Offset c Press Done NOTE The offset value is adjusted with 15 minute steps up to 14 hours ahead or behind Setting automatic updates for the ...

Страница 117: ...sion Power feature enables your radio to choose whether to transmit with Class 3 Class 3L or Class 4 The RF Power icon indicates when the radio uses this feature When and where to use Use this procedure when you are entering the area that requires higher signal strength Procedure 1 From the home screen press the Menu key 2 Select Setup RF Power 3 Select one of the following options Option Descript...

Страница 118: ...luetooth Headset Select an accessory from the list of available Blue tooth headsets NOTE Depending on the configurations Accry Setup will list out additional items 19 13 Editing Book On Settings The Book on Setup menu item allows you to edit RUA RUI feature settings to automatically accept or reject book on requests Procedure 1 From the home screen press the Menu key 2 Select Setup Book on Setup 3...

Страница 119: ...ing actions For volume setting and scrolling select Lock None For scrolling only select Lock Volume For volume setting only select Lock Scroll To disable both volume setting and scrolling select Lock Both Enabling or disabling continuous scrolling in a talkgroup list a Select Wrap Around b Select On or Off Setting the scrolling range in a talkgroup list a Select Scroll Range b Perform one of the f...

Страница 120: ...tivating or deactivating external speakers a Select Spkr On Off b Select Speaker On or Speaker Off Enabling or disabling extra sound and light notification on incoming private calls a Select Horn Lights b Select On or Off Enabling or disabling vibration a Select Vibrate b Perform one of the following actions To disable vibration select Always Ring Only To enable vibration as defined in the Vibrate...

Страница 121: ... alphabetic characters _ NOTE Before using non alphabetic characters ensure that your computer system supports them Procedure 1 From the home screen press the Menu key 2 Select Setup USB Settings 3 Press Change 4 Select one of the following options Option Description Mass Storage Manage pictures that are stored in the internal flash mem ory or microSD card on a computer Installing additional appli...

Страница 122: ... Setting The Default Settings sub menu item resets your radio back to default settings Procedure 1 From the home screen press the Menu key 2 Select Setup Def Settings 3 To confirm press Yes MN006360A01 AE Chapter 19 Setup 122 ...

Страница 123: ...devices are barcode scanners and heart rate sensors Procedure 1 From the home screen press the Menu key 2 Select Setup Bluetooth Add Device 20 3 Configuring Bluetooth Settings Procedure 1 From the home screen press the Menu key 2 Select Bluetooth Settings 3 Select one of the following options Option Description Bluetooth Enables or disables Bluetooth Name Edits the name of your radio This name is ...

Страница 124: ...matically Procedure 1 From the home screen press the Menu key 2 Select Bluetooth Add Device The device that you want to connect with must be in pairing mode 3 Highlight the required device and select Connect Improve the connection between an accessory and your radio by pressing the PTT button on the accessory 4 If needed enter a PIN code or a passkey NOTE If you enter an incorrect PIN code and the...

Страница 125: ...be displayed properly Radio initiated automatic reconnection with several remote Bluetooth devices at the same time cannot be guaranteed to be successful in 100 due to the fundamental nature of Bluetooth In case the reconnection fails after a power cycle reconnect the device manually 4 Select Connect 20 7 Disconnecting Devices Procedure 1 From the home screen press the Menu key 2 Disconnect device...

Страница 126: ...er Bluetooth functions on your radio Procedure 1 From the home screen press the Menu key 2 Select Bluetooth Indoor Location 3 Select Change 4 Select On or Off to activate or deactivate Indoor Location Your radio is now able to detect Bluetooth location beacons when Indoor Location is activated 20 10 Viewing Detected Beacons Prerequisites Turn on Indoor Location If Indoor Location is turned off the...

Страница 127: ...End key Entering Browser Menu Panes Procedure 1 Press the Menu key Your radio displays the Navigate pane or the last browser menu pane 2 If you navigate to a web page that has two or more soft keys options the Options pane appears Perform one of the following actions In the Options pane scroll to other panes by pressing the Left or Right navigation keys Select Browser Menu and scroll to the requir...

Страница 128: ...pen the browser and scroll to the Bookmarks pane 2 Select Organise or More The Organise option is for when no bookmarks are saved 3 Select Menu 4 Scroll to New Bookmark 5 Enter the title and URL of the bookmark and select the location of the bookmark 6 PressSave 21 2 3 Downloading Pages Using Bookmarks Procedure 1 Open the browser and scroll to the Bookmarks pane 2 Scroll to the required bookmark ...

Страница 129: ...d select Save Your radio saves the page into the Bookmarks Saved Pages folder 21 2 7 Selecting Saved Pages Procedure 1 Open the browser and scroll to the Bookmarks pane 2 Select Organise or More The Organise option is for when no bookmarks are saved 3 Enter the Saved Pages folder by selecting Go 4 Select a saved page and press OK The display shows the saved page Depending on the saved page you can...

Страница 130: ...llowing options Option Description Back To display the saved page Details To modify the title and URL of the saved page Update Page To replace the saved version with the current version that must be downloaded from the server Delete To delete the page from the cache Delete All To delete all saved pages from the caches Cancel To exit and return to the previous page 21 5 Managing Documents Procedure...

Страница 131: ...ne allows you to input alphanumeric characters and symbols Procedure 1 From the browser select the URL 2 Open the Text Input pane by pressing the abc softkey 3 Insert the URL by pressing the following softkeys Option Description abc To insert alphabetic characters in lower case ABC To insert alphabetic characters in upper case 123 To insert numeric characters and symbols 4 Select www for HTTP mode...

Страница 132: ... Desciption TMO Your radio powers up in Trunked Mode Operation TMO DMO Your radio powers up in Direct Mode Operation DMO Last Selected Your radio powers up in the mode it was in when last powered down 22 1 2 Determining Talkgroup At Radio Startup When and where to use To determine the talkgroup of your radio at radio startup Procedure 1 From the home screen press the Menu key 2 Select Group Setup ...

Страница 133: ...TMO Talkgroup is used Group Mappings Your radio enters the DMO Home Group unless a Group Mapping is configured If Group Mappings are configured they take precedence The DMO Talkgroup mapped to the current TMO Talkgroup is used Home Group Your radio enters the DMO Home Group ignoring possible group mappings 22 1 4 Configuring Home Group When and where to use To configure the home groups on your rad...

Страница 134: ...ist and then a list name Your radio displays list name selected 4 Select Scanning On Your radio is scanning on the predefined scan list 22 2 2 Setting Talkgroups in the Active Scan List When and where to use If you want to edit talkgroups in the active scan list Procedure 1 From the home screen press the Menu key 2 Select Group Setup Scan Active List NOTE If Scanning is Off is displayed go to Grou...

Страница 135: ...list Select one talk group from your talkgroup folders and assign ap propriate priority Edit Changes the priority of the required talkgroup or deletes it 22 2 4 Deleting Talkgroups from Scan Lists Procedure 1 From the home screen press the Menu key 2 Select Group Setup Scan Scan Lists 3 Highlight the required scan list and press Menu Edit 4 Highlight the required talkgroup and press Menu Delete 22...

Страница 136: ... following options Option Actions Renaming the folder a Select Rename Folder b Enter the new name of the folder and press OK Deleting the folder a Select Delete Folder b Press Yes NOTE You cannot delete the last favorite folder 22 3 4 Deleting Talkgroups from Favorite Folders Procedure 1 From the home screen press the Menu key 2 Select Group Setup My Groups 3 Select required favorite folder 4 Dele...

Страница 137: ... Setting Call Forwarding Prerequisites Enter Trunked Mode Operation TMO Procedure 1 From the home screen press the Menu key 2 Select Individual Setup Trunked Mode Call Forwarding 3 Set Call Forwarding by using the following options Option Actions Enabling Call Forwarding Select Config Sending On Disabling Call Forwarding Select Config Sending Off Setting predefine condition messages a Select Confi...

Страница 138: ...cedure 1 From the home screen press the Menu key 2 Select Contacts 3 Highlight a contact that you want to add to Favorites and using the Left or Right Navigation key select the required number 4 Press the Menu key and select Add to Favorites 5 Select a folder you want to add the contact number to and press Select 24 3 Making Private Calls to Favorite Contacts Procedure 1 To select a contact number...

Страница 139: ...kgroups arranged by folders TG by abc contains talkgroups arranged alphabetically 3 Find and highlight a talkgroup that you want to add to Favorites 4 Press the Menu key and select Add to Favorites 5 Select a folder you want to add the talkgroup to and press Select 24 5 Managing Folders in Favorites Procedure 1 From the home screen press the Menu key 2 Select Favorites 3 Highlight a required folde...

Страница 140: ...y 2 Select Favorites 3 Select a folder containing the item you want to remove 4 Highlight the item and select Delete Deleting All Items Procedure 1 From the home screen press the Menu key 2 Select Favorites 3 Select a required folder 4 Press the Menu key and select Delete All MN006360A01 AE Chapter 24 Favorites 140 ...

Страница 141: ...w other information such as manufac turer product type ISSI TEI Serial Num ber and OPTA Battery Info To view the power level of the battery Storage Info Radio Storage To view the amount of free and total space of the internal memory Storage Info SD card Storage To view the amount of free and total space of the microSD card NOTE You can edit the displayed phone number by selecting Edit You can view...

Страница 142: ...he MicroSD Card You can format microSD cards that are non formatted or incorrectly formatted If the microSD card is correctly formatted this option is not visible in the menu NOTE Formatting removes all files saved in the microSD card Procedure 1 From the home screen press the Menu key 2 Select My Info Storage Info Format SD card 3 Confirm formatting by pressing Yes MN006360A01 AE Chapter 25 My In...

Страница 143: ...mber Viewing received calls a Select Received b Press Menu key and select View to view your received call Viewing missed calls a Select Missed b Press Menu key and select View to view your missed call Call time information is only available if the time and date are set in the radio Call duration is not available in the missed calls list 26 2 Calling from Recent Calls Procedure 1 From the home scre...

Страница 144: ...our contact list 5 Store the number by using one of the following options Option Actions Storing the number as a new entry Select New Contact Storing the number as an existing entry a Select the entry b Press View c Select Edit 6 Highlight the contact type field 7 Display the required contact type for the number by scrolling to the left or right 8 Select Done 26 4 Deleting Recent Calls Procedure 1...

Страница 145: ...Option Actions Deleting a call a Select Delete Deleting all calls a Press Delete All MN006360A01 AE Chapter 26 Recent Calls 145 ...

Страница 146: ...e is displayed 5 Select Yes The key for the shortcut is displayed 6 Press Done 27 2 Managing Menu Shortcuts Procedure 1 From the home screen press the Menu key 2 Select Shortcuts 3 Highlight a required shortcut and press Menu 4 Manage menu shortcuts by using the following options Option Actions Changing the assigned key a Select Edit b Enter the required number from 1 to 20 c Press OK Deleting a s...

Страница 147: ... Option Action Selecting an existing user ID a Select User ID b Select your user ID from the list Creating a user ID a Select New User ID b Enter your user ID 4 Select User PIN 5 Enter your credentials and press OK Logging Off Radio User Identity Procedure 1 From the home screen press the Menu key 2 Select RUI Log off 3 Press Accept MN006360A01 AE Logging On or Off Radio User Identity 147 ...

Страница 148: ...the Repeater Mode TXI Mode Activate to stop sending any radio transmission NOTE If your radio is in TXI Mode you cannot switch from Direct Mode to Trunked Mode or Repeater Mode TG Net Sel Selects one or multiple networks determined by the selected talkgroup 29 2 Network Select The Network Select sub menu allows you to select a network to register your radio 29 2 1 Selecting Your Network NOTE Netwo...

Страница 149: ...gisters to the network automatically from the predefined list 29 3 Talkgroup Network Select The Talkgroup Network Select sub menu allows you to select one or multiple networks to register your radio accordingly to the selected talkgroup 29 3 1 Selecting Your Talkgroup Network NOTE TG Net Sel is available when the selected talkgroup is a Any Net talkgroup or a InterSystem Interface ISI talkgroup ot...

Страница 150: ...red The selected network is the first priority for scanning and registration Procedure 1 From the home screen press the Menu key 2 Select Networks TG Net Sel Prefer TG Net 3 Select the required network from the list 29 3 4 Using Any TG Net Registration When and where to use Your radio has lost its network coverage and wants to increase the number of networks it can scan and register If the talkgro...

Страница 151: ...press the Menu key 2 Select Location Interface On 30 2 Viewing Your Position Procedure 1 From the home screen press the Menu key 2 Select Location Position The display shows your last calculated position 3 To refresh your position select Position and press Refresh Postrequisites Sometimes the GPS or GNSS feature is unable to complete calculating a location Enhance the GPS or GNSS performance by pe...

Страница 152: ...de H for height Sats Used for several tracked satellites B for bearing HS for horizontal speed LC for level of confidence Power To view detailed information of a satellite Your radio displays PRN code Status Mode C N for carrier to noise ratio Version To view detailed information of the software version Your radio displays SW for software version HW for hardware version ASIC for application specif...

Страница 153: ...ng device your radio automatically enters the High mode 30 5 Backlog Backlog sub menu allows you to enable or disable view and delete backlog reports NOTE The backlog of location reports is only available when Local Information Protocol LIP is enabled 30 5 1 Enabling or Disabling Backlog Procedure 1 From the home screen press the Menu key 2 Select Location Backlog Enablement 3 Select one of the fo...

Страница 154: ...30 5 3 Deleting All Backlog Reports Procedure 1 From the home screen press the Menu key 2 Select Location Backlog Delete All MN006360A01 AE Chapter 30 Location 154 ...

Страница 155: ...Displays the number of KBs sent and throughput since current Packet Data activa tion Received Data Displays the number of KBs received and throughput since current Packet Data activa tion Bandwidth Shows the active data session percentage Failed Transfer The percentage of failed sent received pack ets NOTE N A Standby packet data session 31 2 Viewing Encryption Status Procedure 1 From the home scr...

Страница 156: ... Encryption On To enable encryption Encryption Off To disable encryption The display shows a message and icon of the encryption status 32 2 Setting Clear Call Alarm The Clear Call Alarm menu is used to configure an alarm tone to notify on any clear transmission Procedure 1 From the home screen press the Menu key 2 Select Crypto Menu Clear Call Alarm 3 Select Simplex Calls or Duplex Calls 4 Select ...

Страница 157: ... Select Crypto Menu OPTA Filter 3 Scroll to characters that must be masked when the OPTA name is displayed and press Select 4 Press Done to confirm the settings 32 6 Starting Crypto Registration Prerequisites Ensure that your radio is not in an active call or in Direct Mode Operation DMO Procedure 1 From the home screen press the Menu key 2 Select Crypto Menu Crypto Registr Start Registr 32 7 Turn...

Страница 158: ... enable crypto mode bit 1 DMO 2 To enable crypto mode bit 2 32 9 Selecting Encryption Keys for SDS Procedure 1 From the home screen press the Menu key 2 Select Crypto Menu SDS Encr Mode 3 Select encryption keys by using one of the following options Option Actions Selecting the encryption key for individually addressed SDS a Select Individual SDS b Select Global Key or Group Key Selecting the encry...

Страница 159: ...a notification of the Wi Fi status 33 2 Connecting to Networks Through Scan Prerequisites Turn on Wi Fi Procedure 1 From the home screen press the Menu key 2 Select Wi Fi Scan When the scan is complete your radio displays a list of Wi Fi networks within range 3 Select the required network and press Connect NOTE Your radio can only connect to networks that are predefined in the codeplug If you atte...

Страница 160: ...C Address Procedure 1 From the home screen press the Menu key 2 Select Wi Fi MAC Address The display shows the MAC address of the Wi Fi chip 33 6 Viewing Certificate Enrollment Status The certificate enrollment validates your radio to be able to use certain radio features such as Wi Fi OTAP or 802 1x EAP TLS The certificate enrollment only needs to be performed one time and automatically starts wh...

Страница 161: ...P Service Certificate Wi Fi Enterprise Indicates the enrollment status of the Wi Fi Enterprise Serv ice Certificate If enrollment is successful Your radio displays Enrolled for each respective certificate If enrollment failed or enrollment not started Your radio displays Not Enrolled for each respective certificate You can trigger a re enrollment using the Retry button NOTE The Retry button will n...

Страница 162: ...o updates with the new configuration as received over OTAP Visible indication guidance and update status is provided during the update When the OTAP installation prompt is rejected your radio returns to idle mode 34 2 Managing LMR OTAP Procedure 1 From the home screen press the Menu key 2 Select LMR OTAP 3 Select one of the following options Option Description Update Preference Currently only User...

Страница 163: ...de 34 4 Receiving Mandatory Wi Fi OTAP Update Prerequisites Your radio display shows an Wi Fi OTAP prompt with Reboot in 10 for auto update text for a new configuration update Procedure 1 Your radio reboots to complete installation once the countdown timer expires NOTE All LMR services are unavailable during the countdown period 34 5 Managing Wi Fi OTAP NOTE This feature is only available when ena...

Страница 164: ...Chapter 35 Contact Address Motorola Solutions Korea Inc 8F HanyangTower 12 Beobwon ro 11gil Songpa gu Seoul 05836 Republic of Korea MN006360A01 AE Chapter 35 Contact Address 164 ...

Отзывы: