


2-14 Operating Your Computer
Removing the Optical Disk Drive/2
nd
HDD/2
nd
Battery
NOTE:
Due to the depth of the Configurable Media Bay, the user may find it helpful to first open the
Optical Disk Drive tray in order to easily grasp and remove the Optical Disk Drive. Before
shutting down the notebook , use the eject button on the face plate of the drive. Open the tray
and then shut down the notebook . Continue with the removal process. If the power is already
off on the notebook, a paper clip can be insert ed into the small hole on the Optical Disk Drive
face plate in order to open the tray. This is explained in the Inserting and Removing a Disk
section of this chapter.
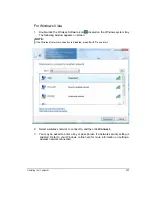
1. Remove the two positioning screws from the base.
2. Open the door of the Configurable Media Bay on the right side of the computer.
Содержание ML910
Страница 2: ......
Страница 28: ...xxvi This page intentionally left blank ...
Страница 112: ...BIOS Setup Utility MLUA 5 17 This page intentionally left blank ...
Страница 126: ...7 8 Caring for the Computer This page intentionally left blank ...
Страница 148: ...8 22 Troubleshooting This page intentionally left blank ...
Страница 153: ...Acronyms 10 3 This page intentionally left blank ...
Страница 157: ...A 4 Specifications This page intentionally left blank ...
Страница 161: ...B 4 Fingerprint Recognition This page intentionally left blank ...
Страница 171: ...C 10 Self Install Internal Wireless Modems l Fix the M logo with a screw ...
Страница 177: ...RoHS WEEE D 1 APPENDIX APPENDIX APPENDIX D RoHS WEEE ...
Страница 178: ...D 2 RoHS WEEE ...
Страница 179: ...RoHS WEEE D 3 ...
Страница 180: ...D 4 RoHS WEEE ...
Страница 181: ...RoHS WEEE D 5 ...
Страница 182: ...D 6 RoHS WEEE ...