background image


© Motor City Wash Works, Inc. 48285 Frank, Wixom Michigan 48393 U.S.A. 

Phone: 248.313.0272 ▪ Fax: 248. 313.0271 


8MANULHYDDOC0004 REV 1.0


www.motorcitywashworks.com


6


2.


Sight Gauge: 

 Ability to view oil level in tank and it a thermometer for temperature.


3.


Hydraulic outlet:

 Feed line to hydraulic motor


4.


Hydraulic return line:

 Hydraulic line connection from hydraulic motor.


5.


Speed adjustment knob:

 Changes fluid volume to slow [turn knob clockwise] or speed up 

[turn knob counter clockwise] the hydraulic motor.


6.


Jam nut:

 Tightening [clockwise] secures valve thread from vibration changing speed 

unknowingly. There is also a jam nut on the pressure gauge valve thread, same concept.


7.


Pump priming filler cap: 

Removing cap allows you to fill hydraulic oil inside to prime pump. 

Replace cap as soon as your done filling oil and tighten snug.


8.


Pressure valve:

 Changes pressure of the pumps output, recommended 900 PSI 

ONLY 

viewable on gauge when hydraulic outlet is plugged [deadhead] and pump is on with gauge 
valve open. When not adjusting keep jam nut tight on valve thread. This will prevent 
vibration from changing pressure unknowingly.


9.


PSI Gauge:

 Allows the ability to see what the pump pressure is at when in use. To help 

prolong the operation of the gauge you can have gauge valve closet to stop oil from entering 
gauge. Open when needing to view PSI pressure on gauge.


10.


Gauge valve:

 Loosen jam nut for opening gauge valve [counter clockwise] allows oil in gauge. 

Close valve [clockwise] and tighten jam nut for normal use. (Gauge needle will not move)


11.


Filler cap:

 Removing cap reveals opening for filling Hydraulic fluid into the tank. [ISO 32 

viscosity recommended]


12.


Filter:

 This is for the return oil for filtration. Change every 3000 miles or 1500 hours 

whichever comes first.  *Lubricate gasket of new filter before installation.


13.


Filter gauge:

 needle in green filter is good. Needle in red filter over due to be changed.


14.


By-pass tee:

 Oil not needed will be dumped back to the tank Via this hose connected to the 

by-pass tee.


15.


Clean out cover:

 Opening will allow you access to left over oil at bottom of tank for cleaning.


Содержание POWERSYS0013

Страница 1: ...ted Tools and Installation Materials Page 2 Equipment Specifications Page 2 3 Safety and warnings Page 4 Installation Operations Instructions Page 4 12 Troubleshooting Page 13 Warranty Page 16 Unit Id...

Страница 2: ...Materials 2 1 Crescent wrenches Standard multi Allen key tool Small size Crescent wrench Funnel Standard Screwdriver Equipment Specifications and Features Convenient 208 480VAC Three Phase Supply Mini...

Страница 3: ...com ucon formulated fluids fire_res htm DO NOT RUN OPEN SEAL BEARING LESS GEAR MOTOR USING WATER BASED FLUID DOING SO WILL REDUCE THE LIFE OF THE GEAR REDUCER AND WILL VOID YOUR WARRANTY HYDRAULIC PO...

Страница 4: ...ment and or the safety of the people working on the equipment Installation Instruction for EQUIPMENT POWER PACK 10 15HP MOTOR 1 Placing power pack in back room is at the discretion of available real e...

Страница 5: ...rds you need to swap the feed and return line at the hydraulic motor OR at the power pack whichever is easiest for you If you have only one side running in the wrong direction you will have to swap at...

Страница 6: ...deadhead and pump is on with gauge valve open When not adjusting keep jam nut tight on valve thread This will prevent vibration from changing pressure unknowingly 9 PSI Gauge Allows the ability to se...

Страница 7: ...state for extended amount of time can heat fluid causing undue ware on the pump 3 Mixing Like base fluids is not Ideal but if you have forgotten what ISO your viscosity is you can add ISO 32 without...

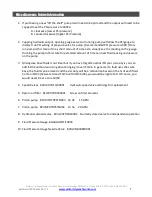
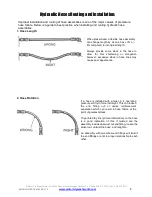
Страница 8: ...l length Always provide some slack in the hose to allow for this shortening or elongation however excessive slack in hose lines may cause poor appearance 2 Hose Rotation If a hose is installed with a...

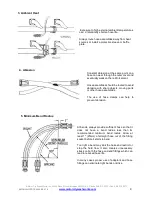
Страница 9: ...forcement Hose assemblies should be routed to avoid abrasion with sharp objects moving parts or other hose assemblies The use of hose clamps can help to prevent abrasion 5 Minimum Bend Radius At bends...

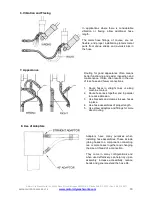
Страница 10: ...nd maintenance It also often results in the use of less hose and fewer connections 1 Route hoses in straight lines or along machine contour 2 Route hose lines together and in parallel to reduce abrasi...

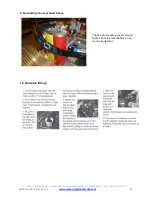
Страница 11: ...higan 48393 U S A Phone 248 313 0272 Fax 248 313 0271 8MANULHYDDOC0004 REV 1 0 www motorcitywashworks com 11 9 Secondary cover around hoses 10 Reusable fittings The use of secondary covers around hose...

Страница 12: ...r is clean as possible 3 Install new filter Secure supply lines and fill reservoir 4 Operate each set of equipment until new fluid is flowing clearly out of return line Refilling reservoir as necessar...

Страница 13: ...to solve it and make the product or process operational again It is imperative to understand that all problems have a cause and solution Many times you may not have an actual fault and just a simple...

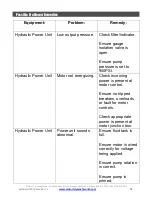
Страница 14: ...Ensure gauge isolation valve is open Ensure pump pressure is set to 900PSI Hydraulic Power Unit Motor not energizing Check incoming power is present at motor control Ensure no tripped breakers overloa...

Страница 15: ...City Wash Works Inc 48285 Frank Wixom Michigan 48393 U S A Phone 248 313 0272 Fax 248 313 0271 8MANULHYDDOC0004 REV 1 0 www motorcitywashworks com 15 Media Links Dry N Shin Media Links Dry N Shine pdf...

Страница 16: ...product if found defectives with a new or refurbished unit but not to include costs of removal or installation Any product returned to MCWW for warranty has to have a Return Material Authorization Num...

Отзывы: