background image

9

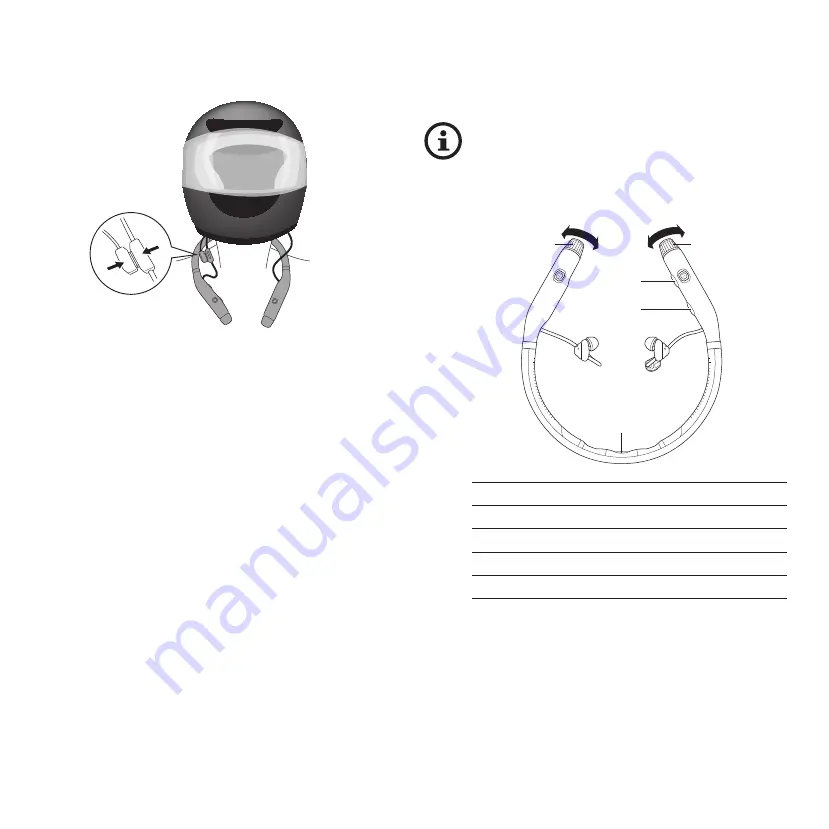
6. Put on your helmet and connect the microphone to the 

microphone connector [

7

] on the neckband.

Note: 

The microphone connector has a special shape 

which allows the microphone to be connected in one 

way only.

7.  Operation

7.1  General controls

•  Use the buttons and knobs below for 

operation.

•  During setup and use, voice prompts are 

available to notify you of current operation 

status.  

POWER

MODE

VOL

MFB

HDNC

POWER

Power button

MFB

Multi-function button

HDNC

HDNC & ambient button/Reset button

MODE

Mode knob

VOL

Volume knob

Содержание MPlus

Страница 1: ...MPlus RA1000S Multipurpose Motorcycle Communication Neckband User Manual FCC ID 2AU2ARALP9 ...

Страница 2: ...Turning Bluetooth on or off 10 7 4 Intercom pairing 10 7 5 Mobile phone pairing 10 7 6 Second device pairing 10 7 7 Pairing with a compatible device 10 7 8 Notes on pairing 11 7 9 Handling phone calls 11 7 10 Activating voice control of your mobile phone 12 7 11 Two way intercom 12 7 12 Controlling the media player of your mobile phone 13 7 13 Hybrid Dynamic Noise Cancellation system 14 7 14 Talk ...

Страница 3: ...ing symbols and signal words are used in this user manual on the device or on the packaging WARNING This signal symbol word designates a hazard with moderate risk which may result in death or severe injury if not avoided NOTICE This signal word warns of possible damage to property This symbol provides you with useful additional information on handling and use IP67 The device is protected from the ...

Страница 4: ... Risk of injury Excessive sound pressure from earphones and headphones can cause hearing loss Avoid using the device at high volume levels for long periods to avoid permanent hearing damage Keep the volume at a modest level Audio warnings alerts and environmental noises may sound different when wearing the device Be aware of how these signals differ in terms of their sound so that you are able to ...

Страница 5: ... this Liability and warranty claims are waived in the event of repairs performed by the user improper connection or incorrect operation If the device is damaged the manufacturer its customer service or a person with similar qualifications must replace it to avoid risks Only parts that comply with the original device data may be used for repairs This device contains electrical and mechanical parts ...

Страница 6: ...hts backside 5 Neckband 6 Microphone 7 Microphone connector 8 USB charging port underside 9 Boom microphone 10 Attachment flap 11 Hook and loop fasteners 2 sets 12 Double sides tape 2 sets spare pieces 13 Wired microphone 14 USB cable Type A USB plug to micro USB plug 15 Carrying case Controls POWER Power button MFB Multi function button HDNC HDNC ambient button Reset button MODE Mode knob VOL Vol...

Страница 7: ...SB power source e g USB port of a computer for charging During charging the LED lights 4 will become red 3 The red LED lights will turn off when the device is fully charged Unplug the USB cable from the USB power source and disconnect the USB cable from the USB charging port of the device 6 Putting on the device 6 1 Attaching the EcoFit Gels 1 Select the EcoFit Gels 2 S or L which fit comfortably ...

Страница 8: ... on the inside of your helmet This must be done on the right hand side of your helmet 4 Press the pair of hook and loop fastener together so that the microphone is fixed in place on your helmet Boom microphone Wired microphone Note Attach the wired microphone to the helmet with a pair of hook and loop fastener 5 Place the neckband 5 around your neck with the opening of the neckband facing forward ...

Страница 9: ...ws the microphone to be connected in one way only 7 Operation 7 1 General controls Use the buttons and knobs below for operation During setup and use voice prompts are available to notify you of current operation status POWER MODE VOL MFB HDNC POWER Power button MFB Multi function button HDNC HDNC ambient button Reset button MODE Mode knob VOL Volume knob ...

Страница 10: ...time and then release the buttons when you hear the voice prompts Intercom pairing and then Phone pairing Note You will hear the voice prompt Remote control pairing if you keep pressing the buttons after the voice prompt Phone pairing This feature remote control pairing is still under development 3 On your mobile phone select Motikom Plus from the list of available devices for pairing 7 6 Second d...

Страница 11: ...ith your last paired Bluetooth device when it is within the device s Bluetooth range 10 m If necessary press MFB button once to prompt this device to actively search for the previously paired Bluetooth device 7 9 Handling phone calls Basic handling Answer an incoming call Turn MODE clockwise and then release MODE Reject an incoming call Turn MODE anticlockwise and then release MODE End a call Turn...

Страница 12: ...ming phone call during intercom Turn MODE anticlockwise and then release MODE End the current phone call and switch back to intercom Turn MODE anticlockwise and then release MODE 7 10 Activating voice control of your mobile phone Turn MODE clockwise and hold for 2 seconds to activate the voice control function e g Siri and Google Assistant MODE If you have paired with two mobile phones only the vo...

Страница 13: ...that device for up to 1 hour a repeating signal sound can be heard Press MFB button to stop searching for the out of range device If your device is paired with two mobile phones only the first paired mobile phone can be controlled during intercom calls 7 12 Controlling the media player of your mobile phone Start playback Start music playback from the media player of your mobile phone Pause playbac...

Страница 14: ...ff talk through mode VOL 7 15 Resetting to factory default 1 While the device is powered on press HDNC for 8 seconds and release the button when you hear the voice prompt Factory reset 2 Press MFB button to confirm the factory reset 7 16 More product information Visit www motikom com for more information 8 LED lights The connection and operation status can be easily checked through the colours and...

Страница 15: ...or distorted sound Make sure your device is within the device s Bluetooth range 10 m Move your device closer to the device Noise cancelling is not working Make sure noise cancelling has been activated Make sure the device is sufficiently charged 12 Technical data Model RA1000S Input DC 5 V 0 5 A Operating time up to 72 hours HDNC only up to 25 hours Music HDNC up to 20 hours Intercom Weight 152 g ...

Страница 16: ...e of cardboard and carton as waste paper and foils via the recyclable material collection service 13 2 Disposing of old devices Old devices must not be disposed of with household waste If the device can no longer be used every user is required by law to dispose of old devices separately from their household waste e g at a collection point in their community borough This ensures that old devices ar...

Страница 17: ...s device complies with part 15 of the FCC rules Operation is subject to the following two conditions 1 this device may not cause harmful interference and 2 this device must accept any interference received including interference that may cause undesired operation NOTE The manufacturer is not responsible for any radio or TV interference caused by unauthorized modifications or changes to this equipm...

Отзывы: