background image

Montageanleitung KTB / 

Mounting Instructions KTB


®

1.9


1.10


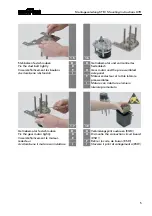
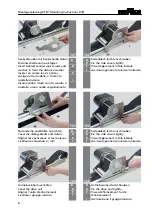
Verbindungsprint auf Getriebemotor 
aufstecken  

Attach the connection circuit board on 
the gear motor   

Insérer la carte de liaison sur le moteur-
réducteur 

Mettere il print di collegamento sul 
motore con riduttore 


E


I


E


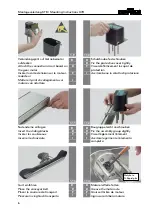
Schutzhaube festschrauben 

Fix the protective cover tightly 

Visser définitivement la capot de 
protection 

Avvitare bene la calotta di protezione


1.11


1.12


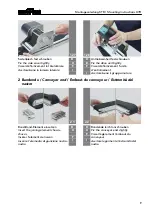
Nutensteine einfügen 

Insert the sliding blocks  

Insérer les coulisseaux 

Inserirel le chiocciole  

E


I


E


I


Baugruppe leicht anschrauben 

Fix the assembly group slightly


Visser légèrement l’élément 

Avvitare legermente l’elemento 
completo


1.13


1.14


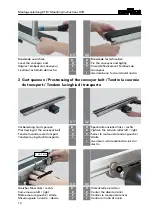
Gurt einführen 

Place the conveyor belt 

Placer la courroie de transport


Piazzare la cinghia di transporto  

E


I


E


I


Motoren-Welle fetten 

Grease the motor axle  

Graisser lârbre de moteur 

Ingrassare l’albero motore 

Molykote
G-Rapid plus

Содержание 508815

Страница 1: ...INSTRUCTIONS DE MONTAGE ISTRUZIONI DI MONTAGGIO Kleintransportband KTB Mittenantrieb Minidrive Conveyor KTB Central drive Mini Convoyeur KTB Entra nement central Mini Trasportatore KTB Azionamento ce...

Страница 2: ...modifiche Bisher erschienene Ausgaben Edition issued so far Editions parues se jour Edizioni finora pubblicate Ausgabe Edition Edition Edizione Bemerkung Comments Remarque Osservazioni Artikelnummer...

Страница 3: ...convoyeur Estremit del nastro 9 3 Gurt spannen Prestressing of the conveyor belt Tendre la courroie de transport Tendere la cinghia di transporto 10 4 Programmierung deutsch 12 5 Programming english...

Страница 4: ...t rale Premontare la lamiera laterale D E F I D E F I Lagerring in Seitenblech legen Insert the bearing ring in the side panel Ins rer la bague de palier dans la t le lat rale Inserire l anello del cu...

Страница 5: ...or and the pre assembled side panel Moteur r ducteur et la t le lat rale pr assembl e Motore con riduttore e lamiera laterale premonteta 1 7 1 8 Getriebemotor festschrauben Fix the gear motor tightly...

Страница 6: ...nt la capot de protection Avvitare bene la calotta di protezione 1 11 1 12 Nutensteine einf gen Insert the sliding blocks Ins rer les coulisseaux Inserirel le chiocciole D E F I D E F I Baugruppe leic...

Страница 7: ...nsport Piazzare la cinghia di transporto D E F I D E F I Deckel festschrauben Fix the cover tightly Visser d finitivement le couvercle Avvitare bene il coperchio 1 19 1 20 Spannrolle und Gegenhalterwe...

Страница 8: ...sser l g rement la t le lat rale Avvitare legermente la lamiera laterale 1 23 1 24 Nutensteine und Rollen ausrichten Level the sliding blocks and rollers Aligner les coulisseaux et les rouleaux Livell...

Страница 9: ...tly Visser d finitivement l unit d entra nement Avvitare bene il gruppo motore 2 Bandende Conveyor end Embout de convoyeur Estremit del nastro 2 1 2 2 Band Band Element einsetzen Insert the joining el...

Страница 10: ...t Tendere la cinghia di transporto 3 1 3 2 Vorbereitung Gurt spannen Prestressing of the conveyor belt Tendre la courroie de transport Tendere la cinghia di transporto D E F I D E F I Spannrolle anzie...

Страница 11: ...Montageanleitung KTB Mounting Instructions KTB 11 3 5 Programmieren nach Vorgabe Program according default Programmer selon directives Programmare come da direttive D E F I...

Страница 12: ...m min i 21 6 1 Version L 0 4 7 6 m min i 59 2 1 Tasten 1 und 2 w hrend 3 sec gleichzeitig dr cken Programmodus anw hlen Taste 5 respektive 3 mehrmals dr cken bis GEA erscheint Quittieren mit Taste 4...

Страница 13: ...in i 21 6 1 Version L 0 4 7 6 m min i 59 2 1 Simultaneously press button 1 and 2 for 3 sec the program mode is obtained Press eather button 5 or button 3 several times until GEA on the display appears...

Страница 14: ...ersion L 0 4 7 6 m min i 59 2 1 En appuyant simultan ment sur les touches1 et 2 pendant 3 sec on arrive dans le mode programmation Enfoncer plusier fois la touche 5 respectivement 3 jusqu GEA apparait...

Страница 15: ...min i 59 2 1 Per accedere al modo operativo dell prgramma premere contemporaneamente i tasti 1 e 2 per 3s Premere il tasto 5 rispettivamente 3 piu volte finche appare GEA sull display Confermare con i...

Страница 16: ...giustare il senso di scorrimento come descritto nelle istruzioni per l uso D E F I 8 Seitenf hrungen Lateral guides Guidages lat raux Guide laterali 8 1 8 2 Seitenf hrung einsetzen Insert the lateral...

Страница 17: ...auf feineinstellen mit max Geschwindigkeit Final adjustment of the belt max speed Centrage de la courroie la vitesse max Regolazione dello scorrimento della cinghia di trasporto velocit max 9 3 9 4 Gu...

Страница 18: ...en Adjust the speed according operating instruction Ajuster la vitesse selon le mode d emploi Aggiustare la velocit come descritto nelle istruzioni per l uso D E F I D E F I Typenschild aufkleben Stic...

Отзывы: