background image

DE

42

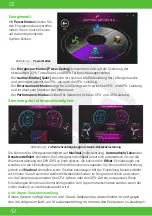
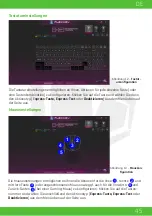
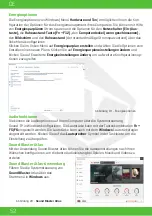
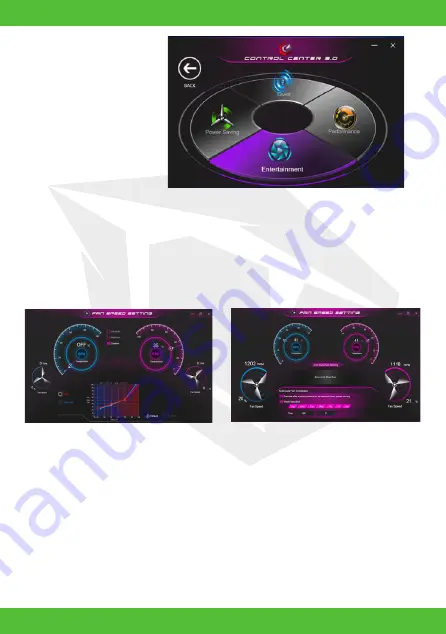
Energiemodi

Mit 

Power Modes

 können Sie 

den Energiemodus einstellen, 
indem Sie im Control Center 
auf das entsprechende 
Symbol klicken.

Steuerung der Lüftergeschwindigkeit

 Der 

Energiespar-Modus (Power Saving)

 konzentriert sich auf die Schonung der 

   Akkulaufzeit (CPU Turbo Boost und dGPU Turbo sind ausgeschaltet).

 Der 

Lautlos-Modus (Quiet)

 konzentriert sich auf die Reduzierung der Lüftergeräusche   

   und verringert sowohl die CPU- als auch die GPU-Leistung.

 Der 

Entertainment-Modus

 sorgt für ein Gleichgewicht zwischen CPU- und GPU-Leistung   

   und ist ideal zum Ansehen von Videos usw.

 Der 

Performance-Modus

 ist ideal für Spiele mit höherer CPU- und GPULeistung.

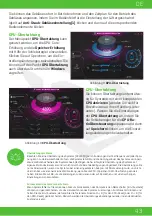
Sie können die Lüftergeschwindigkeit auf 

Maximal

 (volle Leistung), 

Automatisch/ Leise

 oder 

Benutzerdefiniert

 einstellen. Die Lüftergeschwindigkeit passt sich automatisch an, um die 

Wärmeentwicklung der CPU/GPU zu kontrollieren. Sie können den 

Offset

-Schieberegler ver-

wenden, um die Einstellungen nach Ihren Wünschen anzupassen. Sie können die Einstellung 
jedoch auf 

Maximal

 einstellen, wenn Sie dies bevorzugen. Mit der Einstellung Benutzerdefini-

ert können Sie auf einen der beiden Mittelbereichsknoten im Diagramm klicken und ziehen, 
um die Temperaturparameter des CPU-Lüfters oder des GPU-Lüfters anzupassen. Diese 
Einstellungen können aus Sicherheitsgründen vom System überschrieben werden, wenn der 
Lüfter dadurch zu stark beansprucht wird.

Abbildung 7 - 

Power Modes

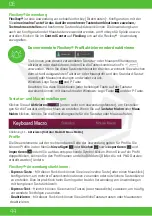
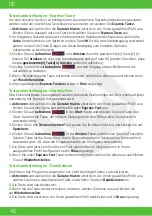
Anti-Staub-Gebläseeinstellung

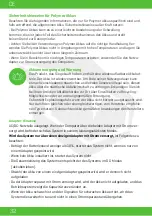
Dieses System verfügt über ein Anti-Staub-Gebläse, das abwechselnd im und gegen 
den Uhrzeigersinn läuft, um Staubansammlung im Inneren des Computers zu beseitigen.

Abbildung 8 - 

Lüfterdrehzahlregelung/Anti-Staub-Gebläseeinstellung

Содержание SEMRUK S7 V7.1

Страница 1: ...01 EN S7 V7 1 U S E R M A N U A L K U L L A N I M K I L AV U Z U B E N U T Z E R H A N D B U C H...

Страница 2: ...rks Intel is a trademark registered trademark of Intel Corporation Windows is a registered trademark of Microsoft Corporation FCC Statement This device complies with Part 15 of the FCC Rules Operation...

Страница 3: ...e it is disconnected from any external power supplies peripherals and cables Use a soft clean cloth to clean the computer but do not apply cleaner directly to the computer Do not use volatile petroleu...

Страница 4: ...uivalent to the system in DC battery powered mode Although powered by a single adapter the battery will not charge As the adapter is powered separately the battery will not be charged and the operatin...

Страница 5: ...ft Windows 10 OS DVD or USB flash drive An Intel Optane SSD installed in your system The Device Drivers Utilities User s Manual disc System Software Your computer may already come with system software...

Страница 6: ...en delete existing partitions 8 Click New to create a partition for Windows 9 It is very important to make sure that when you create the partition leave at least a minimum of unallocated space of 5MB...

Страница 7: ...flash drive Two identical PCIe solid state drives The Device Drivers Utilities User s Manual disc Table 1 RAID Description RAID Setup RAID Level RAID 0 at lease two SSDs needed RAID 1 at lease two SSD...

Страница 8: ...three identical SSDs to form your RAID volume 13 If you have selected RAID 0 Stripe then you can adjust the Strip Size to your requirements It is recommended that you set the Strip Size to 128KB 14 Se...

Страница 9: ...D Indicators Figure 3 Front View with LCD Panel Open 1 PC Camera 2 Camera LED When the camera is in use the LED will be illuminated 3 Built In Array Microphone 4 LCD 5 Power Button 6 Keyboard 7 Finger...

Страница 10: ...ey combinations some visual indicators are available when the Control Center driver is installed Numeric Keypad Fn Key Windows Logo Key Scr Lk Num Lk Function Keys Powered USB Port The powered USB 3 2...

Страница 11: ...t Views 1 LED Indicators 2 Speakers 3 Vent 4 Multi in 1 Card Reader 5 USB 3 2 Gen 2 Type A Ports 6 2 In 1 Audio Jack Microphone S PDIF Optical 7 2 In 1 Audio Jack Headphones Microphone 8 USB 3 2 Gen 2...

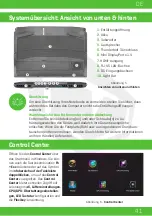
Страница 12: ...for any reason please contact your distributor supplier for further information 1 Vent 2 Battery 3 Subwoofer 4 Speakers 5 Thunderbolt 3 Port 6 Mini DisplayPorts 1 4 7 HDMI Out Port 8 RJ 45 LAN Jack 9...

Страница 13: ...mum full power Automatic Slient or Custom The fan speed will adjust itself automatically to control the heat of the CPU GPU You can use the Offset slider to adjust the settings to your preference Howe...

Страница 14: ...re 9 GPU Overclocking Figure 10 CPU Overclocking Overclocking Issues Note overclocking the system CPU GPU by making alterations to clock frequency and or voltage may cause hardware damage reduce syste...

Страница 15: ...ons which have a complex set of keyboard shortcuts Express Text With this you can assign single keys or mouse clicks to send commonly used strings of text Disable Use this function to disable any keyb...

Страница 16: ...u at the top of the page The mouse settings allow you to configure actions for the left right and middle buttons of any attached mouse and also for any forward and backward buttons if applicable on a...

Страница 17: ...s Text 1 Enable and select Keyboard Macro under your chosen profile click to select a key and then click to select Express Text 2 Click the Record button in Start key and press a key the Start key is...

Страница 18: ...to set individual color settings for any keyboard keys you may wish to highlight Simply click to highlight any keys to which you wish to apply the color and then click a color from the color swatch to...

Страница 19: ...the system is idle before the keyboard LED enters sleep mode i e the LED keyboard illumination will turn off to save power KB Brightness You can adjust the keyboard brightness using the Brightness sli...

Страница 20: ...of the screen Some of the control panels and applications referred to throughout the course of this manual can be accessed from here Throughout this manual you will see an instruction to open the Cont...

Страница 21: ...up to 3 active displays can be configured from Windows by using the Display or System in Settings control panel or the Project menu To access the Display control panel in Windows 1 Right click the des...

Страница 22: ...llow the steps to connect to any wireless enabled display To configure the displays using the Display control panel 1 Attach your external display s to the appropriate port and turn it them on 2 Right...

Страница 23: ...Atlas Application Run the Sound Blaster Atlas control panel from the Start menu in Windows Power Options The Power Options Hardware and Sound menu control panel icon in Windows allows you to configure...

Страница 24: ...operation of the computer This setup will probably have already been done for you If this is not the case insert the disc and click Install Drivers button or Option Drivers button to access the Optio...

Страница 25: ...if required and click Next 5 You can choose to find other devices or not 6 When you are connected to the network access point it will display Connected 7 Select any connected network and click Disconn...

Страница 26: ...nstructed 8 Try to present different parts of your finger in different positions similar to the various positions you may use when using it and note the following Hold the finger on the sensor for at...

Страница 27: ...e computer TPM Management in Windows You can manage your TPM settings from within Windows 1 Go to the Control Panel 2 Click BitLocker Drive Encryption System and Security 3 Click TPM Administration Fi...

Страница 28: ...ions listed in this section are correct at the time of going to press Certain items particularly processor types speeds may be changed delayed or updated due to the manufacturer s release schedule Che...

Страница 29: ...A or PCIe Gen3 x4 SSD Slot 3 for SATA or PCIe Gen3 x4 SSD Slot 4 for PCIe Gen3 x4 SSD Slot 5 for SATA SSD 128Mb SPI Flash ROM INSYDE BIOS Dual Channel DDR4 Four 260 Pin SO DIMM Sockets Supporting up t...

Страница 30: ...ating 20 C 60 C Relative Humidity Operating 20 80 Non Operating 10 90 Removable 8 Cell Smart Lithium Ion Battery Pack 97WH Dual Full Range AC DC Adapters Full Range AC DC Adapter AC Input 100 240V 50...

Страница 31: ...enes Warenzeichen der Intel Corporation Windows ist ein eingetragenes Warenzeichen der Microsoft Corporation FCC Erkl rung Dieses Ger t entspricht Teil 15 der FCC Vorschriften Der Betrieb unterliegt d...

Страница 32: ...rbogen oder verdreht erscheint Selbst wenn der Computer mit einem besch digten Akku weiterarbeitet kann es zu Sch den am Schaltkreis kommen die m glicherweise zu einem Brand f hren Stellen Sie sicher...

Страница 33: ...wird Wenn kein Akku installiert ist startet das System nicht Die Gesamtleistung des Systems entspricht der des Systems im DC Modus akkubetrieben Obwohl der Akku von einem einzigen Adapter gespeist wir...

Страница 34: ...er erstmals an die AC DC Adapter angeschlossen und wie unten beschrieben eingerichtet wurde Schlie en Sie die AC DC Adapterkabel an die DC Eingangsbuchsen auf der R ckseite des Computers an Stecken Si...

Страница 35: ...m aufzurufen 2 W hlen Sie das Men Advanced Erweitert 3 W hlen Sie den SATA Modus dr cken Sie die Eingabetaste und w hlen Sie Intel RST Premium und w hlen Sie OK 4 Dr cken Sie F10 f r Speichern und Bee...

Страница 36: ...d sicherstellen dass das System ber das Netzteil mit Strom versorgt wird und nicht nur ber den Akku 16 Klicken Sie auf Ja um den Vorgang zu starten dies kann einige Zeit dauern 17 Starten Sie nach Abs...

Страница 37: ...e die Daten parallel lesen und schreiben um die Leistung zu erh hen Bei RAID 0 wird ein Striped Disk Array verwendet Die Daten werden in Bl cke aufgeteilt und jeder Block wird auf ein separates Laufwe...

Страница 38: ...uszuw hlen 12 Sie sollten zwei oder drei identische SSDs ausw hlen um Ihr RAID Volume zu erstellen 13 Wenn Sie RAID 0 Striping gew hlt haben k nnen Sie die Strip Size Stripe Gr e an Ihre Anforderungen...

Страница 39: ...eigen Abbildung 3 Ansicht von vorne mit ge ffnetem Bildschirm 1 PC Kamera 2 Kamera LED Wenn die Kamera in Betrieb ist leuchtet die LED 3 Eingebautes Array Mikrofon 4 Bildschirm 5 Ein Aus Taste 6 Tasta...

Страница 40: ...in Aus Taste ein und ausgeschaltet werden Wenn der USB Anschluss eingeschaltet ist liefert er Strom nur zum Laden von Ger ten nicht zum Betrieb von Ger ten sofern das System ausgeschaltet ist aber imm...

Страница 41: ...Fn Fn Fn Fn Fn programmen Tasten Funktion Visuelle Anzeigen Wiedergabe Pause in Audio Videoprogrammen Ruhezustand wechseln Nummerntastatur ein ausschalten Scroll Modus ein ausschalten Feststelltaste...

Страница 42: ...en entfernen m ssen wenden Sie sich bitte f r weitere Informationen an Ihren H ndler Lieferanten 1 Entl ftungs ffnung 2 Akku 3 Subwoofer 4 Lautsprecher 5 Thunderbolt 3 Anschluss 6 Mini DisplayPorts 1...

Страница 43: ...oder Benutzerdefiniert einstellen Die L ftergeschwindigkeit passt sich automatisch an um die W rmeentwicklung der CPU GPU zu kontrollieren Sie k nnen den Offset Schieberegler ver wenden um die Einste...

Страница 44: ...ng bertaktungsprobleme Beachten Sie eine bertaktung des Systems CPU GPU durch nderungen der Taktfrequenz und oder Span nung kann zu Hardwaresch den f hren die Systemstabilit t und die Nutzungsdauer de...

Страница 45: ...mit komplexen Tastaturk rzeln Express Text Hiermit k nnen Sie einzelne Tasten oder Mausklicks zuweisen um h ufig verwendete Textfolgen zu senden Deaktivieren Mit dieser Funktion k nnen Sie s mtlicheTa...

Страница 46: ...Men oben auf der Seite aus Die Mauseinstellungen erm glichen es Ihnen die Aktionen f r die linke rechte und mittlere Taste jeder angeschlossenen Maus sowie ggf auch f r die Vorw rts und Zur ck Tasten...

Страница 47: ...nwendung mit Express Text gesendet wird 1 Aktivieren und w hlen Sie die Tastatur Makro unter dem von Ihnen gew hlten Profil aus klicken Sie auf eine Taste und w hlen Sie dann Express Text aus 2 Klicke...

Страница 48: ...links unter LED Modus um individuelle Farbeinstellungen f r alle Tastaturtasten festzulegen die Sie hervorheben m chten Markieren Sie einfach die Tasten auf die Sie die Farbe anwenden m chten und klic...

Страница 49: ...en Ruhezustand bergeht d h die LEDTastaturbeleuchtung schaltet sich ab um Strom zu sparen Tastatur Helligkeit Sie k nnen die Tastaturhelligkeit mit dem Schieberegler Helligkeit einstellen LED Modus Li...

Страница 50: ...er rechten unteren Ecke des Bildschirms Hier ber k nnen Sie manche Control Panels und Anwendungen aufrufen die in diesem Handbuch angesprochen werden In diesem Handbuch finden Sie eine Anlei tung zum...

Страница 51: ...s 2 W hlen Sie aus den Men s die gew nschten Anzeigeeinstellungen aus So rufen Sie die NVIDIA Systemsteuerung auf 1 Rufen Sie die NVIDIA Systemsteuerung ber das Windows Startmen auf ODER 2 Klicken Sie...

Страница 52: ...lfenster Anzeige 1 Schlie en Sie Ihre externe n Anzeige n an den entsprechenden Anschluss an und schalten Sie sie ein 2 Klicken Sie mit der rechten Maustaste auf den Desktop und w hlen Sie aus dem Men...

Страница 53: ...ound Blaster Atlas ber das Startmen in Windows aus Energieoptionen Die Energieoptionen von Windows Men Hardware und Ton erm glichen Ihnen die Kon figuration der Optionen f r das Energiemanagement Ihre...

Страница 54: ...icht der Fall ist legen Sie die CD ein und klicken Sie auf Treiber installieren Install Drivers Schaltfl che oder Optionale Treiber Optional Drivers Schaltfl che um das Optionale Treibermen aufzurufen...

Страница 55: ...Sie mit dem Computer koppeln m chten und klicken Sie auf Verbinden 5 W hlen Sie ein Ger t aus und klicken Sie auf Ger t entfernen Ja um die Verbindung zum Ger t zu trennen Fingerabdruckleser Registri...

Страница 56: ...hre Fingerabdr cke zu registrieren 7 Sie werden angewiesen den Fingerabdrucksensor mehrmals zu ber hren legen Sie Ihren Finger wiederholt auf den Sensor und heben Sie ihn dann ab bis die Einrichtung w...

Страница 57: ...gen zu speichern und den Computer neu zu starten TPM Verwaltung in Windows Sie k nnen Ihre TPM Einstellungen unter Windows verwalten 1 Rufen Sie die Systemsteuerung auf 2 Klicken Sie auf BitLocker Lau...

Страница 58: ...Sie zum Start Men und w hlen dort Einstellungen dann System und klicken Sie auf Bildschirm Erweiterte Anzeigeneinstellungen Adapterei genschaften anzeigen Problem M gliche Ursachen L sung Die Wireles...

Страница 59: ...x4 SSD Steckplatz 4 f r PCIe Gen3 x4 SSD Steckplatz 5 f r SATA SSD 128Mb SPI Flash ROM INSYDE BIOS Zweikanal DDR4 Vier 260 Pin SO DIMM Sockel Unterst tzung von bis zu 3200 MHz DDR4 Speicher Die tats...

Страница 60: ...80 Nicht Betrieb 10 90 Herausnehmbarer 8 zelliger intelligenter Lithium Ionen Akku 97WH Dualer Vollbereichs AC DC Adapter Vollbereichs AC DC Adapter AC Eingang 100 240V 50 60Hz DC Ausgang 20V 14A 280W...

Страница 61: ...erine dikkat edin May s 2020 Ticari Markalar Intel Intel Corporation n ticari markas tescilli ticari markas d r Windows Microsoft Corporation n tescilli ticari markas d r FCC Beyan Bu cihaz FCC Kurall...

Страница 62: ...kablolardan kar ld ndan emin olun Bilgisayar temizlemek i in yumu ak temiz bir bez kullan n ancak temizleyiciyi do rudan bilgisayara uygulamay n Bilgisayar n hi bir yerinde u ucu petrol destilatlar v...

Страница 63: ...pil arj edilmez ve i letim sistemi kapasiteyi de i tirmez Pil zay fsa ve d k pil bip sesi karsa sistem bunu yapmaya devam eder ve g tasarrufu durumuna ge mez Sistem Ba lang c 1 T m ambalaj malzemeler...

Страница 64: ...ekir ve bunu yapabilmek i in a a dakileri haz rlaman z gerekir DVD veya USB bellekteki Microsoft Windows 10 i letim sistemi Sisteminizde kurulu bir Intel Optane SSD Ayg t S r c leri ve Yard mc Program...

Страница 65: ...k i in Yeni ye t klay n 9 B l m olu turdu unuzda en az 5 MB bo alan b rakt n zdan emin olman z ok nemlidir 10 Windows 10 i letim sistemini y klemek i in ekrandaki talimatlar izleyin 11 Windows s r c l...

Страница 66: ...icrosoft Windows 10 i letim sistemi ki veya zde kat hal s r c s Ayg t S r c leri ve Yard mc Programlar Kullan m K lavuzu diski Tablo 1 RAID A klamas RAID Kurulumu RAID Seviyesi RAID 0 en az iki SSD ge...

Страница 67: ...ID biriminizi olu turmak i in iki veya zde SSD se melisiniz 13 RAID 0 erit se tiyseniz erit Boyutunu gereksinimlerinize g re ayarlayabilirsiniz erit Boyutu nu 128KB olarak ayarlaman z nerilir 14 Birim...

Страница 68: ...kken nden G r n m LED G stergeler ekil 3 Ekran A kken nden G r n m 1 Bilgisayar Kameras 2 Kamera LED i Kamera kullan mdayken LED yanar 3 Dahili Mikrofon Dizisi 4 Ekran 5 A ma Kapama D mesi 6 Klavye 7...

Страница 69: ...3 2 Gen 2 ba lant noktas Fn A ma Kapama D mesi tu kombinasyonuyla a labilir kapat labilir Sistem kapal durumda ancak yine de al an bir prize ba l veya 20 nin zerinde pil kapasitesiyle al an AC DC adap...

Страница 70: ...esini kullanarak g c bu ba lant noktas na ge irin bkz Tablo 2 11 G venlik Kilidi Yuvas Fn Fn Fn Fn Fn Fn Fn Fn Fn Fn Fn Fn Fn Fn Tu lar Fonksiyon G rsel G stergeler Oynat Duraklat Ses Video Programlar...

Страница 71: ...lgi i in distrib t r n ze tedarik inize ba vurun 1 Havaland rma 2 Pil 3 Derin Bas Hoparl r 4 Konu mac lar 5 Thunderbolt 3 Ba lant Noktas 6 Mini DisplayPort 1 4 7 HDMI k Ba lant Noktas 8 RJ 45 LAN Jak...

Страница 72: ...ayarlayacakt r Ayarlar tercihinize g re ayarlamak i in Ofset kayd r c s n kullanabilirsiniz Ancak isterseniz ayar Maksimum olarak ayarlayabilirsiniz zel ayar CPU Fan n n veya GPU Fan n n s cakl k para...

Страница 73: ...GPU h z a rtmas donan mda hasara neden olabilir sistem kararl l n sistemin kullan m mr n azaltabilir ve sistem veri b t nl n etkileyebilir Bu nedenle sistemin h z a rtmas kullan c n n kendi sorumlulu...

Страница 74: ...rken yararl d r Express Text H zl Metin Bu zellik sayesinde s k kullan lan metin dizelerini g ndermek i in tek tu veya fare t klamas atayabilirsiniz Devre d b rak Klavye tu lar n veya fare d melerini...

Страница 75: ...zl Metin veya Devre D B rak se in Fare ayarlar tak l herhangi bir farenin sol sa ve orta d melerinin yan s ra varsa ileri ve geri d melerinin oyun tipi farede eylemlerini yap land rman za olanak tan...

Страница 76: ...profilin alt nda Klavye Makrosu nu etkinle tirin ve se in bir tu se mek i in t klay n ve ard ndan H zl Metni se mek i in t klay n 2 Ba lat tu undaki Kaydet d mesine t klay n ve bir tu a bas n Ba lat...

Страница 77: ...una zel renk ayarlar n yapmak i in LED Modu alt nda soldaki Klavye ye t klay n Rengi uygulamak istedi iniz tu lar vurgulamak i in t klay n ve ard ndan rengi uygulamak i in renk rne inden bir rengi se...

Страница 78: ...nce sistemin bo ta kalaca s reyi se in yani g tasarrufu i in LED klavye ayd nlatmas kapanacakt r Klavye Parlakl Parlakl k kayd r c s n kullanarak klavye parlakl n ayarlayabilirsiniz LED Modu I k ubu u...

Страница 79: ...t taraf ndad r Bu k lavuz i inde at fta bulunulan baz kontrol panellerine ve uygu lamalara buradan eri ilebilir Bu k lavuzda Kontrol Panelini a mak i in bir talimat g receksiniz Denetim Masas na eri m...

Страница 80: ...ows daki Ba lat men s nden NVIDIA Kontrol Paneline eri in VEYA 2 Masa st n sa t klay n ve men den NVIDIA Denetim Masas n se in G SYNC G SYNC monit r n yenileme d ng s n GPU nun olu turma h z yla senkr...

Страница 81: ...ekran ve uyku modu varsay lan g tasarrufu durumu se eneklerini yap land rabilirsiniz Soldaki men den G plan olu tur u t klay n ve yeni bir plan olu turma se eneklerini se in Daha fazla yap land rma s...

Страница 82: ...ullan larak da ayarlanabilir Ayar kontrol etmek i in g rev ubu undaki Hoparl r simgesini t klay n Sound Blaster Atlas Sound Blaster Atlas uygulamas oyunlarda m ziklerde ve filmlerde en iyi performans...

Страница 83: ...c leri ve yard mc programlar i erir Bu kurulum muhtemelen nceden yap lm olacakt r Yap lmam sa diski tak n ve ste e Ba l s r c men s ne eri mek i in S r c leri Y kle d me veya ste e Ba l S r c lere d m...

Страница 84: ...ar bulmay se ebilirsiniz 6 A eri im noktas na ba land n zda Ba land mesaj g r nt lenir 7 Ba l herhangi bir a se in ve ba l bir eri im noktas n n ba lant s n kesmek i in Ba lant y Kes e t klay n 8 Modu...

Страница 85: ...erine getirin ve ard ndan kald r n 8 levi kullan rken kullanabilece iniz e itli konumlara benzer ekilde parma n z n farkl k s mlar n okutmaya al n ve a a dakilere dikkat edin Parma n z sens r zerinde...

Страница 86: ...r yeniden ba latmak i in F10 tu una basman z t klaman z gerekir Windows ta TPM Y netimi TPM ayarlar n z Windows i inden y netebilirsiniz 1 Denetim Masas na gidin 2 BitLocker S r c ifrelemesi ne Sistem...

Страница 87: ...ayn zamanda Kurulu RAM miktar vb hakk nda bilgileri bulabilirsiniz Sisteminizin video ba da t r c s hakk nda bilgi almak i in Ba lat men s ne gidin ve Ayarlar se in ard ndan Sistem i se in ve Ekran G...

Страница 88: ...Yuva PCIe Gen3 x4 SSD i in 4 Yuva SATA SSD i in 5 Yuva 128Mb SPI Flash ROM INSYDE BIOS ift Kanal DDR4 D rt adet 260 Pin SO DIMM Soketi 3200MHz DDR4 Belle e kadar destekleme Ger ek bellek al ma frekan...

Страница 89: ...ar labilir 8 H creli Ak ll Lityum yon Batarya Paketi 97WH ift Tam Kapsaml AC DC Adapt r Tam Kapsaml AC DC Adapt r AC Giri i 100 240V 50 60Hz DC k 20V 14A 280W 399mm g 319mm d 43 5mm y 4 5kg 97WH Pille...

Страница 90: ...TURKEY UAE CYPRUS GERMANY...

Отзывы: