46
English
view a different section, keep the left mouse button pressed
and move the section magnified.
4) To hide the thumbnail view, press the right mouse button.
Then you can double-click the left mouse button to go back
to the normal view.
7.3.2 Sound reproduction
Only the sound of the camera channel displayed in full-screen
mode or, in the multi-image mode, only the sound of the image
highlighted by a blue frame (to be selected with the left mouse
button) will be reproduced.
1) To adjust the volume, show the toolbar (Fig. 7-8) with the
right mouse button.
2) Click the speaker symbol
HD
SD
i
15/09/2019 14:27:38
. A volume control (slider) will
appear.
3) Keep the left mouse button pressed and adjust the volume
with the slider.
4) To mute the sound, click the speaker symbol located directly
beneath the slider. Proceed in the same way to unmute
the sound.
To mute and unmute the sound, the button MUTE on the re-
mote control may be used as well. Please note that the volume
control (slider) must not be shown.
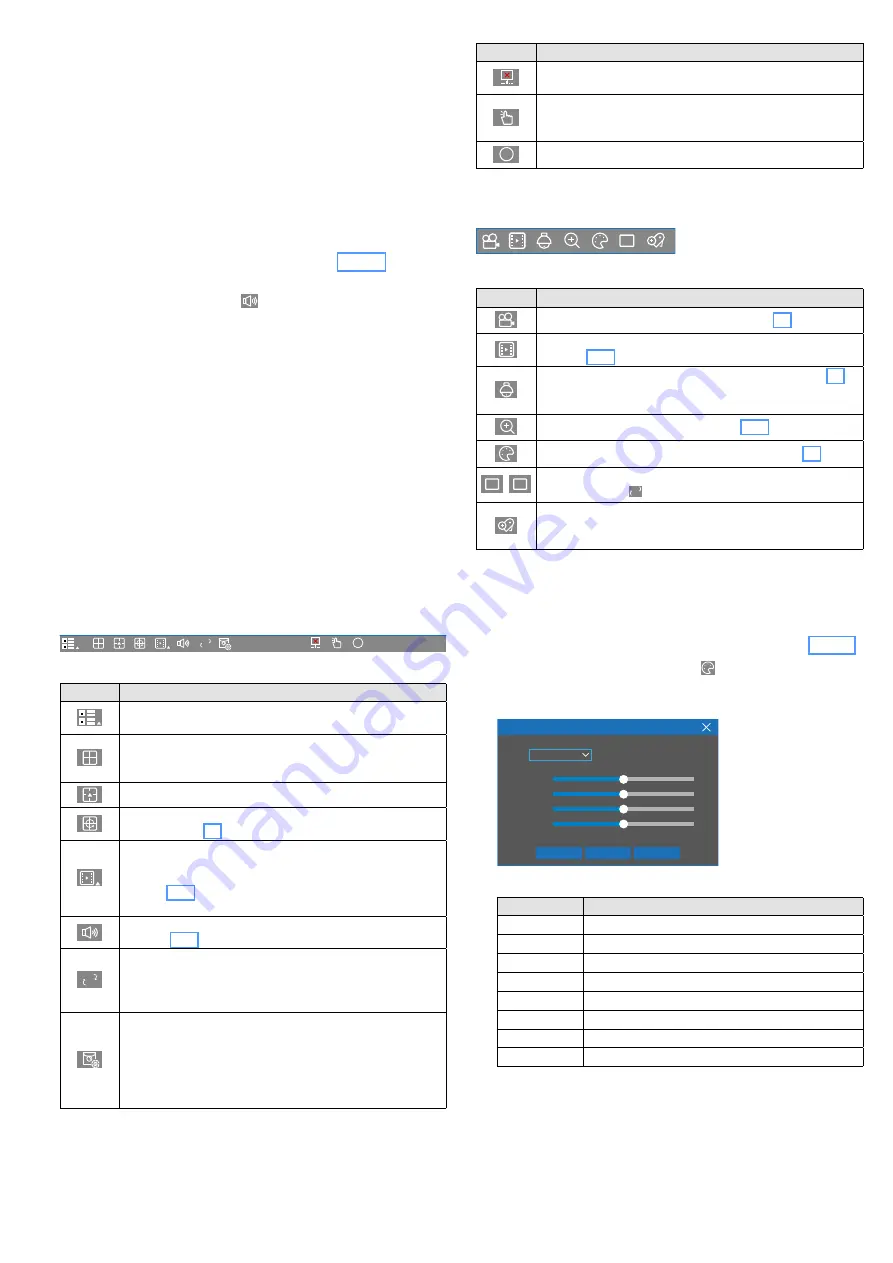
7.4 Operating bars – fast access to settings,
functions and information
For fast access to the setting menus and the most important
functions, the toolbar (click the right mouse button to show
it) is available; for each camera, the quick-access bar (click the
desired camera image with the left mouse button) is provided.
HD
SD
i
09/15/2019 14:27:38
Fig. 7-8
Toolbar
Symbol Function
HD
SD
i
15/09/2019 14:27:38
To call up the start menu for user change, search function,
settings, locking / unlocking, switch-off / restart
HD
SD
i
15/09/2019 14:27:38
View with four camera images
Depending on the recorder model, additional symbols for
further multi-image layouts are available.
HD
SD
i
15/09/2019 14:27:38
View with camera images of different size
HD
SD
i
15/09/2019 14:27:38
To start the sequence of all camera images in full-screen
HD
SD
i
15/09/2019 14:27:38
To replay the most recent 5 sec., 10 sec., 30 sec., 1 min. or
5 min. of the current recording (to select the time, click
)
or to replay the recording from its beginning (click
)
; see
chapter 7.7.2.
To return to live surveillance, press the right mouse button.
HD
SD
i
15/09/2019 14:27:38
To adjust the volume, to mute / unmute the sound
HD
SD
i
15/09/2019 14:27:38
Stream switch for IP cameras
(only relevant for live surveillance):
“Mainstream” = high resolution, high data volume
“Substream” = lower resolution, lower data volume
HD
SD
i
15/09/2019 14:27:38
The “Preview Policy” defines the priorities to be applied
when system utilization has reached 100%
Realtime = highest frame rate possible, lower image quality
Balanced = medium frame rate, medium image quality
Smooth = highest image quality possible, fewer frames per
second
Symbol Function
HD
SD
i
15/09/2019 14:27:38
This symbol will appear when the recorder is not connected
to a network.
HD
SD
i
15/09/2019 14:27:38
To show a window for manual recordings; to start record-
ing, click the symbol
⃠
of the channel desired; to stop
recording, click
✔
.
HD
SD
i
15/09/2019 14:27:38
To show different types of information
HD
Fig. 7-9
Quick-selection bar with functions for each camera image
Symbol Function
HD
To start or stop recording manually (chapter 7.6)
HD
To replay the 5 minutes most recently recorded
(chapter 7.7.1)
HD
To call up the control menu for a PTZ camera (chapter 7.8)
This symbol will only be shown when a PTZ camera is
available
HD
To magnify an image section (chapter 7.3.1)
HD
To adjust colour, brightness and contrast (chapter 7.5)
HD
SD
To switch between “Mainstream” (HD) and “Substream” (SD)
(also see symbol
HD
SD
i
15/09/2019 14:27:38
in the toolbar)
HD
Add a tag at the current position of the recording so that it
will be easier to search for specific recordings (start menu
Search
Tag)
7.5 Adjusting colour, brightness, contrast
1) Use the left mouse button to click the live image to be
adjusted. (In the single-image mode, simply press the left
mouse button.) The quick-selection bar will appear (Fig. 7-9).
2) Click the colour palette symbol
HD
. The live image will be
displayed in the single-image mode and the menu for the
image settings will appear:
CH2
128
128
128
128
Color Settings
Channel
HUE
BRIGHT
CONTRAST
SATURATION
Cancel
Save
Default
Fig. 7-10
Menu for the image settings
Menu item
Function
Channel
To switch to a different camera channel
HUE
To adjust the hue
BRIGHT
To adjust the brightness
CONTRAST
To adjust the contrast
SATURATION
To adjust the saturation
Default
To reset this menu to its factory settings
Save
To save the settings
Cancel
To cancel the setting
3) To go back to the previous view after the menu has been
exited, double-click with the left mouse button.


