39
English
6.5 Information in the camera images
In each camera image, the channel number (CH..) is shown
in the upper left. In addition, a designation (e. g. “Entrance”,
“Checkout Area”) and the recording time (see chapter 6.6.2)
can be shown.
The status is indicated in the upper right of the camera image.
•
= recording; the image is being recorded on the hard disk.
= motion; a motion has been detected in the image
S
= the intelligent analysis feature has detected a specific
situation in the camera image (chapter 6.6.10)
= an alarm sensor connected to the contacts SENSOR (12)
or ALARM IN (17) has reported an alarm to the recorder
If there is no signal from the camera, “No Camera” will be
shown in the window for the camera image.
6.6 Tile menu to call up the setting menus
For further settings or if the setup wizard has not been used,
all setup menus can be called up via the tile menu.
Channel
Channel | Live |
Image Control | PTZ |
Video Cover | Motion
PIR | Deterrence |
Intelligent |
Record
Encode | Record |
Alarm
M
otion | PIR | I/O |
Intelligent |
PTZ Linkage |
Exception |
Alarm Schedule |
Network
General | DDNS |
Email | IP FILTER |
Device
Disk | Cloud |
System
General | Multi-User |
Maintenance |
IP Camera Maintain |
Information |
Fig. 6-13
Tile menu
1) To call up the tile menu, show the toolbar.
HD
SD
i
09/15/2019 14:27:38
For this, either click the right mouse button or move the
mouse pointer to the lower edge of the screen.
2) To call up the start menu, click the first symbol to the
left
HD
SD
i
15/09/2019 14:27:38
.
admin
Search
Setup
Unlock
Shutdown
Fig. 6-14
Start menu
3) Click “Setup”: The tile menu will be shown.
4) To call up a setting menu, click the corresponding menu
item in the tile menu.
5) Use the right mouse button any time to return to the pre-
vious menu level.
6) According to the factory settings, the menus will be ex-
ited automatically one minute after the last click (this can
be changed via the tile “System”, menu item “General”,
chapter 6.6.1); alternatively, the menu can also be exited
by a click on
×
in the upper right corner.
6.6.1 General settings: device name, language,
menu display time, time, etc.
Call up the tile menu and then, in the tile “System”, click the
menu item “General”.
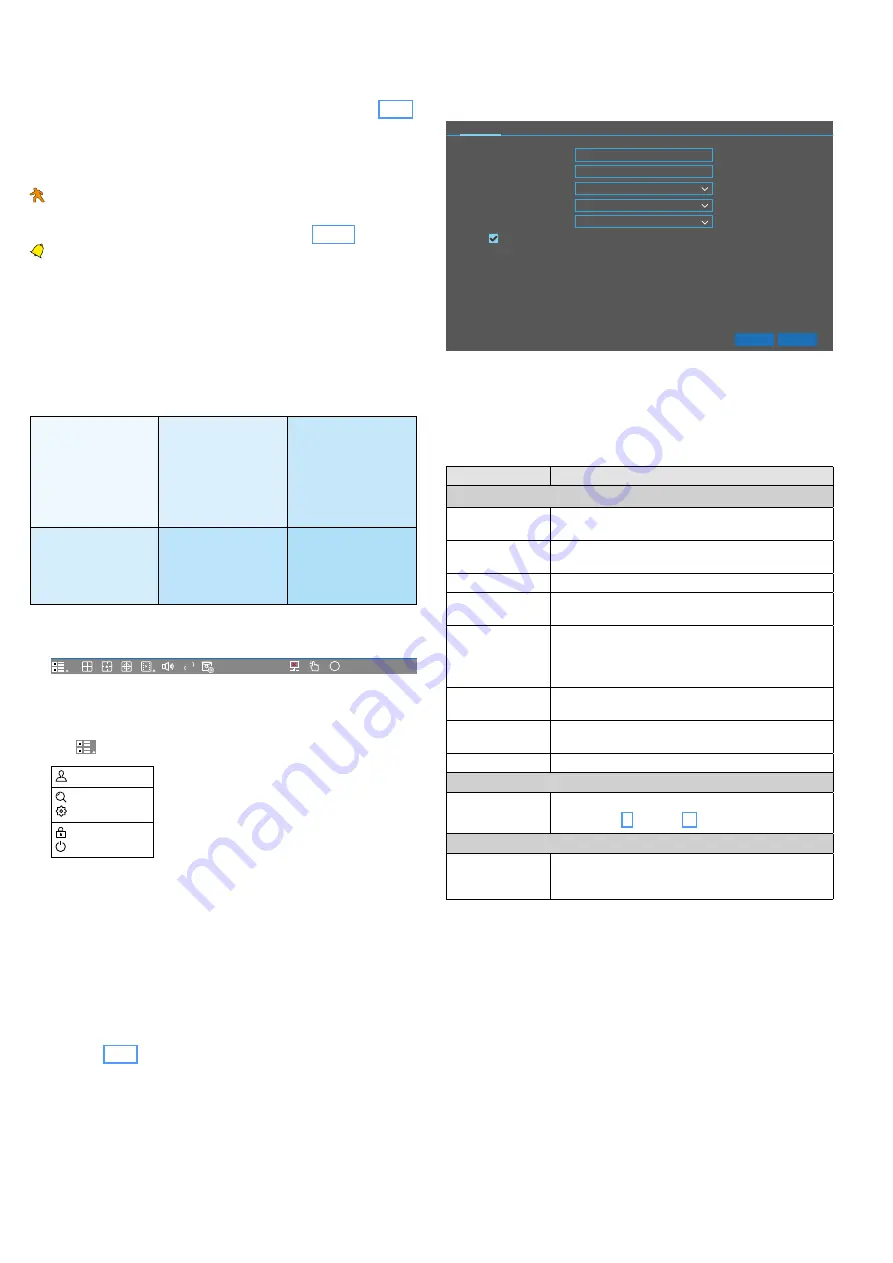
NWR-801POE
000000
PAL
Default
Apply
General
Date and Time Output Configuration
Device Name
Device ID
ENGLISH
Language
Video Format
1MIN
Menu Timeouts
Show wizard
Fig. 6-15
General settings
The submenus “General”, “Date and Time” and “Output
Configuration” are available. The name of the submenu cur-
rently called up is underlined and shown in turquoise. To go to
a different submenu, click the name of the submenu.
Menu item
Function
General
Device Name
Here, a different name can be entered so that it is
easier to identify multiple recorders by their name.
Device ID
You can enter your own identification number in
the line “Device ID”.
Language
Menu language
Video Format
Colour format of the analog cameras connected:
PAL (Europe) or NTSC (USA, Asia)
Menu Timeouts
30 s … 10 Min, OFF; the menus will be exited after
the last click according to the settings made here.
When the setting OFF is selected, the menus can be
exited by means of the right mouse button.
Show wizard
Select this option to show the setup wizard when
the recorder is switched on or restarted.
Default
Click this button to reset this menu to its factory
settings (except language and mode)
Apply
To save the settings
Date and Time
Date
…
Time Zone
The corresponding settings are described in chap-
ter 6.3, step 3) on page 36
Output Configuration
Video Output
SEQ Dwell Time
…
Here, various settings for the live surveillance view
can be made


