background image

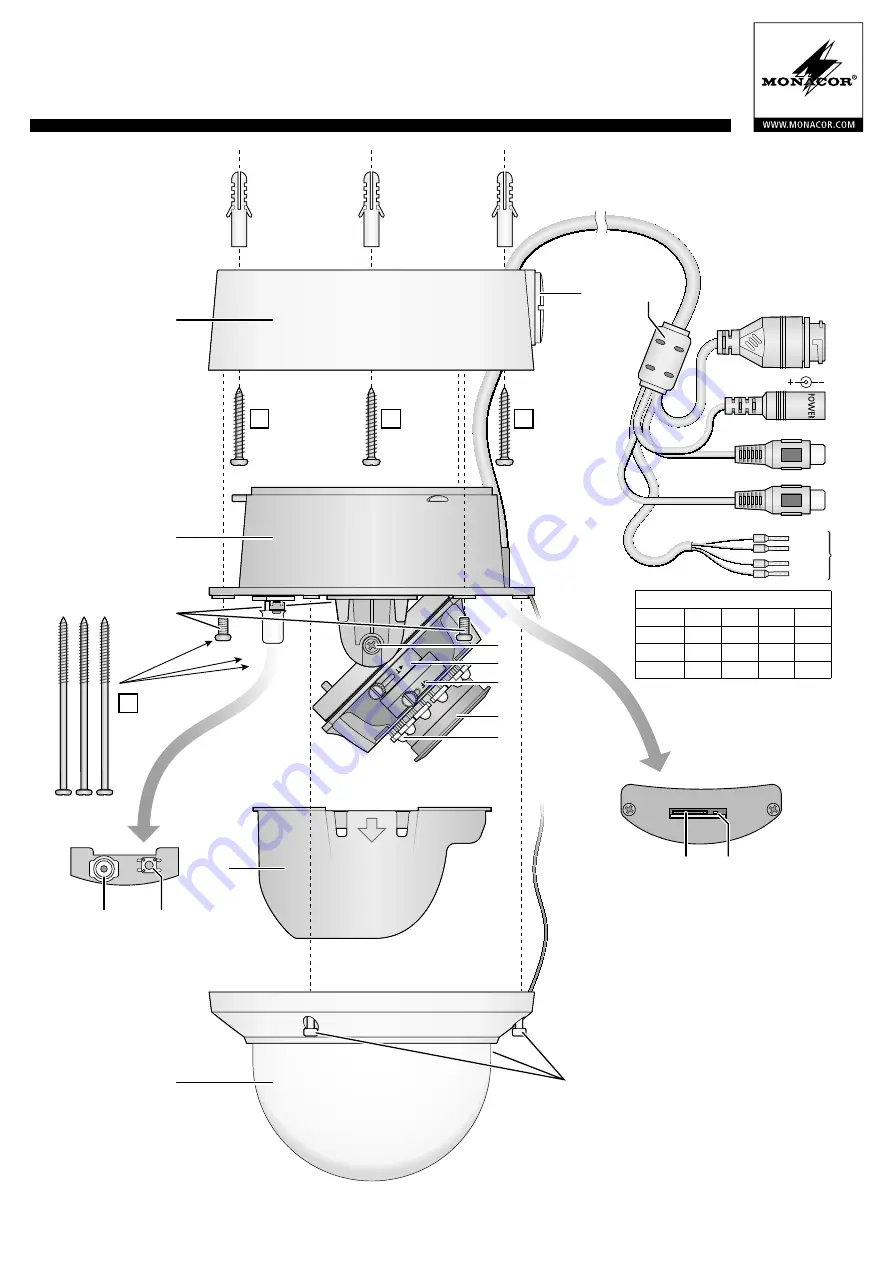
12V

LAN

Audio Input

Audio Output

Alarm

IN0

COM0
OUT1

COM1

Reset

VIDEO

OUT

9

8

1

5

6

4

2

3

7

10

A

B

A

A

11

12

13

14

15

18
19

20
21

16

17

22

ELECTRONICS FOR SPECIALISTS    ELECTRONICS FOR SPECIALISTS    ELECTRONICS FOR SPECIALISTS    ELECTRONICS FOR SPECIALISTS    ELECTRONICS FOR SPECIALISTS    ELECTRONICS

INC-2812DV


Bestellnummer • Order Number • Référence numérique • Codice 18.4730

Alarm

IN 0

gelb

yellow jaune

giallo

COM 0

orange orange orange arancio

OUT 1

grau

grey

gris

grigio

COM 1

violett purple violet

violetto

Содержание 18.4730

Страница 1: ...ICS FOR SPECIALISTS ELECTRONICS FOR SPECIALISTS ELECTRONICS FOR SPECIALISTS ELECTRONICS FOR SPECIALISTS ELECTRONICS FOR SPECIALISTS ELECTRONICS INC 2812DV Bestellnummer Order Number Référence numérique Codice 18 4730 Alarm IN0 gelb yellow jaune giallo COM0 orange orange orange arancio OUT1 grau grey gris grigio COM1 violett purple violet violetto ...

Страница 2: ... 99 01 08 2017 i i f e a g h b c d f e a g h b c d INC 2812DV Bestellnummer Order Number Référence numérique Codice 18 4730 ELECTRONICS FOR SPECIALISTS ELECTRONICS FOR SPECIALISTS ELECTRONICS FOR SPECIALISTS ELECTRONICS FOR SPECIALISTS ELECTRONICS FOR SPECIALISTS ELECTRONICS FOR SPECIALISTS ELECTRONICS Login Deutsch Login English ...

Страница 3: ...ntfernen damit das Kabel durch die Öffnung geführt werden kann 3 Die drei Schrauben 22 der Kuppel lösen und die Kuppel 7 entfernen VORSICHT Berühren Sie die Objektivlinse nicht mit den Fingern und verwenden Sie zum Säubern der Linse nur Mittel speziell für optische Linsen 4 Die drei Schrauben 3 mit denen der Kamera einsatz 2 am Sockel 1 befestigt ist herausdre hen 5 Variante 🄰 I Den Kameraeinsatz ...

Страница 4: ...te auf das Kamera bild zeigt folgendes Menü Menüpunkt Funktion Vollbild schließen Vollbildansicht beenden alternativ Doppelklick auf das Bild Sensor Einstellungen speichern wie Zoom In Out Hinein Herauszoomen alternativ mit Mausrad zoomen oder über dem gewünschten Bildausschnitt einen Rahmen aufziehen Panorama beenden gesamtes Bild zeigen nach Zoom In Zum Ändern der Einstellungen für die Kamera üb...

Страница 5: ... 2 to the base 1 5 Option 🄰 I Turn the camera insert 2 counter clockwise by approx 5 and remove it from the base 1 II Use the three 🄰 screws and the dowels pro vided if required to fasten the base to the mounting location III Guide the cable through the hole in the mounting surface or through the cable inlet 8 on the side IV Place the camera insert into the base and turn clockwise until it latches...

Страница 6: ... will be displayed The following options are available a View Live Video with display of camera image b View Playback to replay the recordings from the camera c View Configuration to change the camera set tings d Button to change the password e Button to log out f Camera image with information on the stream currently transmitted g Click this line to switch between use of Flash Play er and ActiveX ...

Страница 7: ...B sur le gabarit Si le câble ne doit pas passer par la surface de montage mais sortir du socle sur le côté retirez la vis 8 avec la clé livrée pour que le câble puisse passer via l ouverture 3 Desserrez les trois vis 22 du dôme et retirez le dôme 7 ATTENTION Ne touchez pas la lentille de l ob jectif avec les doigts pour nettoyer la lentille utilisez uniquement des produits spécifiques pour les len...

Страница 8: ... le message Modify success s affiche 6 La liste peut être effacée avant une nouvelle re cherche via le bouton Clear All 6 Appeler une caméra via un ordinateur L interface utilisateur de la caméra peut être appelée en saisissant son adresse IP dans la barre d adresse du programme Windows Internet Explorer IE Version 6 ou supérieur Pour ce faire il faut que les adresses IP de l ordinateur et de la c...

Страница 9: ... A o B Se il cavo non deve uscire dal piano di montag gio ma da un lato dello zoccolo togliere la vite 8 usando la chiave in dotazione e far passare il cavo attraverso quest apertura 3 Allentare le tre viti 22 della cupola e togliere la cupola 7 ATTENZIONE Non toccare con le dita la lente dell obiettivo e per pulire la lente usare solo dei mezzi speciali per lenti ottiche 4 Svitare le tre viti 3 c...

Страница 10: ...c sull immagine Sensor come Zoom In Out Zoom in out In alternativa zoomare con il ruotino del mouse oppure trarre una cornice sul set tore richiesto dell immagine Restore Panorama Mostrare l immagine intera dopo zoom In Per modificare le impostazioni per la telecamera tra mite il cavalierino c passare alla vista Configura tion Fig 4 Sul bordo sinistro i selezionare la rubrica desiderata per le imp...

Отзывы: