


FR-D2102
Ultra Germicidal Smart Fan Instructions
12
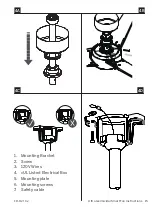
2. Installing the Mounting Bracket
Remember to disconnect the power at the circuit breaker.
1. Remove 1 of 2 screws from the bottom of the mounting bracket
and save for use in section 11. Loosen the other screw (Fig. 2).
2. Pass the 120-volt supply wires through the center hole in the
mounting bracket as shown (Fig. 2A).
3. Secure the mounting bracket to the ceiling outlet box with the
screws and washers provided with your outlet box.
NOTE: Make sure that mounting screws are tight.
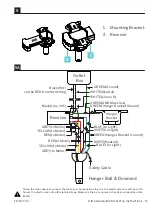
1. Take out the screw located in the hanger ball, lower the hanger
ball and remove the cross pin. Remove the hanger ball from the
hanger ball/downrod assembly. (Fig. 4) You may use the optional
6-inch rod if you prefer. The 10-inch rod is optimal for airflow
production and replacing the UV module in the future.
2. Remove the clevis pin and cotter pin and loosen the two collar
screws from the motor collar.
3. Feed motor wires and safety cable through coupling cover,
canopy ring, and canopy. (Fig 4A)
4. Carefully feed the motor wires and safety cable up through the
downrod. Thread the downrod assembly onto motor collar.
(Fig 4B)
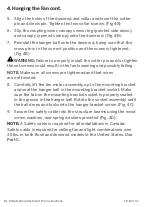
4. Hanging the Fan
1. Secure blade with blade attachment screws and washers.
(Fig. 3)
Use part B.
2. Repeat this procedure with the remaining blades.
3. You are ready to hang the fan - the UV Tray/Module comes
pre-assembled to the motor housing. Ref. Part No. 5A/5B.
3. Attaching the Fan Blade


