13-5
Chapter 13 ADJUSTMENT AND OPERATION
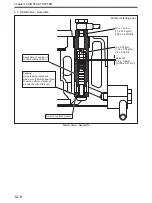
1.4.5 Priming Pump Cap - Lock
(1)
Gently tighten the priming cap by hand until the tight-
ening force suddenly increases. Then, mark the priming
pump cap in this position.
(2)
Using a wrench, further tighten the priming pump cap
by 90 ± 10° from the mark position.
(3)
Check the mounting condition of head packing. If any
defects such as deformation or dent are found, replace
the priming pump with a new one.
Priming Pump Cap - Lock
Priming Pump Cap Packing
If the priming pump cap is not locked sufficiently, the
screw in cap wears due to engine vibration, which can
result in the priming pump cap to pop-off and fuel to
leak.
If it is over-tightened, the head of priming pump can be
damaged. Make sure to tighten the cap to the correct
angle.
Check the head packing of priming pump for deforma-
tion and damage.If any deformation or damage is
found, replace the priming pump with a new one.
Priming pump
When over tightened
(120° or more),
damage of head or
packing can results.
90 ± 10°
Gently tighten
the priming cap
by hand until
the tightening
force suddenly
increases.
Head packing
Содержание S12A2
Страница 1: ...SERVICE MANUAL September 2010 Pub No 99269 20170 199269 20170 ...
Страница 2: ......
Страница 16: ......
Страница 20: ......
Страница 42: ......
Страница 44: ......
Страница 68: ......
Страница 69: ...3 1 Chapter 3 SERVICE TOOLS 1 Special Tools 3 3 ...
Страница 70: ......
Страница 77: ...4 1 Chapter 4 OVERHAUL INSTRUCTIONS 1 Determining Overhaul Timing 4 3 2 Compression Pressure Measure 4 4 ...
Страница 78: ......
Страница 82: ......
Страница 136: ......
Страница 174: ......
Страница 218: ......
Страница 220: ......
Страница 242: ......
Страница 244: ......
Страница 294: ......
Страница 310: ......
Страница 320: ......
Страница 322: ......
Страница 334: ......
Страница 354: ......

