−43−
−42−
3
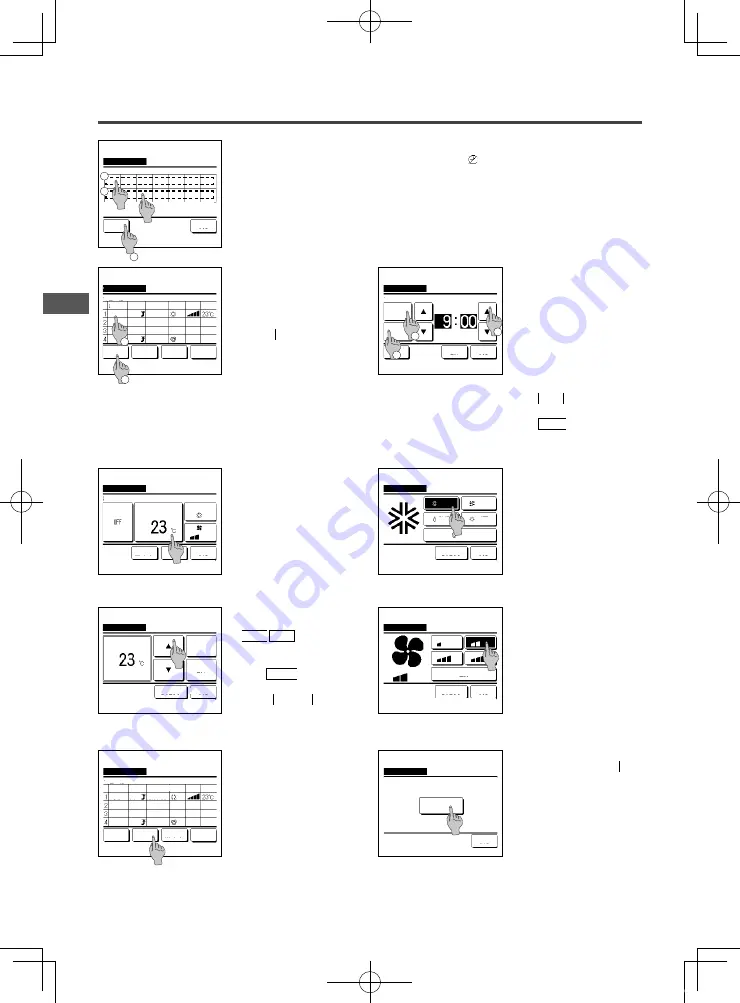
When a desired day of the week
①
is tapped on the display, contents of current setting for the day are displayed. (
☞
5
)
4
For the holiday setting, tap the block
②
under the day to switch between “ ” (the holiday setting) and “(Blank)” (reset).
Timer does not operate on the day set as holiday.
Two or more holidays can be set.
■
To enable the timer on the day set as holiday, it is necessary to reset the holiday setting.
When tapping
③
“All Disable” button, the timer does not operate on all days of the week.
When the timer is used, be sure not to set “All Disable".
5
Screen to check contents of current
setting is displayed.
When the contents are changed or
new setting is added, select a
①
setting line No. and tap the
②
Change button.
2
Weekly timer
Select the day of the week.
Invalid Setting:Tap box below day of week.
If invalid is selected, timer won't start
Back
All Disable
Mon Tue Wed Thu
Fri
Sat Sun
3
1
6
Detail setting screen for the timer
setting contents is displayed.
①
Tap the State button to switch
between “State Enable” and
“State Disable”.
②
Tap the Type button to switch
between the “OFF timer” and the
“ON timer”.
③
Select a desired time (at 5-min
intervals) with the
▲
▼
buttons.
④
In case of “ON timer” when the
Next button is tapped,
operating conditions at the start
of operation can be set. (
☞
7
)
Select a line & tap [Change].
Change
Weekdays
Weekly timer
State
Enable
Enable
Enable
Enable
Type Time
Enter
Back
Next
ON
ON
ON
OFF
Mode Fan Temp
Auto
Auto
1
2
11:00 AM
0:00 AM
0:00 AM
0:00 AM
Weekly timer
Set
Back
State
Enable
Tap
▲▼
to set clock time & tap [Set].
Weekdays:No.1
Next
Type
ON
3
1
2
AM
7
Set the following operating conditions.
①
Warming up ON/OFF
(Operation starts 5 to 60 minutes
earlier in order to warm up the room
temperature closed to the set temp
at the set start time of operation.)
②
Operation mode …
☞
8
③
Set temp
…
☞
9
④
Fan speed
…
☞
1 0
■
Set the operation mode before setting the
set temperature.
9
Select a desired temperature (at 1°C
intervals) with the
▲
▼
buttons. Or tap the
Auto button to select the Auto temp
setting.
Tap the Set button after the
selection. (
☞
7
)
When the No setting button is
tapped, “--
°C” is displayed, and it
starts operation at the last setting
temperature.
8
Tap a desired operation mode.
When the No setting button is
tapped, it operates with the same
operation mode at the last action. (
☞
7
)
Weekly timer
No setting
Back
Tap
▲▼
to set temp & tap [Set].
Auto
Set
Cooling
Weekly timer
Set
Back
Set temp
Select the item to change.
Details
Previous
Warming up
Cooling
Weekly timer
No setting
Back
Please select operation mode.
Fan
Heating
Dry
Auto
10
Tap a desired fan speed.
When the No setting button is
tapped, starts operation at the last
fan speed. (
☞
7
)
11
After setting desired contents at the
screen of
7
, tap the Set button.
12
Display the setting contents check
screen. To register the setting, tap
the Enter button.
(1) In case of group setting (2-
①
Weekdays, 2-
②
Sat/Sun, 2-
③
All
days setting), move to the group
setting screen. (
☞
1 3
)
(2) In case of the individual setting
(2-
④
Each day setting), save the
setting and move to a day of the
week selection screen. (
☞
3
)
13
Display the group setting
acknowledge screen. Tap the Yes
button and save the setting.
The display changes to a day of the
week setting check screen after
saving. (
☞
3
)
When making the setting after
changing a day of the week, repeat
the setting from the step
3
.
Weekly timer
No setting
Back
Select the fan speed.
Auto
Weekly timer
Yes
Back
Do you want to apply group setting?
Select a line & tap [Change].
Change
Weekdays
Weekly timer
State
Enable
Enable
Enable
Enable
Type Time
Enter
Back
Next
ON
ON
ON
OFF
Mode Fan Temp
Auto
Auto
11:00 AM
0:00 AM
0:00 AM
0:00 AM
PJZ012A172_EN.indd 42
2018/05/09 15:04:30
Содержание eco touch RC-EXC3A
Страница 2: ...PJZ012A172_H1 indd 2 2018 04 20 15 32 50 ...
Страница 49: ...PJZ012A172_H4 indd 45 2018 04 26 18 01 22 ...


