


7
(6)
Select the DTV 720P signal for the input video signal. Confirm that the screen position is uniformly
arranged to the top, bottom, right, and left.
If the screen position is found to be unevenly arranged, make adjustments according to the “method of
screen position adjustment” shown below. (The screen size is
STANDARD
only.)
(7)
Select the DTV 480P signal for the input video signal and change over the screen size in the sequential
order of
[STRETCHED ZOOM NARROW STANDARD]
. Confirm in each screen that the screen position is
uniformly arranged to the top, bottom, right, and left. If the screen position is found to be unevenly
arranged, make adjustments according to the “method of screen position adjustment” shown below.
[Method of screen position adjustment]
(1)
Enter the factory setting mode by means of the remote control.
(2)
In the [POSITION] screen ([POSITION] mode for initial setting), make the following setting:
(3)
Press the
FORMAT
key of the remote control in order to select the N
ARROW
mode.
(4)
When the display range of the PDP module is displaced, press the cursor keys [ ] and [V] of the remote
control to select [MHPOS] and [MVPOS], and make adjustments by pressing the cursor keys [<] and [>].
(5)
Press the cursor keys [ ] and [V] to select [H POS].
(6)
Press the cursor keys [<] and [>] to adjust the screen position so that the screen can be arranged evenly
to the right and left.
(7)
Press the cursor keys [ ] and [V] to select [V POS].
(8)
Press the cursor keys [<] and [>] to adjust the screen position so that the screen can be arranged evenly
to the top and bottom.
(9)
Confirm that [H PHA] is 0. Otherwise, adjust it to 0 by pressing the cursor keys [<] and [>].
(10) Confirm that [H CLK] is 0. Otherwise, adjust it to 0 by pressing the cursor keys [<] and [>].
(11) In the same manner, press the [
FORMAT
] key to select the screen mode. (According to the signal type, the
screen mode varies as shown below.) In each case, make adjustments so that the screen position is
uniformly arranged to the top, bottom, right, and left. Confirm that both [H PHA] and [H CLK] are set at 0.
Otherwise, press the cursor keys [<] and [>] in order to adjust both to zero.
• 480 i, 576 i, 480P, 576P
[N
ARROW
→
STANDARD
→
ST
RETCHED
→
ZOOM
→
U-SCAN]
• 1080 i, 1035 i, 720P
[
STANDARD
→
U-SCAN]
(12) Withdraw the factory setting mode.
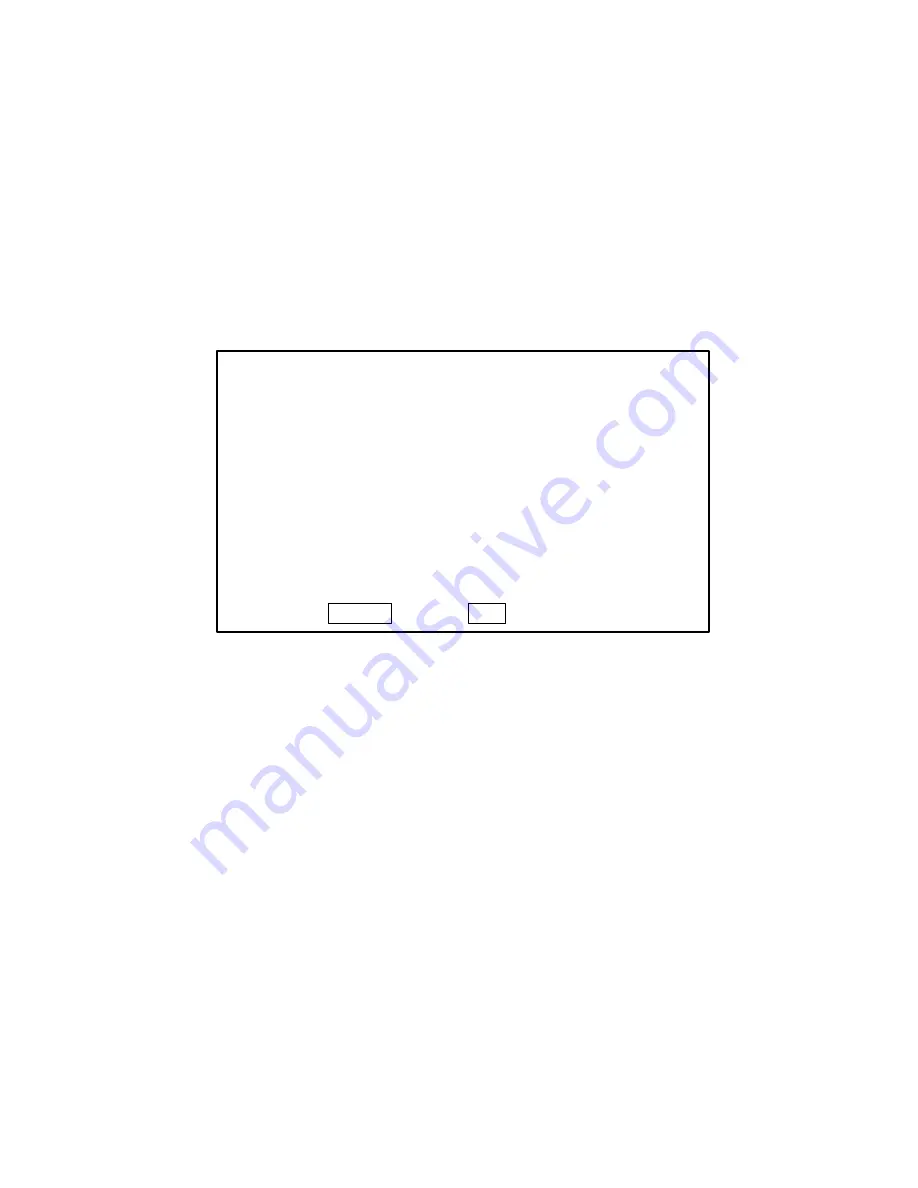
V
V
V
POSITION
COMP N
S T A N D A R D
Ver. DXXX
H POS
0
H PHA
0
V POS
0
H CLK
0
MHPOS 160
H DS
1080B
MVPOS
10
RGBS
AUTO
SUS
ORG
CINEMA
ON
EXIT PREV
1/8
ENTER
NEXT
Содержание PD-5010
Страница 2: ......
Страница 11: ...TROUBLESHOOTING 3 1 ...
Страница 27: ...METHOD OF ADJUSTMENTS 4 1 ...
Страница 54: ...PACKAGING 6 1 ...
Страница 56: ...PLUG CABLE POWER CORD REM T HAND UNIT CABLE D SUB 15P L1800 ACCESSORY BOX BAG B 4 ACCESSORY BOX 2 BAG BAG C ...
Страница 58: ...4 BACK STOPPER TAPE PP BAND JOINT BAR CODE SERIAL LABEL ...
Страница 61: ...CONNECTION DIAGRAMS 8 1 ...
Страница 73: ...BLOCK DIAGRAMS 9 1 ...


