background image

5

4. Installing the refrigerant piping

A

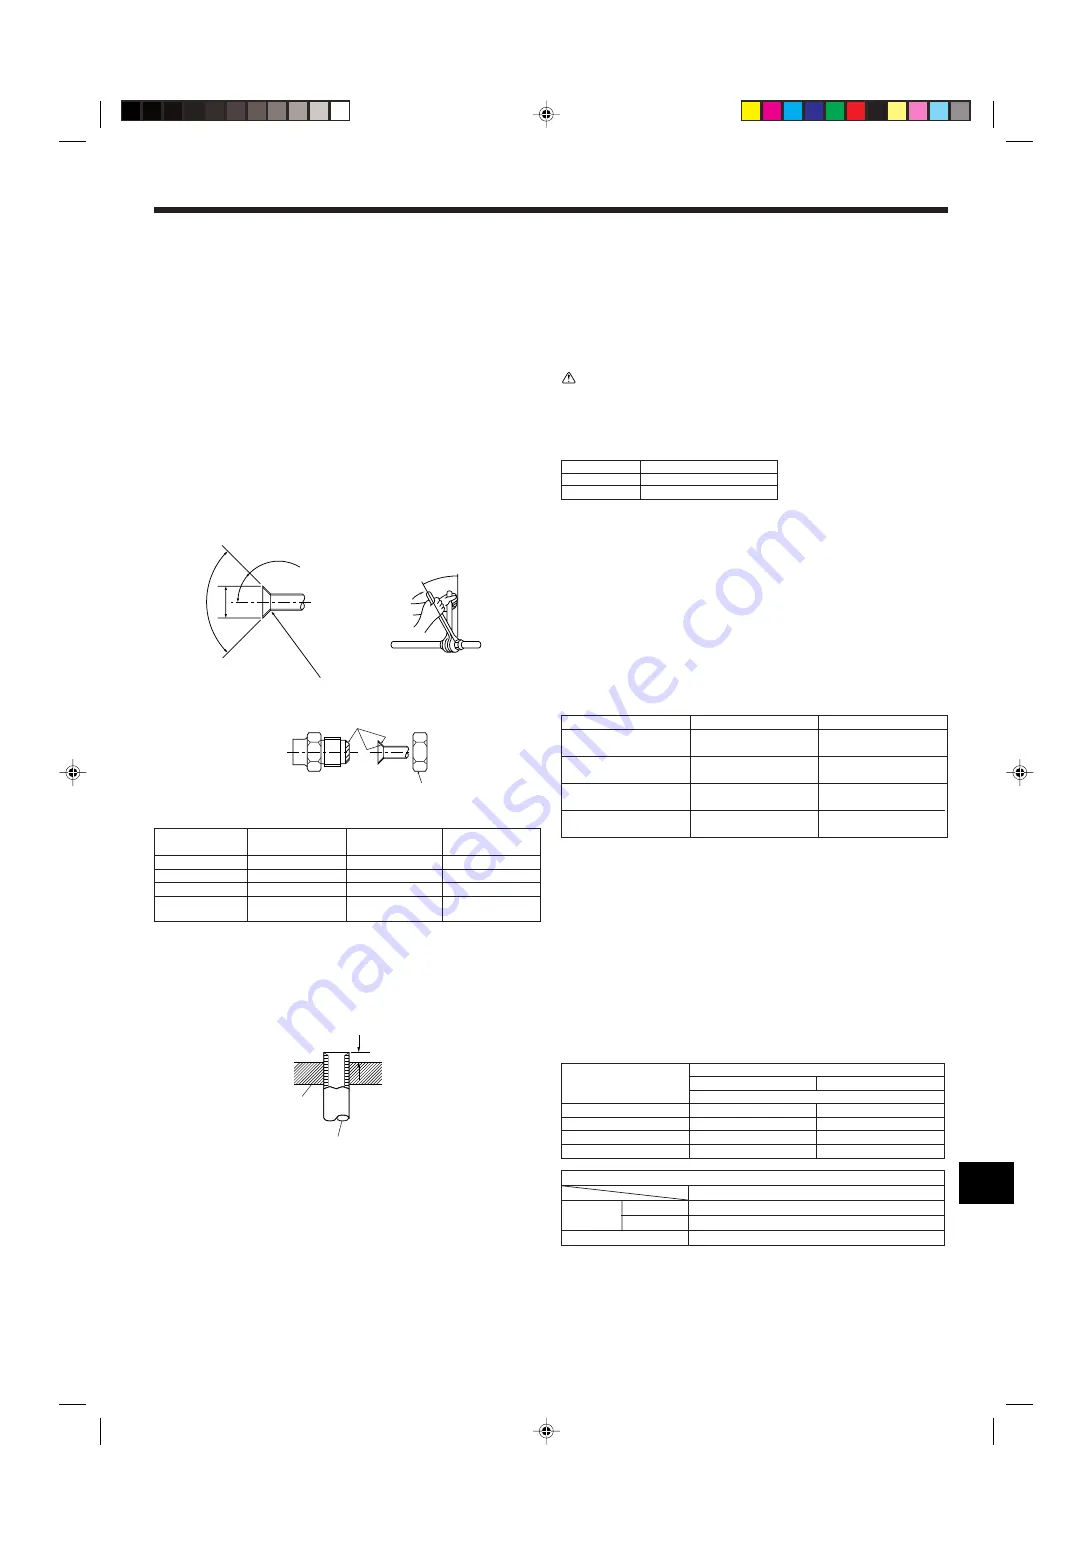
Flare cutting dimensions

B

Flare nut tightening torque

Copper pipe O.D.

Flare dimensions

Flare nut O.D.

Tightening torque

(mm)

 øA dimensions (mm)

(mm)

 (N·m)

ø6.35

8.7 - 9.1

17

14 - 18

ø9.52

12.8 - 13.2

22

34 - 42

ø12.7

16.2 - 16.6

26

49 - 61

ø15.88

19.3 - 19.7

36

69 - 82

100-120

90

°


±

0.5

°

ø

A

R0.4~R0.8

A

45

°±

2

°

B

C

D

* In case that the flare nut attached to indoor gas valve is used, gas leakage or even

pipe extraction will occur.

• When bending the pipes, be careful not to break them. Bend radii of 100 mm to 150

mm are sufficient.

• Make sure the pipes do not contact the compressor. Abnormal noise or vibration

may result.

1

 Pipes must be connected starting from the indoor unit.

Flare nuts must be tightened with a torque wrench.

2

 Flare the liquid pipes and gas pipes and apply a thin layer of refrigeration oil

(Applied on site).

• When usual pipe sealing is used, refer to Table 1 for flaring of R410A refrigerant

pipes.
The size adjustment gauge can be used to confirm A measurements.

Indoor unit (Liquid)

Indoor unit (Gas)

Outdoor unit (Liquid)

Outdoor unit (Gas)

RP3

Flare nut attached to
indoor liquid valve
Flare nut attached to
indoor gas valve
Flare nut attached to
outdoor liquid valve
Flare nut attached to
outdoor gas valve

RP4-6

Flare nut attached to
indoor liquid valve
* Flare nut in outdoor

unit accessories

Flare nut attached to
outdoor liquid valve
Flare nut attached to
outdoor gas valve

Copper pipe O.D.

A (mm)

(mm)

Flare tool for R410A

Flare tool for R22·R407C

Clutch type

ø6.35 (1/4")

0 - 0.5

1.0 - 1.5

ø9.52 (3/8")

0 - 0.5

1.0 - 1.5

ø12.7 (1/2")

0 - 0.5

1.0 - 1.5

ø15.88 (5/8")

0 - 0.5

1.0 - 1.5

Refrigerant
piping

A

 Die

B

 Copper pipe

Refrigerant and Drainage Piping Sizes

Item

Model

RP3-6

Liquid

ODø9.52 (3/8")

Gas

ODø15.88 (5/8")

Drainage piping

PVC ODø32 (1-1/4")

Table 1 (Fig. 4-2)

Fig. 4-1

A

A

B

Fig. 4-2

4.1. Precautions for devices that use R410A refrigerant

• Refer to page 3 for precautions not included below on using air conditioners

with R410A refrigerant.

• Use ester oil, ether oil, alkylbenzene oil (small amount) as the refrigeration oil

applied to the flared sections.

• Use C1220 copper phosphorus, for copper and copper alloy seamless pipes,

to connect the refrigerant pipes. Use refrigerant pipes with the thicknesses
specified in the table to the below. Make sure the insides of the pipes are
clean and do not contain any harmful contaminants such as sulfuric com-
pounds, oxidants, debris, or dust.

 Warning:

When installing or moving the air conditioner, use only the specified refriger-
ant (R410A) to charge the refrigerant lines. Do not mix it with any other refriger-
ant and do not allow air to remain in the lines. Air enclosed in the lines can
cause pressure peaks resulting in a rupture and other hazards.

RP3-6

Liquid pipe

ø9.52 thickness 0.8 mm

Gas pipe

ø15.88 thickness 1.0 mm

• Do not use pipes thinner than those specified above.

4.2. Connecting pipes (Fig. 4-1)

• When commercially available copper pipes are used, wrap liquid and gas pipes

with commercially available insulation materials (heat-resistant to 100 °C or more,
thickness of 12 mm or more).

• The indoor parts of the drain pipe should be wrapped with polyethylene foam insu-

lation materials (specific gravity of 0.03, thickness of 9 mm or more).

• Apply thin layer of refrigerant oil to pipe and joint seating surface before tightening

flare nut. 

A

• Use two wrenches to tighten piping connections. 

B

• Use leak detector or soapy water to check for gas leaks after connections are com-

pleted.

• Apply refrigerating machine oil over the entire flare seat surface. 

C

• Use the flare nuts as follows. 

D

Table 1 (Fig. 4-1)

Содержание Mr.Slim PUNZ-RP-HA-A

Страница 1: ...Air Conditioners PUHZ RP HA A English INSTALLATION MANUAL For safe and correct use please read this installation manual thoroughly before installing the air conditioner unit FOR INSTALLER ...

Страница 2: ...ant pipes If the pipes are not connected correctly the unit will not be properly grounded and electric shock may result Use only specified cables for wiring The connections must be made securely without tension on the terminals If the cables are connected or installed in correctly overheating or fire may result The terminal block cover panel of the outdoor unit must be firmly attached If the cover...

Страница 3: ...e rioration or compressor breakdown may result Use ester oil ether oil alkylbenzene oil small amount as the refrigeration oil applied to the flared sections If mineral oil is mixed in the refrigeration oil oil deterioration may result Do not use refrigerant other than R410A refrigerant If another refrigerant is used the chlorine will cause the oil to deteriorate Use the following tools specificall...

Страница 4: ...nal air outlet guides for upward airflow 3 Obstacles at front only Fig 2 14 When using an optional air outlet guide the clearance for RP4 6 models is 1000 mm or more 4 Obstacles at front and rear only Fig 2 15 When using an optional air outlet guide the clearance for RP4 6 models is 1000 mm or more 5 Single parallel unit arrangement Fig 2 16 When using an optional air outlet guide installed for up...

Страница 5: ...Model RP3 6 Liquid ODø9 52 3 8 Gas ODø15 88 5 8 Drainage piping PVC ODø32 1 1 4 Table 1 Fig 4 2 Fig 4 1 A A B Fig 4 2 4 1 Precautions for devices that use R410A refrigerant Refer to page 3 for precautions not included below on using air conditioners with R410A refrigerant Use ester oil ether oil alkylbenzene oil small amount as the refrigeration oil applied to the flared sections Use C1220 copper ...

Страница 6: ... method 1 Gas side Fig 4 5 1 Remove the cap pull the handle toward you and rotate 1 4 turn in a counterclock wise direction to open 2 Make sure that the stop valve is open completely push in the handle and rotate the cap back to its original position 2 Liquid side Fig 4 6 1 Remove the cap and turn the valve rod counterclockwise as far as it will go with the use of a 4 mm hexagonal wrench Stop turn...

Страница 7: ...inutes do a pump down work Use a refrigerant collecting device to collect the refrigerant Check the oil condition when collecting the refrigerant Oil is clean Oil is dirty When the compressor bearings are glazed rotation scratches are present or the compressor breaks down iron particles or oil deterioration will blacken the oil Disconnect the existing air conditioner from the pipes Disconnect the ...

Страница 8: ... 1 0MΩ Ω Ω Ω Ω s Do not carry out this test on the control wiring low voltage circuit termi nals Warning Do not use the air conditioner if the insulation resistance is less than 1 0MΩ Ω Ω Ω Ω Insulation resistance After installation or after the power source to the unit has been cut for an extended period the insulation resistance will drop below 1 MΩ due to refrigerant accumulat ing in the compre...

Страница 9: ... down Perform the following procedures to collect the refrigerant when moving the indoor unit or the outdoor unit 1 Before collecting the refrigerant first make sure that the all of the SW5 DIP switches for function changes on the control board of the outdoor unit are set to OFF If all of the SW5 switches are not set to OFF record the settings and then set all of the switches to OFF Start collecti...

Страница 10: ......

Страница 11: ...0 1500 300 500 Max 500 200 300 1000 1500 300 500 1000 1500 Max 300 1000 1500 1000 1500 300 500 500 1000 400 600 1000 2000 100 150 1000 1500 500 800 150 1000 1500 400 600 2000 3000 300 500 Fig 2 6 Fig 2 7 Fig 2 8 Fig 2 9 Fig 2 10 Fig 2 11 Fig 2 12 Fig 2 13 Fig 2 14 Fig 2 15 Fig 2 16 Fig 2 17 Fig 2 18 ...

Страница 12: ... sure to put the contact address telephone number on this manual before handing it to the customer HEAD OFFICE MITSUBISHI DENKI BLDG 2 2 3 MARUNOUCHI CHIYODA KU TOKYO 100 8310 JAPAN Printed in Japan BG79U130H01 ...

Отзывы: