12
Customising Settings for Your Home
4
EN
Holiday Mode
Holiday mode can be used to keep the system running at lower flow temperatures
and thus reduced power usage whilst the property is unoccupied. Holiday mode
can run either flow temp., room temp., heating, compensation curve heating and
DHW all at reduced flow temperatures to save energy if the occupier is absent.
From the main menu screen press button E should be pressed. Be careful not to
hold down button E for too long as this will turn off the controller and system.
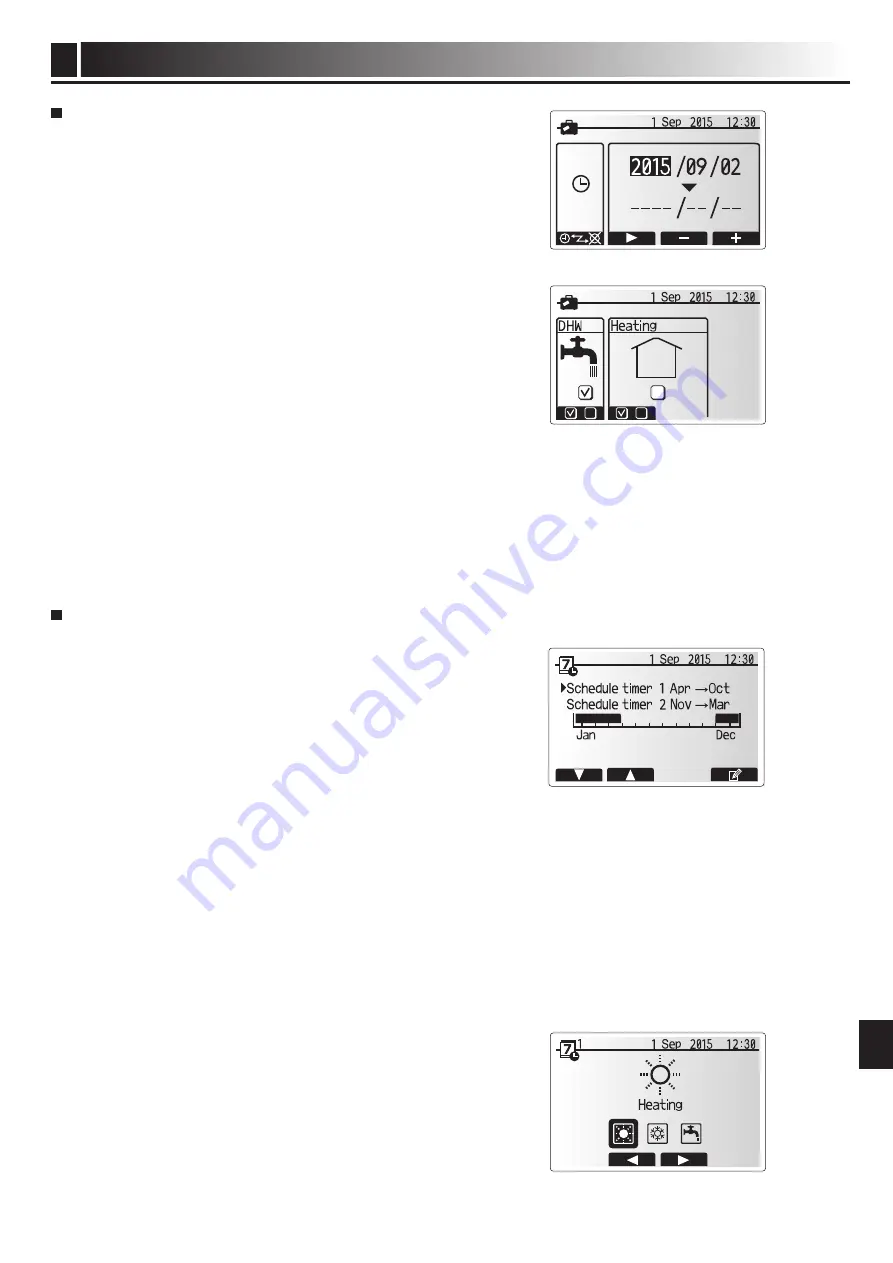
Once the holiday mode activation screen is displayed you can activate/deactivate
and select the duration that you would like holiday mode to run for.
●
Press button F1 to activate or deactivate holiday mode.
●
Use buttons F2, F3 and F4 to input the date which you would like holiday
mode to activate or deactivate holiday mode for space heating.
<Editing holiday mode>
Refer to the menu tree in “Main remote controller” of Installation Manual.
Should you require the Holiday mode settings e.g. the flow temp., room temp. to
be altered you should contact your installer.
Schedule timer
Scheduled timer can be set in two ways, for example; one for summer and the
other for winter. (Refer to as “Schedule 1” and “Schedule 2” respectively.) Once
the term (months) for the Schedule 2 is specified, rest of the term will be speci
-
fied as Schedule 1. In each Schedule, an operational pattern of modes (Heating/
Cooling/DHW) can be set. If no operational pattern is set for Schedule2, only the
pattern for Schedule 1 will be valid. If Schedule 2 is set to full-year (i.e. March to
Feb.), only the operational pattern for Schedule 2 will be valid.
The schedule timer is activated or deactivated in the option screen. (See
‘General Operation’ section)
<Setting the Schedule period>
1. From the main settings menu use F2 and F3 to highlight the schedule icon
then press CONFIRM.
2. The Schedule period preview screen is displayed.
3. To change the Schedule period, press F4. button.
4. The time bar edit screen is displayed.
5. Use F2/F3 button to point at a starting month of the Schedule2, then press
CONFIRM.
6. Use F2/F3 button to point at an ending month of the Schedule2, then press
CONFIRM.
7. Press F4 to save settings.
<Setting the Schedule timer>
1. From the main settings menu use F2 and F3 to highlight the schedule icon
then press CONFIRM.
2. From the schedule 2 period preview screen use F1 and F2 to scroll through the
selecting each subtitle in turn by pressing CONFIRM.
3. The schedule timer sub menu will be displayed. The icons show the following
modes;
• Heating
• Cooling
• DHW
4. Use F2 and F3 buttons to move between mode icons press CONFIRM to be
shown the PREVIEW screen for each mode.
The preview screen allows you to view the current settings. In 2-zone heating/
cooling operation, press F1 to switch between Zone1 and Zone2. Days of the
week are displayed across the top of the screen. Where day appears underlined
the settings are the same for all those days underlined.
Hours of the day and night are represented as a bar across the main part of the
screen. Where the bar is solid black, space heating/cooling and DHW (whichever
is selected) is allowed.
Schedule1 mode select screen
Schedule2 period preview screen
Содержание ecodan EHPT20X-MHCW
Страница 17: ...16 Notes EN ...


