background image

8

Customising Settings for Your Home

4

EN

Icon

Description

Hot water (DHW)

Heating/Cooling

Schedule timer

Holiday mode

Initial settings

Service

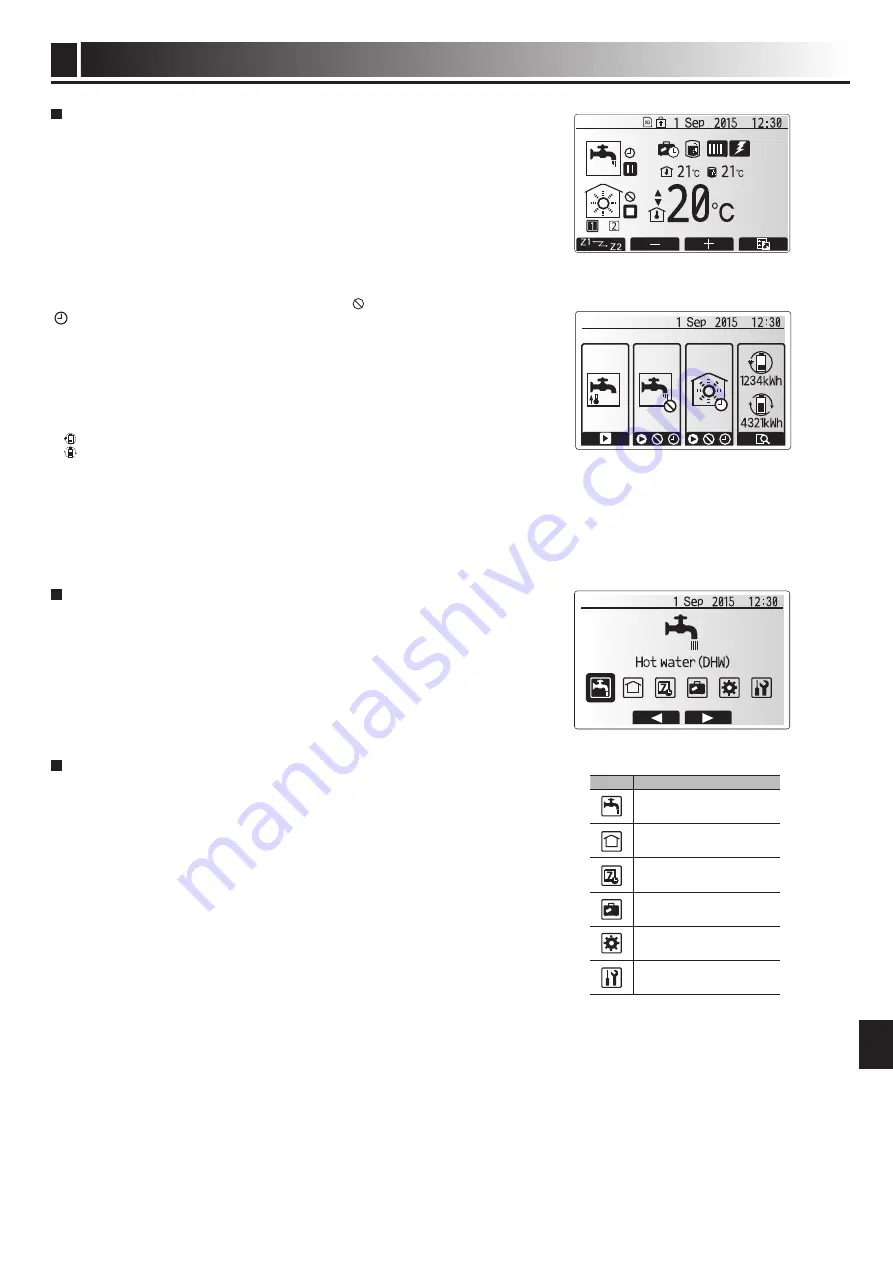
Home screen

Option screen

Main settings menu screen

General operation

In general operation the screen displayed on the main remote controller will be 

shown as in the figure on the right.

This screen shows the target temperature, space heating mode, DHW mode (if 

DHW tank is present in system), any additional heat sources being used, holiday 

mode, and the date and time.

You should use the function buttons to access more information. When this 

screen is displayed pressing F1 will display the current status and pressing F4 

will take the user to the option menu screen.

<option screen>

This screen shows the main operating modes of the system.  

Use function buttons to switch between Operating (►), Prohibited (

) and Timer 

( ) for DHW and space heating/cooling, or detailed information on energy or 

capacity.

The option screen allows quick setting of the following;

•  Forced DHW (if DHW tank present) — to turn ON/OFF press F1

•  DHW operating mode (if DHW tank present) — to change mode press F2

•  Space heating/cooling  operating mode — to change mode press F3

•  Energy monitor 

Following accumulated energy values are displayed.

 : Consumed electrical energy in total (month-to-date)

 : Delivered heat energy in total (month-to-date)

To monitor the energy values in each operation mode for [month-to-date/ last 

month/ the month before last/ year-to-date/ last year], press F4 to access to 

the Energy monitor menu. 

Note:

If a certain accuracy is required for the monitoring, the method to display 

captured data from external energy meter(s) should be set up. Contact your 

installer for further details.

Main Settings Menu

To access the main settings menu press button B ‘MENU’

The following menus will be displayed;

•  DHW (Cylinder unit or hydrobox plus locally supplied DHW tank)

•  Heating/Cooling

•  Schedule timer

•  Holiday mode

•  Initial settings

•  Service (Password protected)

initial Settings

1. From the main settings menu use F2 and F3 buttons to highlight ‘Initial set-

tings’ icon and select by pressing CONFIRM.

2. Use F1 and F2 buttons to scroll through the menu list. When the required title 

is highlighted then press CONFIRM to edit.

3. Use the relevant function buttons to edit each initial setting then press CON-

FIRM to save the setting.

Initial settings that can be edited are

  Date/Time *Be sure to set it to the local standard time.

 Language

  Summer time

  Temp. display

  Contact number

  Time display

 °C/°F

  Room sensor settings

To return to the main settings menu press the BACK button.

Содержание ecodan EHPT20X-MHCW

Страница 1: ...r garantir une utilisation sûre et appropriée lisez attentivement le présent mode d emploi avant d utiliser l ECODAN hydrobox duo et l ECODAN hydrobox OPERATION MANUAL For safe and correct use please read this operation manual thoroughly before operating the cylinder unit and the hydrobox FOR USER POUR LES UTILISATEURS English EN Français FR ...

Страница 2: ...Underfloor heating 10 Hydrobox Indoor unit housing the component plumbing parts NO DHW tank 11 Legionella Bacteria potentially found in plumbing showers and water tanks that may cause Legionnaires disease 12 LP mode Legionella prevention mode a function on systems with water tanks to prevent the growth of legionella bacterium 13 Packaged model Plate heat exchanger Refrigerant Water in the outdoor ...

Страница 3: ...ced physical sensory or mental capabilities or lack of experience and knowledge unless they have been given supervision or instruction concerning use of the appliance by a person responsible for their safety Children should be supervised to ensure that they do not play with the appliance In the case of a refrigeration leak stop the operation of the unit thoroughly ventilate the room and contact th...

Страница 4: ...to the cooler side water side of the heat exchanger As the temperature of the refrigerant decreases its state changes from a gas to a liquid 3 Now as a cold liquid it still has a high pressure To reduce the pressure the liq uid passes through an expansion valve The pressure drops but the refrigerant remains a cold liquid 4 The final stage of the cycle is when the refrigerant passes into the evapor...

Страница 5: ...nd react to changes in a controlled manner utilising the specialised Mitsubi shi Electric controls Using the SCHEDULE and HOLIDAY functions prevent unnecessary Space or DHW heating when the property is known to be unoccupied for instance during the working day Due to lower flow temperatures heat pump heating systems should be used with large surface area radiators or under floor heating This will ...

Страница 6: ... Power supply Phase voltage frequency N 230 V 50 Hz N 230 V 50 Hz 3 400 V 50 Hz 3 230 V 50 Hz N 230 V 50 Hz N 230 V 50 Hz 3 400 V 50 Hz N 230 V 50 Hz N 230 V 50 Hz 3 400 V 50 Hz Capacity 2kW 2kW 4kW 3kW 6kW 3kW 6kW 2kW 2kW 4kW 3kW 6kW 2kW 2kW 3kW 6kW Current 9 A 26 A 13A 23A 9 A 26 A 13A 9 A 9 A 13A Immersion heater 5 Power supply Phase voltage frequency N 230 V 50 Hz Capacity 3kW Current 13A Cyli...

Страница 7: ...able Guaranteed operating range Ambient 1 0 35 C 80 RH Outdoor temperature Heating See outdoor unit spec table Cooling See outdoor unit spec table min 10 C 2 Unvented expansion vessel Primary heating Nominal volume 10 L 10 L 10 L 10 L 10 L 10 L Charge pressure 0 1 MPa 1 bar 0 1 MPa 1 bar 0 1 MPa 1 bar 0 1 MPa 1 bar 0 1 MPa 1 bar 0 1 MPa 1 bar Electrical data Control board Power supply Phase voltag...

Страница 8: ...hat without these safety functions enabled the indoor unit may potentially become exposed to damage Main screen icons Icon Description 1 Legionella prevention When this icon is displayed Legionella prevention mode is active 2 Heat pump Heat pump is running Defrosting Emergency heating 3 Electric heater When this icon is displayed the Electric heaters booster or immersion heater are in use 4 Target...

Страница 9: ...onitor Following accumulated energy values are displayed Consumed electrical energy in total month to date Delivered heat energy in total month to date To monitor the energy values in each operation mode for month to date last month the month before last year to date last year press F4 to access to the Energy monitor menu Note If a certain accuracy is required for the monitoring the method to disp...

Страница 10: ...ing screen select a room sensor to be used for monitoring the room temperature from Zone1 and Zone2 separately Control option Remote Controller Options Installation manual Corresponding initial settings room sensor Zone1 Zone2 A Room RC1 8 one each for Zone1 and Zone2 B TH1 C Main remote controller D Not specified if a field supplied room thermostat is used Room RC1 8 one each for Zone1 and Zone2 ...

Страница 11: ...nely operate The duration of this feature is set by the installer and during its opera tion DHW mode can not normally be reactivated allowing time for the system to deliver primary hot water to the space heating cooling if required However if at this time there is no current demand for space heating cooling the system will automatically resume DHW mode This will continue until it receives a de man...

Страница 12: ... of useful heat from the sys tem is diverted to heat the water in the DHW tank When the temperature of the stored water exceeds the Hot Water temp set by the installer above 65 C primary circuit water is no longer diverted to heat the DHW tank Whilst LP mode is in operation hot water is not directed to the space heating cooling circuit Directly after LP mode operation Duration of max temp will ope...

Страница 13: ...or Schedule 1 will be valid If Schedule 2 is set to full year i e March to Feb only the operational pattern for Schedule 2 will be valid The schedule timer is activated or deactivated in the option screen See General Operation section Setting the Schedule period 1 From the main settings menu use F2 and F3 to highlight the schedule icon then press CONFIRM 2 The Schedule period preview screen is dis...

Страница 14: ...not want the selected mode to be active press CONFIRM to start 11 Use F3 button to set the required time of inactivity then press CONFIRM 12 You can add up to 4 periods of inactivity within a 24 hour interval 13 Press F4 to save settings When scheduling heating button F1 changes the scheduled variable between time and temperature This enables a lower temperature to be set for a number of hours e g...

Страница 15: ...essary Mechanical noise heard coming from cylinder unit Heaters switching on off Normal operation no action required 3 way valve changing position between DHW and heating mode Normal operation no action necessary Noisy pipework Air trapped in the system Try bleeding radiators if present If the symptoms persist contact installer Loose pipework Contact installer Water discharges from one of the reli...

Страница 16: ...N The serial number is indicated on the SPEC NAME PLATE Year of manufacture western calendar 2014 4 2015 5 Month of manufacture A 1 B 2 C 3 D 4 E 5 F 6 G 7 H 8 J 9 K 10 L 11 M 12 Sequential number for each unit 00001 99999 ...

Страница 17: ...16 Notes EN ...

Страница 18: ...1 Legionelle Bactérie susceptible de se trouver dans les tuyauteries les douches et les ballons d eau et pouvant provoquer la maladie du légionnaire 12 Mode CT Mode choc thermique fonction disponible sur les systèmes équipés de ballon d eau afin d éviter la croissance de la bactérie legionelle 13 Modèle Package Échangeur à plaques fluide frigorigène eau dans l unité extérieure de la pompe à chaleu...

Страница 19: ...onctionnement du système ou la panne de l unité Dans le pire des cas cela peut conduire à un sérieux obstacle dans la garantie de sécurité du produit En mode de chauffage afin d éviter que les émetteurs de chaleur soient endommagés par une eau excessivement chaude réglez la température de départ d eau sur une valeur minimale de 2 C en dessous de la température maximale admissible de tous les émett...

Страница 20: ...ient de performance COP défini comme étant le rapport entre la chaleur délivrée et la puissance consommée Le fonctionnement d une pompe à chaleur est semblable à celui d un réfrigérateur fonctionnant en sens inverse Ce processus est connu sous le nom de cycle à compression de vapeur et les éléments suivants en donnent une explication plus détaillée La première phase commence lorsque le fluide frig...

Страница 21: ...proprié En fonctionnement normal le chauffage et le chauffage ECS simultanés ne sont pas conseillés Cependant pendant des périodes de température exté rieure particulièrement basse la résistance électrique ECS immergée le cas échéant peut être utilisée pour l ECS alors que la pompe à chaleur continue à fournir du chauffage Soyez conscient du fait que la résistance électrique ECS immergée utilisée ...

Страница 22: ...trique Alimentation électrique Phase tension fréquence N 230 V 50 Hz N 230 V 50 Hz 3 400 V 50 Hz 3 230 V 50 Hz N 230 V 50 Hz N 230 V 50 Hz 3 400 V 50 Hz N 230 V 50 Hz N 230 V 50 Hz 3 400 V 50 Hz Capacité 2 kW 2 kW 4 kW 3 kW 6 kW 3 kW 6 kW 2 kW 2 kW 4 kW 3 kW 6 kW 2 kW 2 kW 3 kW 6 kW Courant 9 A 26 A 13 A 23 A 9 A 26 A 13 A 9 A 9 A 13 A Résistance électrique ECS immergée 5 Alimentation électrique P...

Страница 23: ...C 80 HR Température extérieure Chauffage Voir le tableau des spécifications de l unité extérieure Rafraîchissement Voir le tableau des spécifications de l unité extérieure min 10 C 2 Vase d expansion non ventilé chauffage primaire Volume nominal 10 L 10 L 10 L 10 L 10 L 10 L Pression de charge 0 1 MPa 1 bar 0 1 MPa 1 bar 0 1 MPa 1 bar 0 1 MPa 1 bar 0 1 MPa 1 bar 0 1 MPa 1 bar Données électriques C...

Страница 24: ... duo présente un risque d être exposé à des dommages Icônes du menu principal Icône Description 1 Choc thermique Lorsque cette icône est affichée le mode de choc thermique est activé 2 Pompe à chaleur La pompe à chaleur est en fonctionnement Dégivrage Chauffage de secours 3 Résistance électrique Lorsque cette icône est affichée les Résistances électriques appoint électrique ou résistance électriqu...

Страница 25: ...ez à la configurer sur l heure locale standard Langue Heure d été Affichage temp réelle Numéro à contacter Affichage Heure C F Sélection sonde ambiance Pour revenir au menu des rayonnages principaux appuyez sur le bouton RETOUR Écran Options Cet écran affiche les modes de fonctionnement principaux du système Utilisez les boutons de fonction pour basculer entre Fonctionnement Interdit et Programmat...

Страница 26: ...our surveiller séparément la température ambiante de la Zone1 et de la Zone2 Options de commande Options de la télécommande Manuel d installation Capteur d ambiance correspondant dans le réglage initial Zone1 Zone2 A Sonde RC 1 8 une de chaque pour Zone1 et Zone2 B Sonde T1 C Sonde MR D Non spécifié en cas d utilisation d un thermostat d ambiance fourni sur site Sondes R1 8 une de chaque pour Zone...

Страница 27: ...ateur et pendant son fonctionnement le mode ECS ne peut normalement pas être réactivé ce qui laisse au système le temps de délivrer l eau chaude primaire au chauffage refroidissement si nécessaire Cependant s il n existe aucune demande actuelle de chauffage refroidissement à ce stade le système repassera automatiquement en mode ECS Cela se poursuivra jusqu à ce qu il reçoive une demande de chauffa...

Страница 28: ...e d entrée de la pompe à chaleur Le chauffage de l eau pendant des périodes prolongées n est pas efficace et augmentera les coûts de fonctionnement L installateur doit examiner attentivement la nécessité d un traitement de prévention contre la legionelle tout en ne gaspillant pas l énergie en chauffant l eau stockée pendant des durées excessives L utilisateur doit comprendre l importance de cette ...

Страница 29: ... la Programmation 2 est réglée sur l année complète c est à dire de mars à février seul le modèle opérationnel de la Programmation 2 sera valide L écran Options permet d activer ou de désactiver la programmation Voir la section Fonctionnement général Réglage de la période de programmation 1 Dans le menu Réglages principaux utilisez F2 et F3 pour mettre en évidence l icône puis appuyez sur VALIDER ...

Страница 30: ...EZ pour confirmer 12 Vous pouvez ajuster jusqu à 4 périodes d inactivité par intervalle de 24 heures 13 Appuyez sur F4 pour enregistrer les réglages Lorsque vous programmez le chauffage le bouton F1 permet d affecter à la variable programmée le temps ou la température Cela permet de définir une température plus basse pendant un certain nombre d heures par exemple il peut être nécessaire d avoir un...

Страница 31: ...T pour les modèles ERSC D et ERST20C D Lorsque l eau du circuit de circulation est excessivement chaude le mode de refroidissement démarre avec un retard pour la protection de l unité extérieure Fonctionnement normal Lorsque la température ambiante extérieure est particulièrement basse le mode de refroidissement ne commence pas à fonctionner afin d éviter de geler les canalisations d eau Si la fon...

Страница 32: ...TOKYO BUILDING 2 7 3 MARUNOUCHI CHIYODA KU TOKYO 100 8310 JAPAN RG79D942R01 Printed in the UNITED KINGDOM Please be sure to put the contact address telephone number on this manual before handing it to the customer ...

Отзывы: